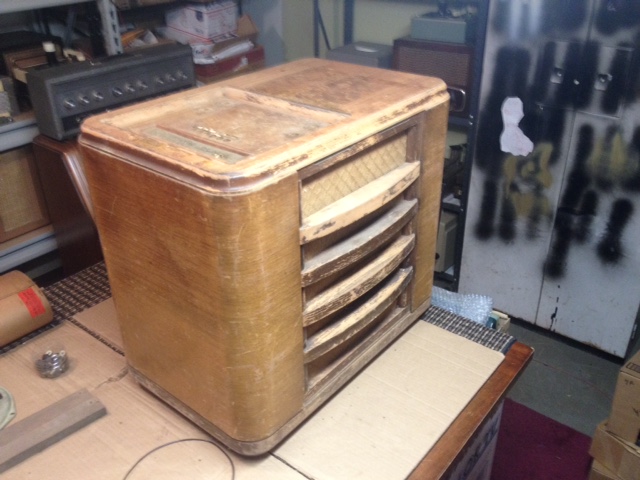
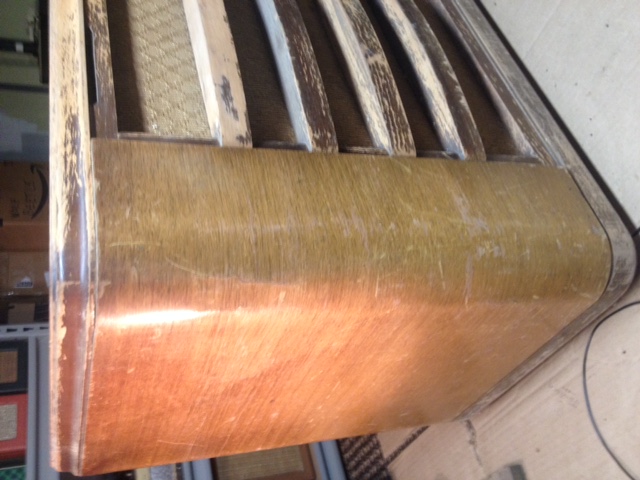
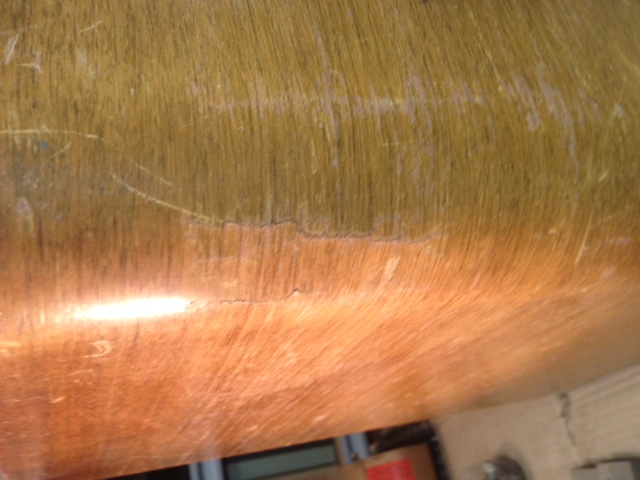
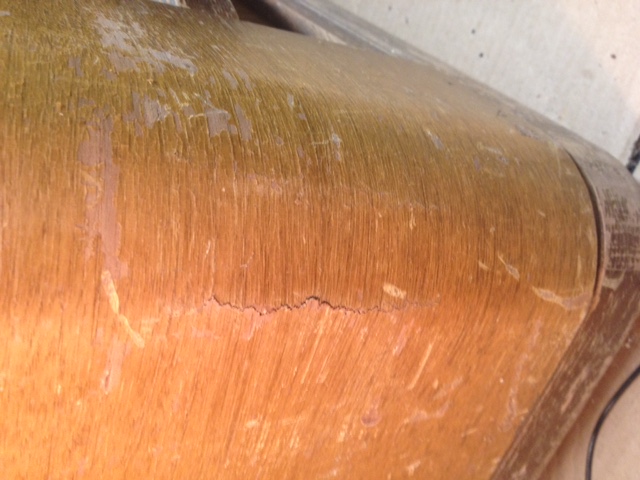
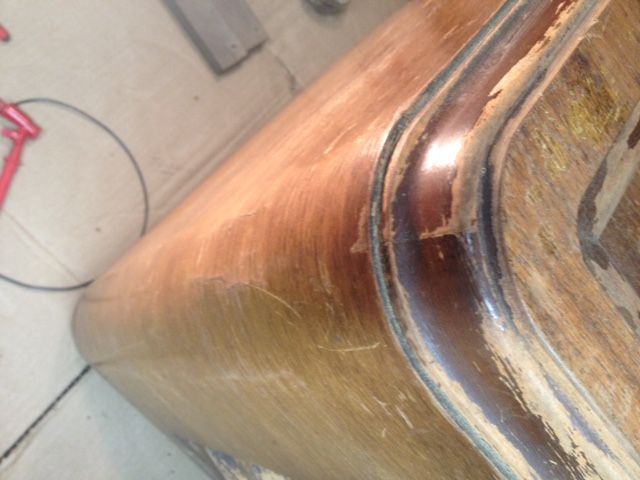
40-170cs cabinet crack help needed
Posts: 45
Threads: 7
Joined: Sep 2015
City: Toledo, Ohio
(This post was last modified: 05-02-2017, 05:18 PM by bastardbus.)
Posts: 4,109
Threads: 310
Joined: Nov 2013
City: Kings Park NY
Hey!
Unfortunately there is not much you can do short of re-veneering it.
You could inject watered down glue in there and clamp to stop the cracking but then you will have to fill it and try to match it.. That should be done even if you are veneering it.
Maybe someone else will have other options.. BOB! 
I want a gift like that...

Times I have been electrocuted in 2021
As of 1/01/2021
AC: 4 DC: 1
Last year: 6
Posts: 5,088
Threads: 270
Joined: Nov 2012
City: Wilsonville
State, Province, Country: OR
Kirk...I was hoping you would chime in on this....I have never dealt with a cracked veneer on the curve like that, (unless there is another Bob you are thinking of). 
Posts: 45
Threads: 7
Joined: Sep 2015
City: Toledo, Ohio
I have a couple ideas what to do but ideas and testing-result is a different story. I hate to test ideas on a neat radio like this so any experience please chime in.
-strap clamp idea. Basically a ratcheting tie down. Seen these used to hole pictures frames together to glue. Glue in the crack that perhaps a non stick barrier like wax paper and then strap it down. This should close the crack and bring the that bowed crack back into place.
-12" clamps...I have some HUGE 12" deep clamps I could use. a couple of these are compound and the curve has lost it's shape. I am wondering if on those I would need a backer like a wooden curved buck piece that I could clamp from behind and perhaps clamp a flexible piece of plastic or plywood across the front to bring that broken piece into position.
-the guitar tool fix....we use this type of clamp when butt welding panels into cars at the shop...very cool method but kina expensive...none the less check the stuff out...great for cabinet repair. https://youtu.be/Nbn6rcSzAP8 There is a great idea of using a heat gun and thing acrylic to create a curved cull or buck to hold the cracked piece in proper position...
My plan for this radio was fix the cracks, touch them up and refinish the thing. I was not overly concerned with some scars from the cracks being present...but....since that I am getting the vibe this is kinda a hard to find radio and one perhaps worth reentering those sections. Due to the design it could be done fairly easily but it is a bunch more work.
Is this THAT special of a radio or should I not worry about fixing the cracks and leaving them as is. Honestly, I have repaired similar before and was able to hide the repair pretty darn good.
Thanks
T
BTW who is Bob..my guess someone with expertise in fixing these type issues...?
(This post was last modified: 05-02-2017, 08:58 PM by bastardbus.)
Posts: 1,874
Threads: 212
Joined: May 2015
City: Seattle
State, Province, Country: WA
Posts: 4,706
Threads: 51
Joined: Sep 2008
City: Sandwick, BC, CA
Gluing up that sort of crack never holds over the long term, because wood tends to expand and contract with changes in humidity it will only crack again. I say this from experience, and concur with what Kirk said, the only way to permanently repair it is to replace the damaged veneer. However this is not all bad news, in looking at the pictures of your cabinet I believe that you could repair it by cutting out a strip of veneer as wide as the damaged area, parallel to the grain of the wood, and replace only the damaged sections. The main issue will be finding French walnut veneer with a similar grain and colour to the original veneer next to it, I believe it was quarter sawn. In some cases they also book matched the veneer on one side of the cabinet to the other, I don't know if they would have bothered on this cabinet but on the higher end ones they would have. One good thing about the design of this cabinet is that you would not have to take it apart to repair it, the ends of the veneer meet up with a straight and exposed edge rather then being hidden behind a piece of moulding or terminating inside a dado joint.
Regards
Arran
Posts: 45
Threads: 7
Joined: Sep 2015
City: Toledo, Ohio
I glued up the base of the radio cabinet yesterday and fabbed-installed new glue blocks. Now the cabinet is nice and secure. I bought and used a strap clamp for fixing the cracks and used it to secure the bottom when gluing and it worked GREAT.
Closer look at the cracks and a couple are all the way through the wood substrate not just the veneer. So regardless of re-veneering those cracks have to be repaired-glued before refinished OR new veneer is placed over the top. I have glued similar cracks on the waterfall of a B.F. Goodrich Mantola wood table top and it has help up great the past couple years. On that Mantola I built a wooden mold to fit inside the curve and clamped-glued the crack up, worked great but was far easier to access then the cracks on this radio. That is going to be the issue.
I think I am going to try molding some acrylic plexiglass to the correct curve of the corner and use it as a cull or form when reglue-clamping the crack down. Seen this done guitars with great results (see the link I posted previously).
T
(This post was last modified: 05-04-2017, 03:43 AM by bastardbus.)
Posts: 45
Threads: 7
Joined: Sep 2015
City: Toledo, Ohio
Posts: 45
Threads: 7
Joined: Sep 2015
City: Toledo, Ohio
Here is the cracks repaired and cabinet refinished. It turned out well and saved having to re-veneer the entire cabinet. If I point it out you can still see the 'scar' of the original crack but it is fixed-solid and practically invisible. Very happy with the out come.
(This post was last modified: 06-14-2017, 03:07 AM by bastardbus.)
Posts: 4,109
Threads: 310
Joined: Nov 2013
City: Kings Park NY
Of course we are interested!!
Very cool idea... These curve cracks are a true PITB.. I had then on a Philco something and it was many years ago. I tried fixing it but did not do a good job...
I dont see any finished pics though...

Times I have been electrocuted in 2021
As of 1/01/2021
AC: 4 DC: 1
Last year: 6
Posts: 204
Threads: 5
Joined: Sep 2005
City: Newark, Ohio
Yes, no pics!
We want pics!
Posts: 13,776
Threads: 580
Joined: Sep 2005
City: Ferdinand
State, Province, Country: Indiana
As some people like to say...Pics or it didn't happen! 
--
Ron Ramirez
Ferdinand IN
Posts: 2,118
Threads: 112
Joined: Jun 2010
City: Medford OR (OR what?)
(05-04-2017, 03:41 AM)bastardbus Wrote: I glued up the base of the radio cabinet yesterday and fabbed-installed new glue blocks. Now the cabinet is nice and secure. I bought and used a strap clamp for fixing the cracks and used it to secure the bottom when gluing and it worked GREAT.
Closer look at the cracks and a couple are all the way through the wood substrate not just the veneer. So regardless of re-veneering those cracks have to be repaired-glued before refinished OR new veneer is placed over the top. I have glued similar cracks on the waterfall of a B.F. Goodrich Mantola wood table top and it has help up great the past couple years. On that Mantola I built a wooden mold to fit inside the curve and clamped-glued the crack up, worked great but was far easier to access then the cracks on this radio. That is going to be the issue.
I think I am going to try molding some acrylic plexiglass to the correct curve of the corner and use it as a cull or form when reglue-clamping the crack down. Seen this done guitars with great results (see the link I posted previously).
T
+1 or however many times I have tried this.
The problem is structural. Lack of support in the bend. A repair will have to address this problem and all of the cracked layers will need to be replaced. OR one day the crack will be back. Depending on the environment, the glue and clamp repairs usually last a year or two before the crock becomes visible again. Cracks look much worse on a refinished cabinet.
"I just might turn into smoke, but I feel fine"
http://www.russoldradios.com/
Posts: 4,706
Threads: 51
Joined: Sep 2008
City: Sandwick, BC, CA
My experience with fixing veneer cracked this way was pretty much as Russ stated, it looked decent for a year or more and then cracked again. Fortunately this was on on the bottom towards the back on a Canadian RCA-Victor model A-20 from 1939-40. I made the repair when I was 16 back in high school, which was before the internet so there wasn't really wasn't anyone with cabinet/furniture restoration experience to ask about whether it was the right way to repair it.
One day I may go back and re-restore that cabinet, but now I have three of them and the cabinets on the more recent ones either don't have this problem or it is limited to the final 3/4'' of the curve near the rear of the cabinet. The A-20 cabinets are basically made out of laminated veneer with some solid sections such as the top and the bottom, so there isn't a lot of structure in the curved areas on the bottom. On the sister model, the RCA-Victor A-23 the cabinets have blocks in these areas for re-enforcement so it isn't often that they will suffer damage on the bottom curve on the sides, the A-20s do not because the spacing between the chassis and the inside of the cabinet doesn't really leave much room for it. What I may tray is gluing some extra layers of veneer on the inside of the curves to stiffen them up.
Regards
Arran
Users browsing this thread: 1 Guest(s)
|
|
Recent Posts
|
|
trying to identify this wire type
|
| Thanks to all for the feedback. As Arran said, it is probably an older replacement and yes it has a grid cap so I will ...georgetownjohn — 09:32 PM |
|
trying to identify this wire type
|
| It's possible that the red wire, actually a grid cap lead, is a very old replacement, I can't remember seeing a pre 1939...Arran — 09:18 PM |
|
Gilfillan Brothers Car Radio?
|
| Hi everyone,
Special thanks to Joe Rossi for tracking down this obscure radio and thanks to others who took up the hun...Antipodal — 08:15 PM |
|
trying to identify this wire type
|
| Here's one source for your wire of many.
Take care and BE HEALTHY! Gary
P.S. Can't get the right color you need? I ...GarySP — 06:40 PM |
|
trying to identify this wire type
|
| ...and modern wire of the appropriate gauges and insulation V-rating (300V minimum, usually shown right on the wire) is ...morzh — 05:47 PM |
|
1930s Stromberg-Carlson Tombstone Radio need help identifying model number
|
| I have a question about this radio, is there anyone that has access to this radio that has an intact unmolested speaker ...captainclock1988 — 04:28 PM |
|
1930s Stromberg-Carlson Tombstone Radio need help identifying model number
|
| Well what makes me confuse all of those companies is that all three of those companies (Setchell-Carlson, Stromberg-Carl...captainclock1988 — 04:21 PM |
|
trying to identify this wire type
|
| The red wire is rubber covered wire.
The others are cotton braid over rubber often in colors or a tracer, also strand...Chas — 02:43 PM |
|
trying to identify this wire type
|
| Greetings Phorum members,
Hope you can help me identify this type of wire in the photo I have attached. I am not sure ...georgetownjohn — 01:53 PM |
|
Philco 60 Squealing
|
| All correct shields must be in place, all tubes correct no subs of any kind.
Check any soldered, riveted ground conne...Chas — 01:24 PM |
|
Who's Online
|
| There are currently no members online. |

|
 
|


![[-] [-]](https://philcoradio.com/phorum/images/bootbb/collapse.png)


