Philco 42-1002P parts values question
Posts: 264
Threads: 51
Joined: Aug 2014
City: San Antonio, TX
The candohm is measuring at 50 ohms which is what the schematic calls for, but I've always heard that it is best to replace them while you're working in the chassis since they will go out sooner or later. Would a 5w 50 ohm sand resistor do?
Also, on the 40-40 electrolytics, will 250 volt caps be sufficient?
I've been replacing rubber coated wire, resistors, and wax caps today, but tomorrow I will head over to the electronics shop after work for the rest of the parts.
http://www.nostalgiaair.org/pagesbymodel...013479.pdf
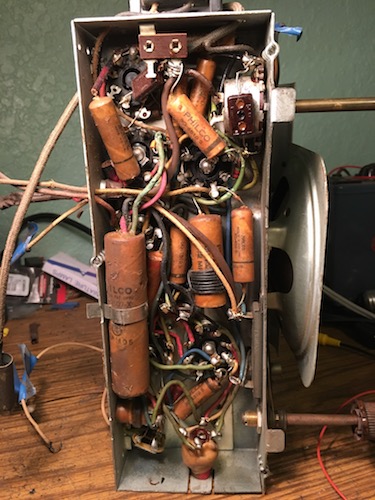
Charlie in San Antonio
Posts: 18,427
Threads: 622
Joined: Oct 2011
City: Jackson
State, Province, Country: NJ
Yes 5W is enough. I would not touch the candohm, it dissipates very little, just above 1W and even that only if the lightbulb is gone.
250V is enough.
People who do not drink, do not smoke, do not eat red meat will one day feel really stupid lying there and dying from nothing.
Posts: 44
Threads: 4
Joined: Dec 2013
City: Freeport, LI, NY
What works nicely are the Dale bolt on resistors. Once these candohm assy's start going, the smart money is to replace the whole unit. With the proper Dale resistors replacing each section in a Candohm, you have your resistor taps right there. The biggest worry is how many holes you're going to drill on the rear apron (or wherever the old unit was mounted).
Another point is some candohms run HOT! This would be the perfect opportunity to bring up the wattage on that hot running section....easily done with a Dale resistor.
They're low in profile so they fit in about the same footprint of the Candohm also.
Posts: 264
Threads: 51
Joined: Aug 2014
City: San Antonio, TX
I had not seen those before. They are perfect. This candohm only has a single section at 50 ohms and still measures as good. Mike mentioned the pilot light, and it is the only one of its kind I've seen. It is about the size of a smaller old-fashioned Christmas light. I thought it was tacked in, but the soldering and the base look to be factory.
The filament string seems intact, and the only replacement on the set looked to be a .05 cap R16 from the 7B7 grid to 1st IF.
Just be sure because I haven't worked with loctals all that much, but you do count the pins from either side of the lug that hangs down from the center post, right? Not the open space opposite the lug? So in the photo below, C9 (the .2 cap with the hand-made choke on it) is connected to pin 4 which isn't used on the 7C6, so it's just a tie point?
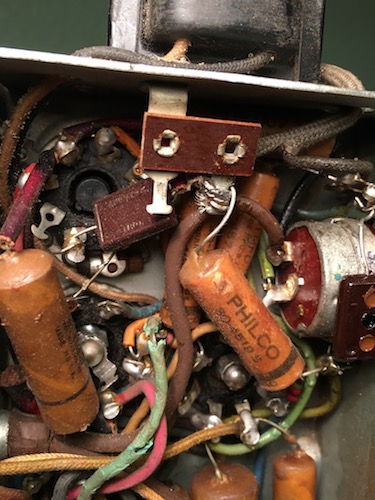
Charlie in San Antonio
Posts: 18,427
Threads: 622
Joined: Oct 2011
City: Jackson
State, Province, Country: NJ
Loctals same as octals, you count from the key clockwise when looking at the pins (bottom view).
yes they did use unused pins as soldering posts.
People who do not drink, do not smoke, do not eat red meat will one day feel really stupid lying there and dying from nothing.
Posts: 7,323
Threads: 270
Joined: Dec 2009
City: Roslyn Pa
The cap w/the coil around it is to help block out long wave stations from being amplified in the IF stage and causing interference. LW activity is pretty low theses days so interference isn't a problem. Short answer is you need the cap but not the coil. If you want to keep it original looking you can restuff the old cap and keep the coil.
Loktal tubes can be a little problematic as the steel pins get oxidized and cause a intermittent or bad connection. It's good practice to clean the pins w/some Deoxit and plug it in and out of the socket a few times. Some lock in really well and are difficult to remove, a very small amount of grease to the index pin in the center works for me. They can really be a pita in portable because of the lower voltages and hi impedance.
When my pals were reading comic books
I was down in the basement in my dad's
workshop. Perusing his Sam's Photofoacts
Vol 1-50 admiring the old set and trying to
figure out what all those squiggly meant.
Circa 1966
Now I think I've got it!
Terry
(This post was last modified: 11-22-2016, 04:31 PM by Radioroslyn.)
Posts: 18,427
Threads: 622
Joined: Oct 2011
City: Jackson
State, Province, Country: NJ
I don't like loctals.
One thing, as Terry said, pin oxidation.
The other, I have to look underneath to figure what direction to tilt the tube to unlock it. Sometimes this is inconvenient.
And the very tilting itself might be inconvenient if the space is tight and you are pressing on some other component with the tube you are tilting.
People who do not drink, do not smoke, do not eat red meat will one day feel really stupid lying there and dying from nothing.
Posts: 1,519
Threads: 69
Joined: Nov 2012
City: Kansas city, MO.
There should be an bump on the side of the base of the loctal tube that pinpoints the direction to tilt the tube.
Users browsing this thread:
|
|
Recent Posts
|
|
Philco 71 Code 125
|
| Hello,
I am in need of a schematic for this radio. Mine has the three separate circular tube shields and a shadow me...dconant — 08:06 AM |
|
Stromberg Carlson 1500 Squeal
|
| And life just keeps getting more complicated.dconant — 07:57 AM |
|
54C Complete Teardown/Rebuild
|
| Hello Roy,
here is this one
sincerely Richardradiorich — 12:45 AM |
|
54C Complete Teardown/Rebuild
|
| Richard,
Had grabbed it already but thank you just the same. I find myself wanting to find some way to block out the...glyphmon — 12:03 AM |
|
54C Complete Teardown/Rebuild
|
| Hello roy,
here is a link to the schematic .
Sincerely Richardradiorich — 11:54 PM |
|
54C Complete Teardown/Rebuild
|
| Richard,
The Silvertone 2014 also is a transformerless set, so I am incorporating a 1:1 600 ohm audio isolation transfo...glyphmon — 11:37 PM |
|
Preliminary work on wife's Silvertone 2014
|
| Did an alignment today which was interesting. IF alignment went great, almost all was already spot-on. Adjusting on th...glyphmon — 11:35 PM |
|
54C Complete Teardown/Rebuild
|
| The main problem with adding a Bluetooth input is that this set lacks a traditional power transformer to isolate it from...radiorich — 11:19 PM |
|
54C Cabinet Refinish
|
|
I started stripping this cabinet before it got super chilly out because I knew I wasn't going to be able to work on ...glyphmon — 11:18 PM |
|
54C Complete Teardown/Rebuild
|
| While I'm waiting to wrap up the final steps on my wife's Silvertone 2014, I started disassembly on the next project. O...glyphmon — 11:07 PM |
|
Who's Online
|
There are currently 1584 online users. [Complete List]
» 1 Member(s) | 1583 Guest(s)
|
|
|

|
 
|