Posts: 126
Threads: 13
Joined: Sep 2013
City: Milwaukee, Wisconsin
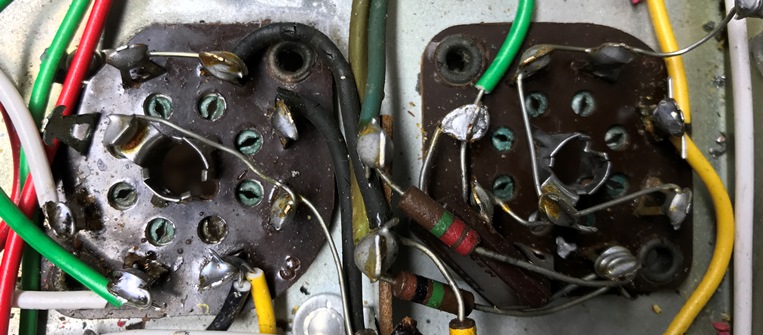
I'm working on a 41-255, and two of the loctal sockets have quite a bit of the notorious loctal green corrosion on the "faces" of the pin sockets. I know the important part is to clean the edges where the pins make contact. Which I usually use a welding tip cleaner for in the case of locatals.
But is there any good way to clean the corrosion off the "face"? I tried spraying some D5 on a cotton swab and working it around in there, but it didn't do much. Tried the same with a drop of D100 from a needle tip onto the pin hole, and worked it in with a cotton swab. Still nothing.
This is what I'm talking about:

Any other methods to clean it out?
Thanks!
Posts: 44
Threads: 4
Joined: Dec 2013
City: Freeport, LI, NY
Tough call.....
What you see is one thing. What you don't see could be an entirely different matter. Those wafers are notorious for inside shorts in the form of carbon bridges. I would seriously think about replacing the sockets with fresh clean ones. If the pin sockets start bridging, you'll drive yourself nutz trying to trouble shoot it.
Good luck with the project and all of us here are expecting a full report when you're finished.
Posts: 641
Threads: 48
Joined: Mar 2017
City: Gap Mills Wv 24941
they are also easy to take apart.
i found a carbon bridge on one of mine, i replaced it with new but.....
if you simply sand paper both sides of the insulator then flip it over.. the carbon bridge isnt in the game anymore plus you have sanded the thickness of the insulator down past the bridge.
i saved my old loctal for a spare part someday.
to get rid of the green stuff, start with baking soda water mix
also, if you have guns, the cleaning kit come with some really small brushes that you could spin around on top to scrap away at the green.
baking soda will break down green oxidation.
the real issues i "think" is installing a proper rivit. i used standard typical diy rivits and found they work but up top, you have to file down the profile of the rivit to allow for the tube to properly slip down far enough to clip into the lock.
(This post was last modified: 06-21-2017, 09:58 PM by
jcassity.)
Posts: 203
Threads: 20
Joined: Feb 2017
City: Orland Park
State, Province, Country: Illiinois
Assuming those sockets are steel and you can take them apart, I'd recommend a small brass brush on JUST the steel parts.
Greg
"We are here to laugh at the odds and live our lives so well that Death will tremble to take us."
Posts: 16,481
Threads: 573
Joined: Oct 2011
City: Jackson
State, Province, Country: NJ
I doubt it is steel. Could be brass, plated with tin or something.
People who do not drink, do not smoke, do not eat red meat will one day feel really stupid lying there and dying from nothing.
Posts: 670
Threads: 11
Joined: Sep 2014
City: Bellmawr, NJ
HOW about a PIPE cleaner,(smoking pipes),,you know them long ones,,,with the baking soda Mix---CHEERS
Posts: 4,864
Threads: 54
Joined: Sep 2008
City: Sandwick, BC, CA
This is another case where a T.S.P chassis washing comes in useful, it takes much of the oxidation right off, probably better then baking soda actually. I think that Mike is right, the tube socket contacts are probably brass, or some other copper alloy, with a tin plating, the green looks a bit like tin oxide.
One of the problems in replacing Loctal sockets is in finding replacement Loctal sockets, so it's probably better to try to work with what you have if possible. There are Chinese made replacements but the diameter and the rivet hole spacing might be different then what Philco used, and everything is measured in Millimeters rather then inches so it's easy to get it wrong.
Regards
Arran


![[-] [-]](https://philcoradio.com/phorum/images/bootbb/collapse.png)


