Posts: 109
Threads: 15
Joined: Mar 2024
City: BERTHOUD
State, Province, Country: CO
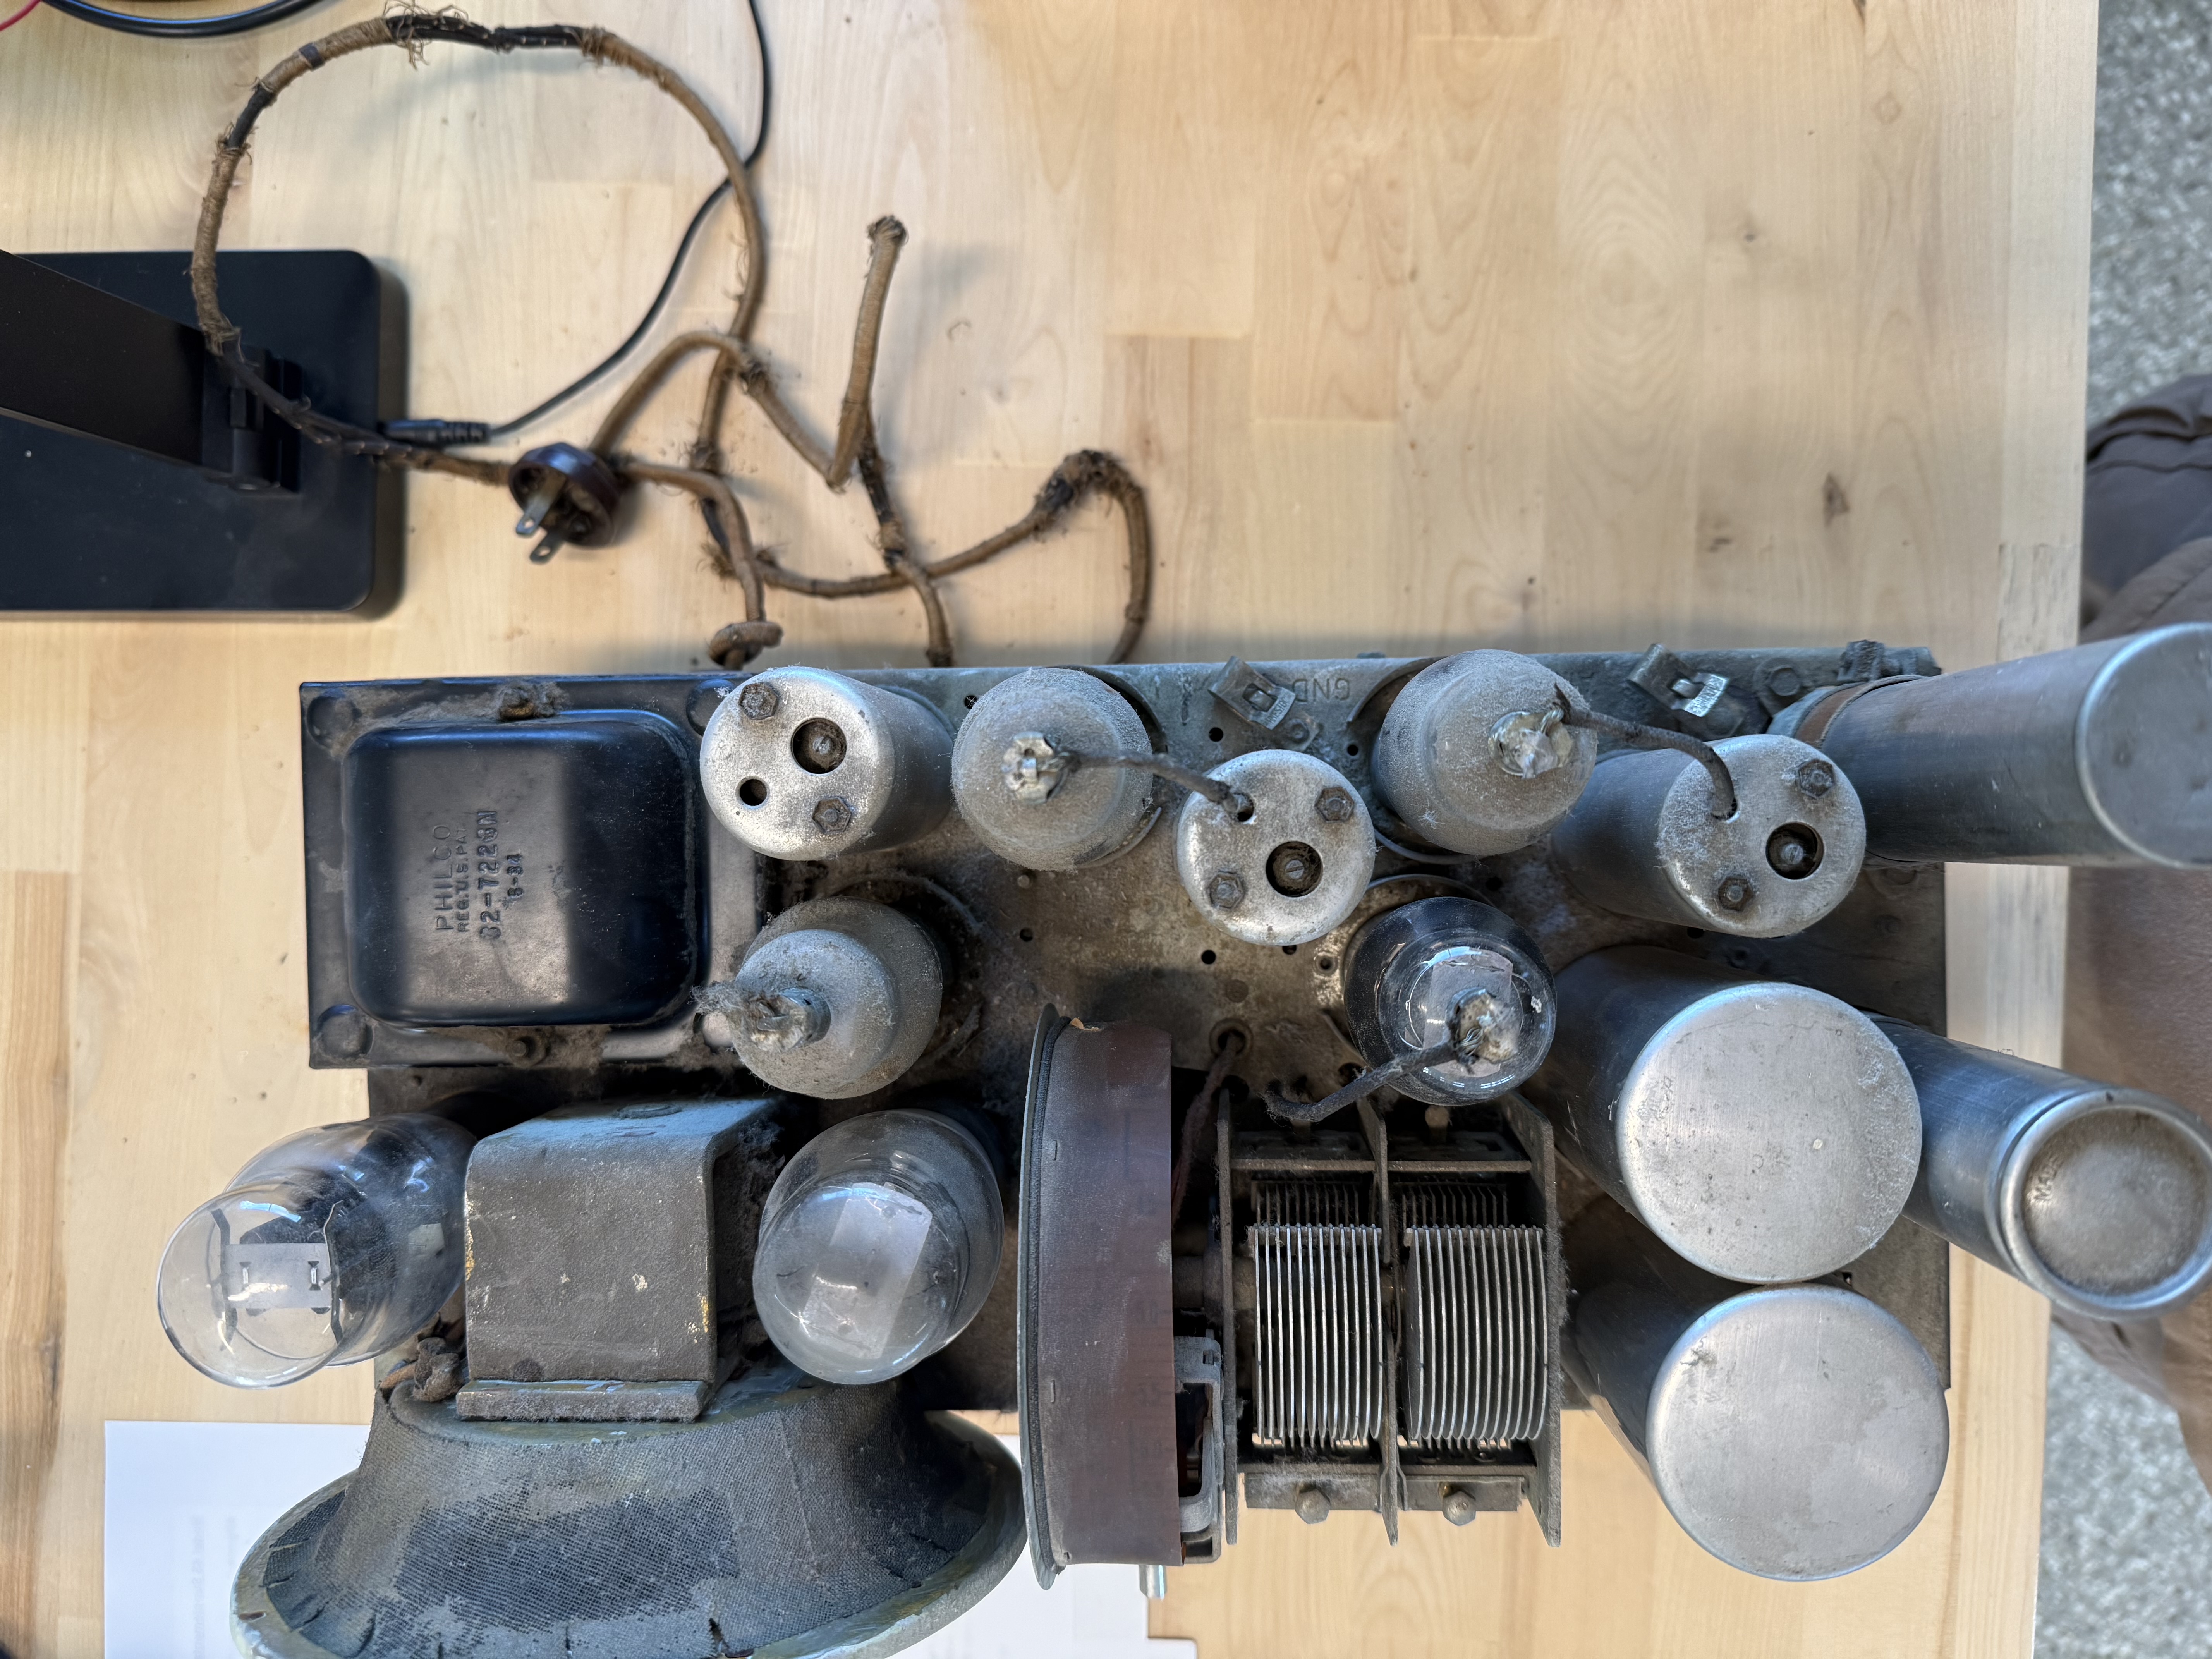
I have been working on the Butterfly model 45, just got the chassis running. I decided to mount the electrolytics underneath versus refreshing since the cans were in great shape and I wanted the top side to look original. I still need to do a full cleaning on the chassis, and I just started stripping the cabinet. Anyone want to share their best-practices for cleaning grime and polishing the chassis?
Craftsmanship is an ongoing cycle of learning fueled by patience, persistence, and care, where every project refines our judgment and challenges our skills, in the steady pursuit of the Path to Mastery.
Posts: 18,427
Threads: 622
Joined: Oct 2011
City: Jackson
State, Province, Country: NJ
Good performer, desirable radio, but I hate those ones with that extra board in them.
I think 19 has it also.
Worked on one a few years ago.
People who do not drink, do not smoke, do not eat red meat will one day feel really stupid lying there and dying from nothing.
Posts: 2,111
Threads: 373
Joined: Jun 2010
City: Dover, OH
I've got a nice 45L that I need to get finished up. It was mostly redone years ago by a previous owner, but they never replaced the caps in the tone control, so it now changes by itself! Hey, only got $50 in it though and it is a nice radio. I'd love to have one of the butterfly models, but only one I have ever run across for sale around here was needing cabinet work and the store wanted $165 a month ago. I passed.
No matter where you go, there you are.
Posts: 109
Threads: 15
Joined: Mar 2024
City: BERTHOUD
State, Province, Country: CO
Yeah those extra boards are hard to work around. Of course a dog bone I needed to replace ran underneath one and I tried to work around it but ended up having to pull the whole thing out with all the wiring. Patience tester.
Jayce, somehow I ended up with 2 butterfly units which ended up being great to have one chassis to look at while working on the other. I had hoped to get both running, but ended up having to steal the band switch from the backup unit. The original band switch had frozen up and I tried every trick to get it freed up, couldn’t get it to budge. BTW, on the tone control, the mid-tone I had to modify the cap value from what I could find on the forum and info if you ever work on your tone control. Recommendation is us a 0.02u for mid, but I found a 0.004u worked best to get good mid-tone balance.
Anyway, fun stuff, my wife loves the butterfly cabinet so I’m working on it for her.
Craftsmanship is an ongoing cycle of learning fueled by patience, persistence, and care, where every project refines our judgment and challenges our skills, in the steady pursuit of the Path to Mastery.
Posts: 5,652
Threads: 56
Joined: Sep 2008
City: Sandwick, BC, CA
I would not give up on the band switch, since it's already out it makes it easier to work on. I would soak the think with a mix of acetone and ATF, that's an unofficial mechanic's trick for seized bolts. Also heating the shaft may help, having worked on a lot of controls it's likely coagulated oil or grease in the bushing. I'm sort of indifferent to the circuit boards in things like this, having worked on some early 30s G.E/RCA chassis, and mid 30s Rogers sets, why Philco did it with this model and the 66 I have no idea.
Regards
Arran
Posts: 5,652
Threads: 56
Joined: Sep 2008
City: Sandwick, BC, CA
Jayce;
I have no idea why people ask a premium for this model, they are not really that rare, and the cabinet is kind of on the cheap side. There was once a Canadian model 345L in the family years ago, it used to belong to a great aunt and was apparently a decent performer, I would not mind finding a duplicate of that set some time.
Regards
Arrn
Posts: 18,427
Threads: 622
Joined: Oct 2011
City: Jackson
State, Province, Country: NJ
Actually, I also had to work on the bottom side of the board, but somehow I managed not having to take it all out.
Yes, a very irritating exercize.
People who do not drink, do not smoke, do not eat red meat will one day feel really stupid lying there and dying from nothing.
Posts: 109
Threads: 15
Joined: Mar 2024
City: BERTHOUD
State, Province, Country: CO
Hey Arran,
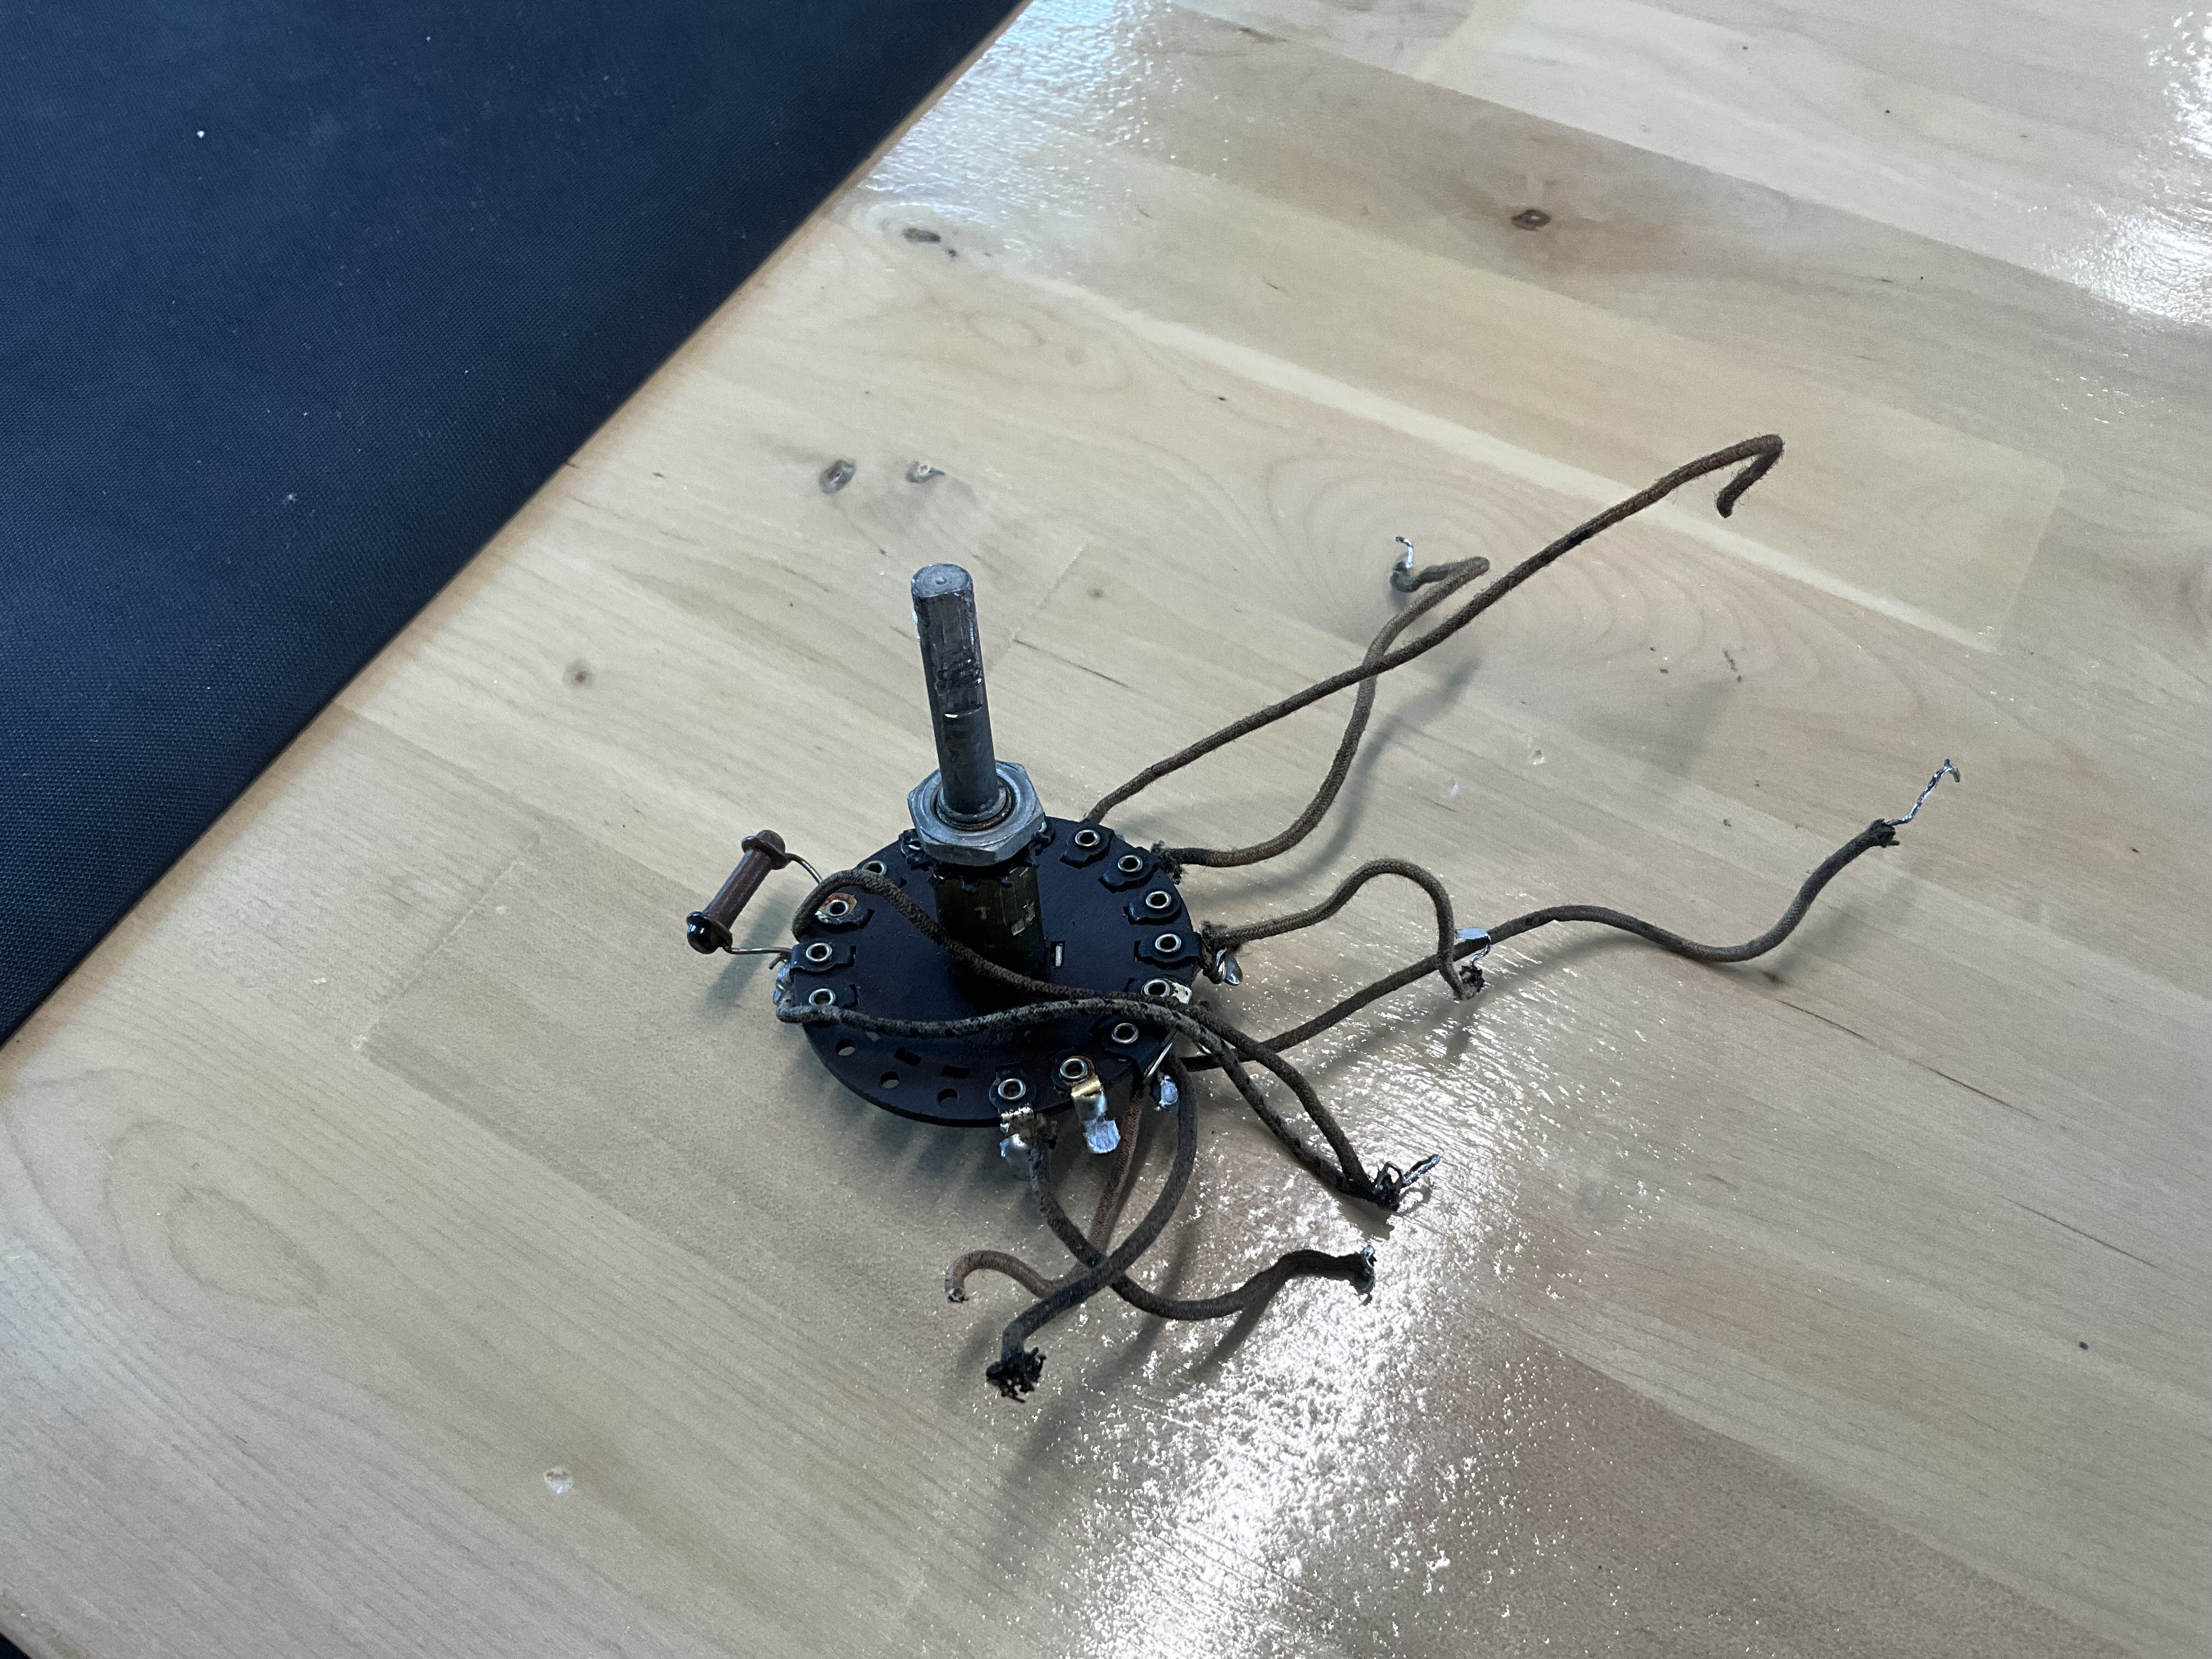
Thanks for the tip on the band switch. I tried heat, but I’ll soak it. When I first started on this unit and pulled the Bakelite knob off the shaft, I noticed someone had taken pliers to the shaft which you can see in this pic. The switch is stuck in shortwave mode, so someone was desperately trying to get it to AM haha. I’ll soak it and see if that frees it up along with some more heat.
Craftsmanship is an ongoing cycle of learning fueled by patience, persistence, and care, where every project refines our judgment and challenges our skills, in the steady pursuit of the Path to Mastery.
Posts: 5,652
Threads: 56
Joined: Sep 2008
City: Sandwick, BC, CA
George;
I don't know if this has one or not but quite often controls, and switches have a "C" shaped clip holding the shaft in place, if you can carefully pry it open with a small screwdriver, and extract it, that will allow you to get more solvent into what looks like a rather tall bushing. In fact one you get it loose you should be able to tap or pull the shaft right out of the bushing to give it a good cleaning, though you will want to file, or polish off any burs caused by the pliers.
Regards
Arran
Posts: 18,427
Threads: 622
Joined: Oct 2011
City: Jackson
State, Province, Country: NJ
What Arran said.
I did several.
Sometimes the circlips are flat E-type, and sometimes they are square x-section type. What you have seems to be the latter.
First I take something hard and long with a flat surface (a big screwdriver, a metal bar), and press against the gap in the clip. I do it while holding the pot or the switch with both my hands (pushing it with the thumbs) while pressing that bar agains the gap, pulling the bar with the rest of the fingers. The goal is to widen the gap and to see a little of the space between the clip and the groove it is in.
If you could stick an awl (large sharp metal pick) in that gap and start pulling - great. Look for the clip to not fly across the room. This is why it is called "Jesus clip."
Also look for the pick not to slip and end up in your hand/eye/beerbelly (if you got one).
Some folks use two bent picks to pull the ends apart. On a couple of occasions I successfully used a pair of neednose pliers to accomplish it.
Nest step: if it is really frozen, well, soak is not necessary, but introducing some penetrating oil (PB Blaster) and wait a bit.
Use heat on the bushing (not on the contact phenolic piece).
Apply force ( torque) against the bushing, NOT the board. Which could be accomplished by bolting the switch back in place and toruqing CCW.
Usually works fine.
People who do not drink, do not smoke, do not eat red meat will one day feel really stupid lying there and dying from nothing.
Posts: 109
Threads: 15
Joined: Mar 2024
City: BERTHOUD
State, Province, Country: CO
Thanks Arran and Mike,
I'll probably have my wife hold it while I use the awl, just so I am not the one injured in this process. I saw the clip and I thought to myself, 1) no way I get that off without an injury, and 2) no way I find it once it shoots across the room. So I stuck with my heat gun then finally gave up and decided to scavenge the switch from my second model 45 where I had already stolen the filter choke from. But I would like to get the other unit running, so let's see if I can get this clip off. Appreciate the feedback.
George
Craftsmanship is an ongoing cycle of learning fueled by patience, persistence, and care, where every project refines our judgment and challenges our skills, in the steady pursuit of the Path to Mastery.
Posts: 2,111
Threads: 373
Joined: Jun 2010
City: Dover, OH
Thanks for the advice on those tone control caps, George! That is one thing my late friend did on the 610T I have when he did the initial restoration on it for a fellow collector years back was to replace the tone control capacitors. Now that it has been refreshed with a new cord and some final tweaks made, it is a great radio when I can play it. Someday I'll get my 45L dug back out and get it finished.
No matter where you go, there you are.
Users browsing this thread: 1 Guest(s)
|
|
Recent Posts
|
|
Philco P45-6365 Universal Transformer Instruction Manual
|
| Can anyone guide me to where this may be found?GRG — 03:00 PM |
|
54C Complete Teardown/Rebuild
|
| I don't think that I have encountered a 12Z3 before, curious how it uses one of those but includes a #43, which is a 25 ...Arran — 02:17 PM |
|
HiFi (Chifi) tube amp build - but my own design.
|
| It's the other forum. I'm also in DIY, but mostly read there. Honestly, I kinda jumped into this without much thought to...TV MAN — 10:43 AM |
|
Philco 71 Code 125
|
| Hello,
I am in need of a schematic for this radio. Mine has the three separate circular tube shields and a shadow me...dconant — 08:06 AM |
|
Stromberg Carlson 1500 Squeal
|
| And life just keeps getting more complicated.dconant — 07:57 AM |
|
54C Complete Teardown/Rebuild
|
| Hello Roy,
here is this one
sincerely Richardradiorich — 12:45 AM |
|
54C Complete Teardown/Rebuild
|
| Richard,
Had grabbed it already but thank you just the same. I find myself wanting to find some way to block out the...glyphmon — 12:03 AM |
|
54C Complete Teardown/Rebuild
|
| Hello roy,
here is a link to the schematic .
Sincerely Richardradiorich — 11:54 PM |
|
54C Complete Teardown/Rebuild
|
| Richard,
The Silvertone 2014 also is a transformerless set, so I am incorporating a 1:1 600 ohm audio isolation transfo...glyphmon — 11:37 PM |
|
Preliminary work on wife's Silvertone 2014
|
| Did an alignment today which was interesting. IF alignment went great, almost all was already spot-on. Adjusting on th...glyphmon — 11:35 PM |
|
Who's Online
|
There are currently 1813 online users. [Complete List]
» 2 Member(s) | 1811 Guest(s)
|
|
|

|
 
|