10-19-2016, 01:25 PM
First - Sorry again. I have been working on the pile of radios on the floor of my shop (SEE: Blog posts for story). I am down to about 4 that need to be restored - one is a Philco 65 in the tall-boy console (I think, really haven't done more than lift the lid and I like it. I also think it is pictured in the "haul" photo). It should be a good example of radios from Phlico that DO NOT apply to my distaste for Philco photofinish. I have 3 more table radios completed and should post them soon. One is a Packard Bell 51 that appears to be one of a kind - I'd like to hear otherwise.
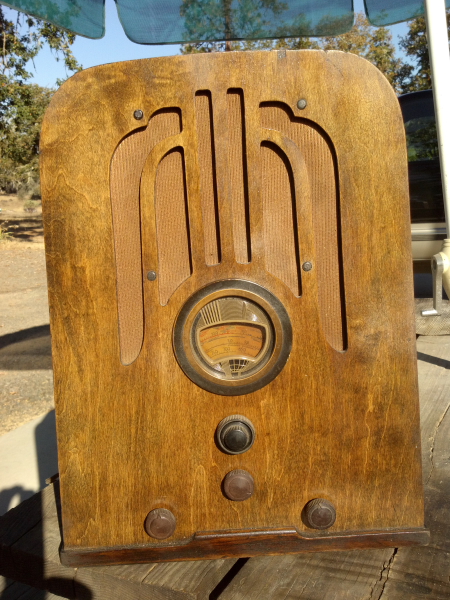
Anyway, the victim here is a 620. Shown below "as found". Like so many of these table radios, I suspect that somebody started a refinish without noticing the photofinish or simply hoping that what was underneath was good-enough. IT ISN'T.

Now, I have posted pictures of this radio before, but it has been years ago and I don't even remember where, though it is in my blog - way back. Since I believe this is a common issue for both experienced and novice collectors, I feel it is worth a post here.
Short story - This was part of a collection from Sand Point ID from which I acquired about 10 radios and parts from the daughter of the collector on his passing (RIP). It was obviously a parts radio, but it had a nice chassis and speaker which I removed, restored and stored waiting for a cabinet. I don't know why, but I put the cabinet in the parts shed. Though this was several years ago, as I recall it was during a slack time (not many of those) and I had reached the point that I was needing to "purge" the less desireable items from the shed or face the "Great Garbage Avalanche" of 2013. Just as it was about to become part of a marshmallow roast - I like my food to taste like old glue and acquire a patina - well, I felt sorry for it.
I have done several radios since that needed a refinish that included a lot of photofinish. I have developed a process to recreate that finish. The difficult part was in preparing the proper lacquer colors and sequence where the application is actually the easy part (pictures on my blog). But this was prior to that.
I did not even try to go with the 620 pattern as I liked the look of the 610 cathedral better. And, in the same shed resided a few book-matched pieces of walnut burl and birds-eye maple. So WHY NOT!
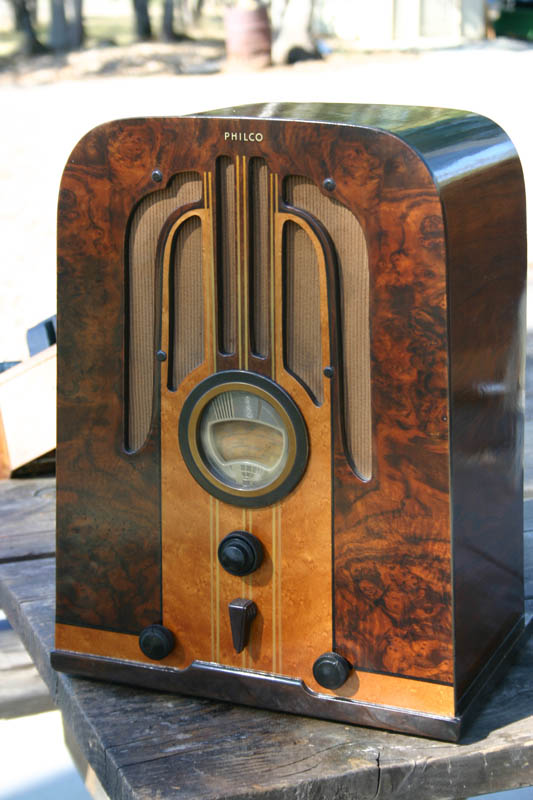
Now, this is the only radio in my display that is a "resto-mod" and one day I might try the photo-finish replacement process on one of these, but, hold your breath, I don't really care for the look of Philco's late-1930s photofinish anyway. It is just too yellow, even with the yellowed top-coat removed. So without further delay, here is the way I believe that Philco should have finished these cabinets:

The additional graphics were added with custom toned lacquer. The radio has all period correct, Philco branded toobs.
Well - back to work.
Anyway, the victim here is a 620. Shown below "as found". Like so many of these table radios, I suspect that somebody started a refinish without noticing the photofinish or simply hoping that what was underneath was good-enough. IT ISN'T.
Now, I have posted pictures of this radio before, but it has been years ago and I don't even remember where, though it is in my blog - way back. Since I believe this is a common issue for both experienced and novice collectors, I feel it is worth a post here.
Short story - This was part of a collection from Sand Point ID from which I acquired about 10 radios and parts from the daughter of the collector on his passing (RIP). It was obviously a parts radio, but it had a nice chassis and speaker which I removed, restored and stored waiting for a cabinet. I don't know why, but I put the cabinet in the parts shed. Though this was several years ago, as I recall it was during a slack time (not many of those) and I had reached the point that I was needing to "purge" the less desireable items from the shed or face the "Great Garbage Avalanche" of 2013. Just as it was about to become part of a marshmallow roast - I like my food to taste like old glue and acquire a patina - well, I felt sorry for it.
I have done several radios since that needed a refinish that included a lot of photofinish. I have developed a process to recreate that finish. The difficult part was in preparing the proper lacquer colors and sequence where the application is actually the easy part (pictures on my blog). But this was prior to that.
I did not even try to go with the 620 pattern as I liked the look of the 610 cathedral better. And, in the same shed resided a few book-matched pieces of walnut burl and birds-eye maple. So WHY NOT!
Now, this is the only radio in my display that is a "resto-mod" and one day I might try the photo-finish replacement process on one of these, but, hold your breath, I don't really care for the look of Philco's late-1930s photofinish anyway. It is just too yellow, even with the yellowed top-coat removed. So without further delay, here is the way I believe that Philco should have finished these cabinets:
The additional graphics were added with custom toned lacquer. The radio has all period correct, Philco branded toobs.
Well - back to work.


![[-] [-]](https://philcoradio.com/phorum/images/bootbb/collapse.png)


