Restoring a 46-1226 Code 125
Posts: 348
Threads: 48
Joined: Oct 2013
City: Tioga, Texas, USA
Back to the Philco again! I had to deal with a few other projects and the holiday tasks. Today I managed to install a new AC cord for the set. The old one was hopelessly falling apart. Even the molded rubber grommet on the cord was cracking and coming apart. I had a suitable two-piece strain relief of the more modern type. I had to use a 3/8" drill bit to begin enlarging the opening in the chassis to hold the new strain-relief. I finished shaping the opening with my Dremel tool equipped with a small cylindrical diamond grinding bit. The hole for the two-piece strain-relief has to be somewhat elongated. After about 10 minutes of work I had the opening shaped well enough that the strain-relief would fit when the AC cord was placed inside it and compressed.
I did some preliminary ohmmeter checks in the B+ circuitry and found no shorts and the electrolytics slowly charged up. Tomorrow I plan to do an AC power on test and make a few more measurements, while watching for any possible smoke!
All of the essential paper-wax-foil capacitors have been changed. I had planned to change the two AC input .01 filter capacitors, but discovered I had used up all the ones I thought I had, so I stopped to order some more from a supplier. I may get lucky and receive those by the end of this week. For now I will operate the set with the OEM capacitors. They check OK for now.
One thing more that I need to do before applying power tomorrow is to check all the tubes. No point in applying power if one has a short in it! I suspect however that they are OK except some may have low emission after so many years. You never know though. The Philco 40-201 I restored had all of its original tubes except for one and it worked quite well for signal pulling power etc. after I got the paper caps, some resistors and rubber wiring replaced. It will be interesting to see how this one compares to the 1940 model. The RF loop antenna on this set is a much lower impedance than the one that was in the 40-201.
I am not sure where the schematic that I am using came from. I think it may actually be a Beitman's generated schematic. In any case most of the parts I have checked match the values shown in its schematic. There are however a few differences in the power supply and those were taken care of in the supplemental schematics that jcassity had contributed in his thread on this model and production code.
One neat feature I discovered about this chassis is that there is a spring loaded slide switch on a bracket that mounts where movement of the record changer forward when opening the changer compartment allows the switch to move and engage power to a dial lamp so that the changer compartment has light while loading or unloading records. The switch was almost impossible to move so lubrication and cleaning had to be done. Now it moves easily once again.
I also repaired the two speaker leads where the arms of the changer mounting had cut them. When the chassis goes back into the cabinet the lead dress of these wires will have to be watched and secured in such a way that the brackets and levers associated with the changer compartment do not cut them again.
Joe
(This post was last modified: 11-26-2017, 08:41 PM by Joeztech.)
Posts: 640
Threads: 48
Joined: Mar 2017
City: Gap Mills Wv 24941
when you get a chance, pay attention to the SW/BC/Phono linkages. I noticed that the linkags bump into the dial string when phono is chosen. all that linkage stuff can only go on one way and i had to modify the part in question to clear the string. I am sure its when the switch is in phono only now that i think about it.
(This post was last modified: 11-27-2017, 09:37 AM by jcassity.)
Posts: 348
Threads: 48
Joined: Oct 2013
City: Tioga, Texas, USA
jcassity;
OK, thanks for that item. I will check mine to see what is happening with the dial string and levers.
This morning I did do a check of all the tubes. All checked OK except for the 6J5, which in this set was a metal tube. The 6J5 had no emission whatsoever! The tube did get warm, but just no emission. I had another 6J5 that checked good from an E H Scott 800B tuner parts chassis. I installed that tube so that the audio section would have some chance to work.
Now for the checks on the power transformer, 5Y3, 300 ohm resistor in the B+ and the AC measurements:
AC input voltage this morning was 123VAC.
Measuring at pin 4 and 6 of the 5Y3 socket, tube removed, 705VAC
Measuring ground to pin 4 of 5Y3 socket, tube removed, 352VAC
Measuring ground to pin 6 of 5Y3 socket, tube removed, 352VAC
Measuring pin 4 to 6 of the 5Y3 socket, tube installed, 690VAC
Measuring Gnd to pin 4 of the 5Y3 socket, tube installed, 345VAC
Measuring Gnd to pin 6 of the 5Y3 socket, tube installed, 345VAC
Measuring at 5Y3 cathode, tube installed, 31VAC and +337VDC
Measuring at the first Electrolytic filter section, +311VDC
The 300 ohm resistor is hot but not smoking and although I would not want to keep my finger on it, it is well within the capability of the 5W resistor I installed.
My next step will be to try the chassis with a speaker and an antenna to see if I can pick up any stations.
Here are a couple of pictures of the chassis;
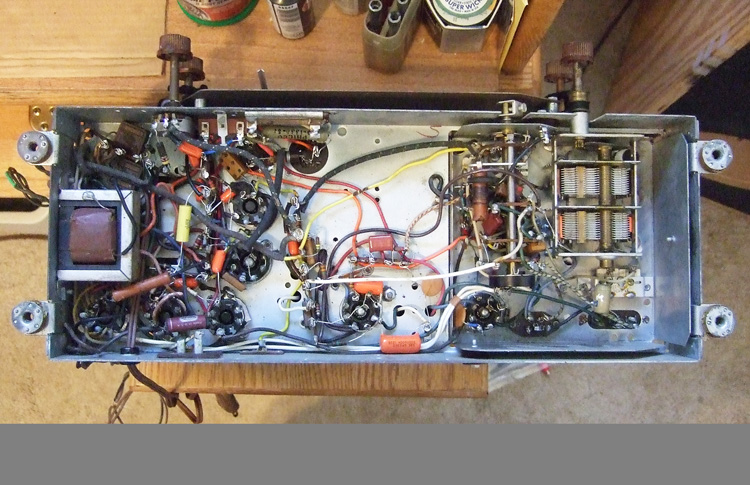
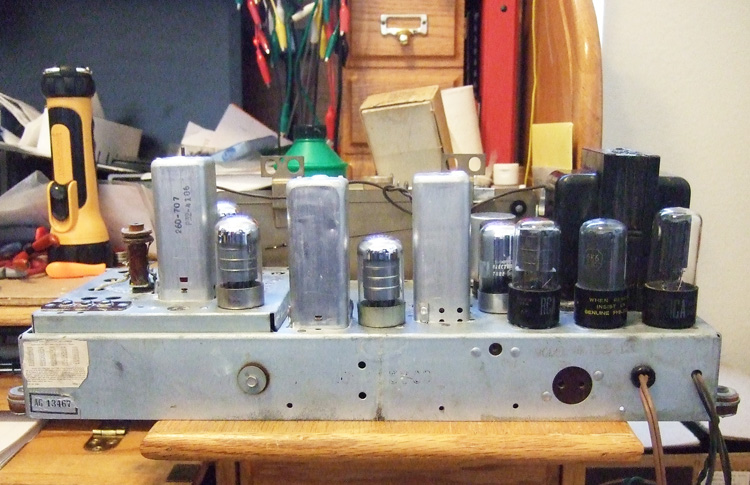
Joe
Posts: 348
Threads: 48
Joined: Oct 2013
City: Tioga, Texas, USA
Two capacitors I have not changed:
1) there is a .006 between the cathodes of the 7AF7 RF tube that is in an almost impossible location to change. Since the voltages there are very low and the impedance is also low there, I elected not to change it.
2) there is a .003uF@600VDC capacitor across the primary of the audio output transformer. I have not changed it, but do plan to do so. Usually you see capacitors in this application that are rated at 1KVDC or higher. It is there to suppress high AC spikes from noise impulses that make it through to the audio detector and amplifier stages. It is supposed to protect the output tubes plate circuits and the output transformer primary from transient spikes beyond their expected operating ranges. I will have to order this one as I only have a .001 rated at 1KV.
For now I have not changed any of the mica capacitors in the set as they usually are good. If any do prove to be bad I will do so.
Joe
Posts: 348
Threads: 48
Joined: Oct 2013
City: Tioga, Texas, USA
Bad news! The RF antenna input coil is open between the tap from above ground to the top of the coil. The lower part of the winding is OK, but mice have chewed the wires to the top lug completely away. Looks like the top section should measure about 1.6 ohms while the lower section should measure about 0.2 ohms. I don't have a coil like this on hand. I will have to see if I can find something to replace it.
Joe
Posts: 640
Threads: 48
Joined: Mar 2017
City: Gap Mills Wv 24941
I was about to start thinking about re-winding an antenna but lucky for me i found out it was not the antenna.
I may have caps you need, 304 772 3411 if you want to call and give me a list.
I was steering my chassis towards just under 300v on the 6k6's, maybe thats why i had to calibrate around the original design. where the resistor is put from the factory just radiates too much heat up into the above tubes for my taste.
good work!
and yes,, if you felt like taking out the band selector, you may have better access.
there are a few important parts underneath that bugger.
does yours have a 7AF7 as the V1?
If yes, that means you are a run3 and to that the diagram dedicated to run 3 does not exist. You have to use two prints and combine them "as applicable" specific to the wording applied to run3.
(This post was last modified: 11-27-2017, 04:18 PM by jcassity.)
Posts: 348
Threads: 48
Joined: Oct 2013
City: Tioga, Texas, USA
jcassity;
Yes the unit I am working on is Run 3 with a 7AF7 RF tube in the front end.
I was lucky that I was able to fish out the end of the wire the mice had chewed apart and by careful re-tinning of the lead I established continuity again, then used a very fine insulated wire from one of the very small audio cables often seen used for connection to phonograph cartridge connections. It is about 28AWG stranded wire with a white insulation cover. That matches with the white wire coming up to the solder lug on the bottom of the transformer. I used the smallest size of white heat-shrink tubing to protect the completed connection and shrunk that, then added a couple of small drops of clear plastic glue to stabilize the end of the wire at the winding of the transformer.
I turned on the radio again and tuned across the dial and began to pick up stations with my finger serving as an antenna - success! I had been on line looking at Philco radios and spotted a 46-1226 chassis complete with tubes for $25 plus a little over $21 for shipping. However, since I managed to repair this transformer I will not have to do anything that drastic to complete the restoration.
When I was changing the old wax paper-foil capacitors I spent hours tracing the other components and wires attached to them and studying the schematic versions to verify each circuit. It was a good thing, as it kept me from connecting some parts incorrectly as I replaced parts. I did get myself in a problem with one circuit where I stopped overnight without finishing one reconnect. I had to remove one connection and re-solder the parts to correct my error the next morning. Hand wired chassis are often somewhat of a rat's nest and can be confusing to work on. This one is no exception.
Yes I have had to use two schematic versions to work on this set. I was lucky that the tube tester I have had a supplemental booklet that showed the settings for testing the 7AF7 tube. In fact the roll-chart of my tube tester had only about two 7xx type tubes listed on it. All the others are in the supplement. This is my oldest tester (an Allied Radio unit) which has the sockets needed for the old 4 pin, 5 pin tubes seen in radios from the late 1920s and into the 1930s. My other tube tester does not have the Loctal type sockets and so does not cover the 7xx tubes at all, but it will check tubes such as the 7868 tubes used in late model Fisher tube type stereos.
Joe
Posts: 348
Threads: 48
Joined: Oct 2013
City: Tioga, Texas, USA
I found the break in the wire of the antenna transformer by connecting one lead of the ohmmeter to the center tap lug on the bottom of the coil form, then using the other meter lead to move along the circumference of the top winding. I could hit a certain spot and establish continuity. I began to work on that spot with my finger nail and also a scribe and eventually managed to break away some of the original glue that held the end of the winding to the rest of that coil section. I wound up with about 3/8" of lead to work with. I used a small white wire from very small shielded audio cable to make the connection to the end of the exposed wire after first tinning the end until the litz wire insulation was burned back enough to tin about 1/16" of the wire. The other end of the wire was attached to the solder lug on the coil form that the white wire from under the chassis was attached to and soldered. I used some magic mending tape to secure the new white wire to the coil form body and then shrunk the white heat-shrink tubing I had slid over the small white wire. Next some clear plastic glue was used to stabilize the soldered wire to wire end at the coil. Here is a picture of the repaired coil.
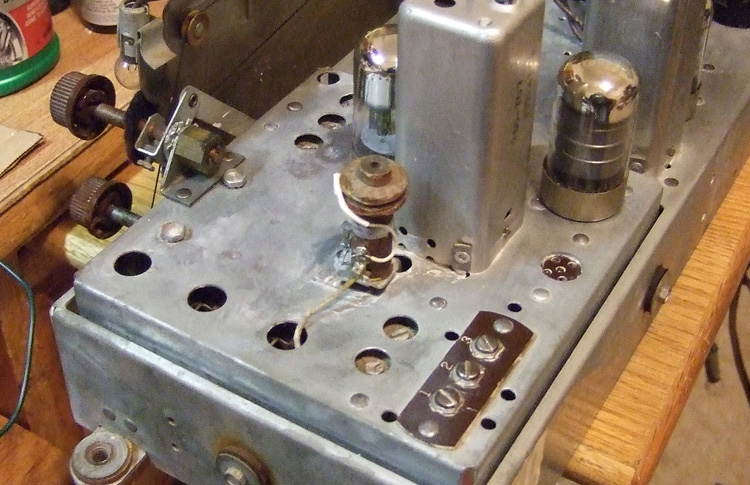
Joe
Posts: 348
Threads: 48
Joined: Oct 2013
City: Tioga, Texas, USA
I was able to determine how the lamp for the record changer compartment works. Near the bottom left pivot for the record changer door, there is a small metal tab with a hole in the end of it. A steel coil spring has one end looped through the hole in the metal tab. The spring loaded switch on right angle steel bracket mounts on the stationary wooden rib near the same height as the metal tab with the coil spring on it. The handle/tab of the switch must be closest or facing the changer, not facing the left side of the cabinet. The switch handle or tab has a small hole drilled through it. A piece of dial cord or fishing cord of small size is passed through the hole in the switch handle/tab while its other end is fastened to the free end of the coil spring. Then the end passed through the hole in the spring-loaded switch tab is drawn tight enough to eliminate slack when the record changer door is shut. Then tie the cord with the slack removed at the switch handle/tab securely. Cut the excess of cord off but not so short that it might come loose. A small dot of model airplane cement will stabilize the knot at both the switch and the end attached to the coil spring.
The hole in the switch handle/tab is small and you may not even notice it unless you look closely. On this radio, the string or cord used had broken loose from the switch and I had taken everything apart without knowing how it was put together by the manufacturer. I found it necessary to clean out the hole in the handle/tab with a small wire before I was able to pass a new piece of fishing line through it, which is what I used to connect to the spring on the changer door.
I added a small steel wire with a screw near the bottom of the stationary wooden rib of the left side of the cabinet (viewed from the front) in order to wrap the wire around the speaker wires so that they are kept taut and away from the scissor levers of the record changer door and the rotating loop antenna. This way the wires will not get caught in the door or tangle with the loop antenna. I noticed a few staples in several places on that side and believe that something was used originally to keep the wires and cables organized to avoid problems with movement of the changer door and the loop antenna rotation. Whatever was there originally was gone before I ever saw the radio.
Now when the record changer door is opened, the light for the compartment comes on as it should and goes off when the door is closed.
I find that with the radio chassis back in the cabinet and its loop antenna reconnected that the radio stations come in with much better signal levels and volume.
Next step on the radio will be to align the front end on AM and SW bands for best signal and reasonably correct dial accuracy.
There is no reaction from the cartridge of the changer. I measured for a magnetic coil, but the ohmmeter shows open circuit. In any case the changer is to be replaced with something modern that can play all speeds. The existing area for the changer permits something about 14 5/8" wide by 13 1/2" deep, so that is the size I will be looking for.
Joe
(This post was last modified: 11-28-2017, 05:19 PM by Joeztech.)
Posts: 348
Threads: 48
Joined: Oct 2013
City: Tioga, Texas, USA
Today I got around to dealing with a vexing problem with this radio. Right in the middle of the dial tuning there was a constant static crashing and no stations could be tuned in. I started by rechecking and re-doing the tuning capacitor pivot points (where the moving shaft is grounded). I tried new lubrication to no avail. Then I used Deoxit to clean those same points - no help. Next I checked between the isolated vanes and ground looking for intermittent shorting, but my digital meter just could not show the problem. I had put away my analog VOM, so I did not want to dig through the closet to find it. I took some silver CPU heat-sink compound and used some at each pivot point of the tuning capacitor shaft and the brass grounding clips. I used my Xacto knife blade to work it in between the clip surfaces and the tuning shaft. The radio was still acting up. Next I took a folded piece of paper and carefully cleaned between the moving vanes and stationary vanes of the tuning capacitor - still no help. I finally looked closely with a magnifying glass at the tuning vanes and noticed that the ones closest to the front of the radio seemed much closer together on the forward side than the back side of the vane to vane spacing. I wound up sliding my Xacto blade between the vanes and very gently moving the vanes slightly apart. When I stopped at each vane the distance appeared equal on each side of the moving vanes. I stopped for a recheck and I had cured the problem! Now the tuning capacitor has smooth tuning action from end to end.
Dealing with a tuning capacitor can be really frustrating and extreme care has to be exercised in working on them. At several points I was thinking I was going to have to buy a donor chassis to get a replacement tuning capacitor. Since I had reached that point of frustration with this one, I felt I had nothing to loose so I made the decision to try slightly bending each vane to get them centered vane-to-vane.
I mentioned in my last post about the speaker and phono compartment lamp wire lead dress in the cabinet. The speaker wires had been cut in two because they got caught between some of the steel levers associated with the phono compartment tilt-out feature. When I reinstalled the radio chassis in the cabinet I dressed the phono compartment lamp wires and the speaker wires in such a way that I could keep them away from the steel levers and the rotating AM Loop Antenna. There are some openings at the sides of the radio chassis mounting shelf in the cabinet which are at the leading edge and approximately the center on each side of that mounting shelf. I passed both sets of wires through the front opening on the left side of the cabinet (viewed from the front). I attached the lamp and its wires to the post at the middle above the tilt-out-door and the rest of that wire includes the spring loaded switch (which mounts near the bottom pivot point of the tilt-out door) was fastened at the position where it was originally secured. I repaired the broken/missing dial cord attached to the spring loaded switch using some braided nylon fishing cord. Here are some pictures of that area of the cabinet.
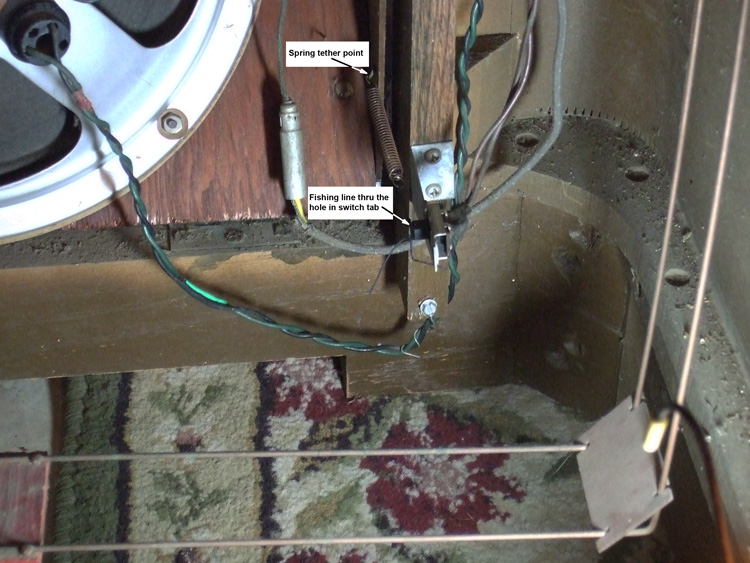
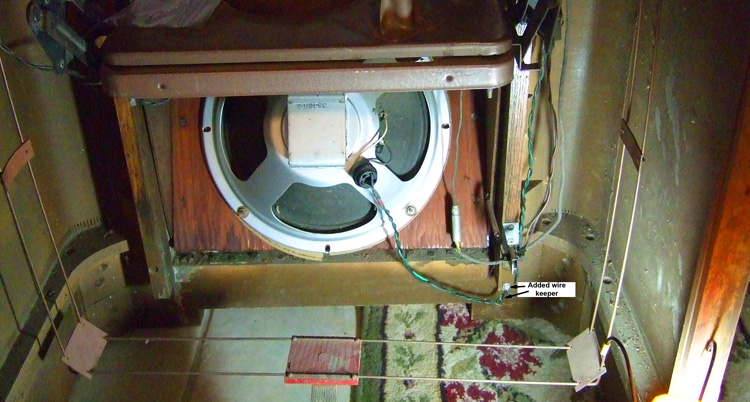
I thought this might help someone else deal with similar problems.
Joe
Posts: 640
Threads: 48
Joined: Mar 2017
City: Gap Mills Wv 24941
the antenna,, it appears i was wrong, my antenna has those red blocks of plywood and the same spacers. I thought my dad added those parts to try and fix the box antenna.
your issue with the tuning cap, i have the same problem with one of my other radios that has a bandspread cap, the signal goes null as soon as a couple fins touch.
Posts: 348
Threads: 48
Joined: Oct 2013
City: Tioga, Texas, USA
jcassity;
It is always worth a try to see if the vanes can be spread just enough to stop the shorting out that happens when they touch. If they cannot, you likely have not made it any worse than it was to begin with. I was lucky that there were some same-model chassis on the auction website, but fortunately I was able to correct this one.
The BSR-310 changer I ordered for this unit arrived today. I think the plastic changer base and changer will both fit into the space available without having to make a custom mounting board for the changer. Measurements seem to indicate the plastic base will fit between the two steel brackets the original changer was mounted to. I will be checking to see. The changer came with a Shure magnetic cartridge. I don't know if there is enough gain in the audio stages here without having to add a preamp. If not, I might look for a ceramic cartridge replacement.
Joe
Posts: 348
Threads: 48
Joined: Oct 2013
City: Tioga, Texas, USA
The BSR 310 changer came with a Shure M75CS cartridge which is designed to track at 3-5 grams and provide an output of about 9.3mV and a load resistance of 47K ohms. I do not know if this will be sufficient for the Philco 46-1226 audio amplifier circuitry. There is a 150K ohm load resistance attached to the phonograph input jack on this radio, so for now the only thing I can do is to try it and see what happens. I have a suspicion that it will need a preamp.
Joe
Posts: 7,305
Threads: 270
Joined: Dec 2009
City: Roslyn Pa
Sound like a job for the mighty MPF-102.
When my pals were reading comic books
I was down in the basement in my dad's
workshop. Perusing his Sam's Photofoacts
Vol 1-50 admiring the old set and trying to
figure out what all those squiggly meant.
Circa 1966
Now I think I've got!
Terry
Posts: 348
Threads: 48
Joined: Oct 2013
City: Tioga, Texas, USA
I used the original 2-prong AC plug and socket on the back of the radio chassis to connect AC power to the BSR 310 record changer. I had to be careful about routing the AC cord and the audio cords plus the changer ground wire to the radio chassis. The AC cord comes up the right side of the cabinet while the audio cord and ground come up the left side. All are secured with cable and twist ties to make sure nothing can get caught in moving parts including the rotating AM Loop Antenna.
I removed the plastic molded feet from the bottom of the record changer base using a hacksaw blade so that it would rest flush with the top surface of the rose colored Philco record changer base. I drilled 4 small holes in the plastic base of the BSR changer and used some #8 5/16 Hex Head screws to attach the BSR base to the Philco base. It is a great fit with the BSR resting exactly between the support/tilt-pivot brackets of the Philco changer base. After spending about 6+ hours working on all the issues I decided to stop. I will take a rest and work on this again tomorrow.
As to making up for needed gain on the changer to the audio circuits of the Philco, I will just look for a pre-assembled preamp of tube type to add in circuit if needed. I could probably add a 12AX7 preamp stage in a small Bud-box, but just don't want to go to that much trouble constructing a custom piece. It will probably come from the on-line auction site.
I will also try to get some pictures of the installation of the record changer and post them tomorrow.
Joe
(This post was last modified: 12-26-2017, 05:24 PM by Joeztech.)
Users browsing this thread: 1 Guest(s)
|
|
Recent Posts
|
|
Philco 89 Code 123 Osc Coil
|
| Hello,
I thought I would post my findings on my bad oscillator tickler coil. There were 27 turns on the outer coil b...dconant — 12:38 PM |
|
Philco Model 16 wiring question
|
| Thanks Morzh. So it appears I did wire it incorrectly and I have to switch the wires between pins 2 and 4.bobclausen — 09:24 AM |
|
Philco 46-1209 strange behavior
|
| No, it's not a problem, just during certain condition it could show up.
Yes, an internal tube short could do that too.
...morzh — 09:13 AM |
|
HiFi (Chifi) tube amp build - but my own design.
|
| You sound guys are never satisfied. :crazy: :clap:RodB — 09:10 AM |
|
HiFi (Chifi) tube amp build - but my own design.
|
| I got some new ceramic octal tube sockets installed and also tried some different coupling caps.
The results:
The go...TV MAN — 08:42 AM |
|
Philco 46-1209 strange behavior
|
| I pulled the tube out and it's shorted from pin 1 to pin 2. I suppose that's the problem...sq65 — 08:12 AM |
|
1949 Motorola 5A9M
|
| bob
Nice work on battery . If you don't. Have terminals i have a few spares
Samsam — 02:12 AM |
|
1949 Motorola 5A9M
|
| hello mr Fixr,
for sure !!
I have some radios that I need to make some batteries for too.
Sincerely richardradiorich — 12:33 AM |
|
1949 Motorola 5A9M
|
| Dittos, sweet b on the battery. Love the "9 Lives" logo, remembered from my childhood. Other neat ones are t...MrFixr55 — 11:24 PM |
|
Philco 46-1209 strange behavior
|
| Hi Morzh,
Dunno if the AC EMI caps are an issue. I never liked the concept but never had an issue with these causin...MrFixr55 — 11:21 PM |
|
Who's Online
|
| There are currently no members online. |

|
 
|


![[-] [-]](https://philcoradio.com/phorum/images/bootbb/collapse.png)


