Posts: 1,378
Threads: 45
Joined: Nov 2017
City: Menlo Park
State, Province, Country: CA
Hi Folks,
In this thread I will share the tale of a 16X that was found, saved, nearly lost again and is now getting close to its second saving and a more full restoration. There are pictures I will share along the way, some of which might upset those of a nervous disposition.
Chapter 1: the find
Rewind to the year 2000, and a blossoming love affair stretched from the UK to California (I promise there wont be too much sloppy stuff). My new girlfriend bid me visit the West Coast, and just before my arrival, had spotted a radio and decided I might find it interesting. It was among the last items in a yard sale and was secured for $20 from the sellers who were glad to see it go. During that trip it was possible to get enough info to identify it and order a schematic. We worked on the cabinet with help from museum conservator friends. I returned to the UK with a list of items and plans to get back to California. During my next trip, there was time to tinker and add the caps I had brought, still aware that the blocks needed attention. The set was basically complete but dilapidated, had been repaired in the past since the old wet electrolytics were gone and other signs told the tale. With attention to some caps completed, including the large multi block but not the bakelite blocks, it was time to test. At this point the radio played rather well, and was reassembled and kept carefully in the house with the intention to restore in full when there was time...
Well, before I knew it, lots of life happened with no time to revisit this project. Then we were packing up the LA house and moving to Northern California, and the radio had nowhere to go but storage.
Tune in next post to the thrilling tale of agent 16X and her rescue from "The Pit of Dispair".
The radio is an early 5 band 16X matching the 1934 spec. The cabinet is the style with 3 posts in front of the speaker, lyre motifs and a large flat top, similar to some 18X sets. Pics soon.
I don't hold with furniture that talks.
Posts: 16,483
Threads: 573
Joined: Oct 2011
City: Jackson
State, Province, Country: NJ
We love sloppy stuff!
People who do not drink, do not smoke, do not eat red meat will one day feel really stupid lying there and dying from nothing.
Posts: 246
Threads: 27
Joined: Aug 2013
City: Petaluma, CA
REALLY looking forward to this story!
Craig R
Posts: 1,378
Threads: 45
Joined: Nov 2017
City: Menlo Park
State, Province, Country: CA
Before we resume our tale recounting the fortunes of our heroine, allow me to share a link. The radio in question is the same model (as far as I can establish) as the one described in the following web page:
http://www.tuberadioland.com/philco16X-main.html
Chapter 2: Released from the pit.
After the move from LA in 2006, the set was stored, along with a great number of other belongings in what was assured to us to be a good outbuilding on my father in-law's property... With movers flying left-right and center, it was all I could do to direct 50% of the stuff to the proper locations, let alone supervise careful handling. It was probably at this point that some of the knobs were lost.. Since it came off the truck early, it was buried before I could know what was going on, and languished at the back of a stack of belongings, inaccessible for far too long. Somehow, 10 years passed until clear out of the store was possible last September (2016), and we returned to find a horror story of rat infested damp decay, with many items damaged irrevocably. Poor Mrs H saw many beloved things in terrible condition, and my hand first turned to cleaning and finishing some of the Victorian wooden furniture for her.
When I looked at the radio, I was a bit crestfallen to say the least. The top veneer was peeling and the finish ruined, and the decorative thicker veneer on the cabinet sides was also loosening and curling. The chassis and speaker were covered in rodent droppings, and the speaker cone had provided at least one meal. Despite this, I thought that there was enough to work with, and at 83 years old, a survivor like this deserves preservation, and the more complete electrical restoration I had in mind all along. Done by the end of the year, I had confidently predicted.
That day, I gave myself an early lift by sanding, gluing and attending to the cabinet top. Things looked brighter - the cabinet would look great again with some more work. It was only the beginning.
Tune in next post to the incredible tale of "The Saga of the 16X"
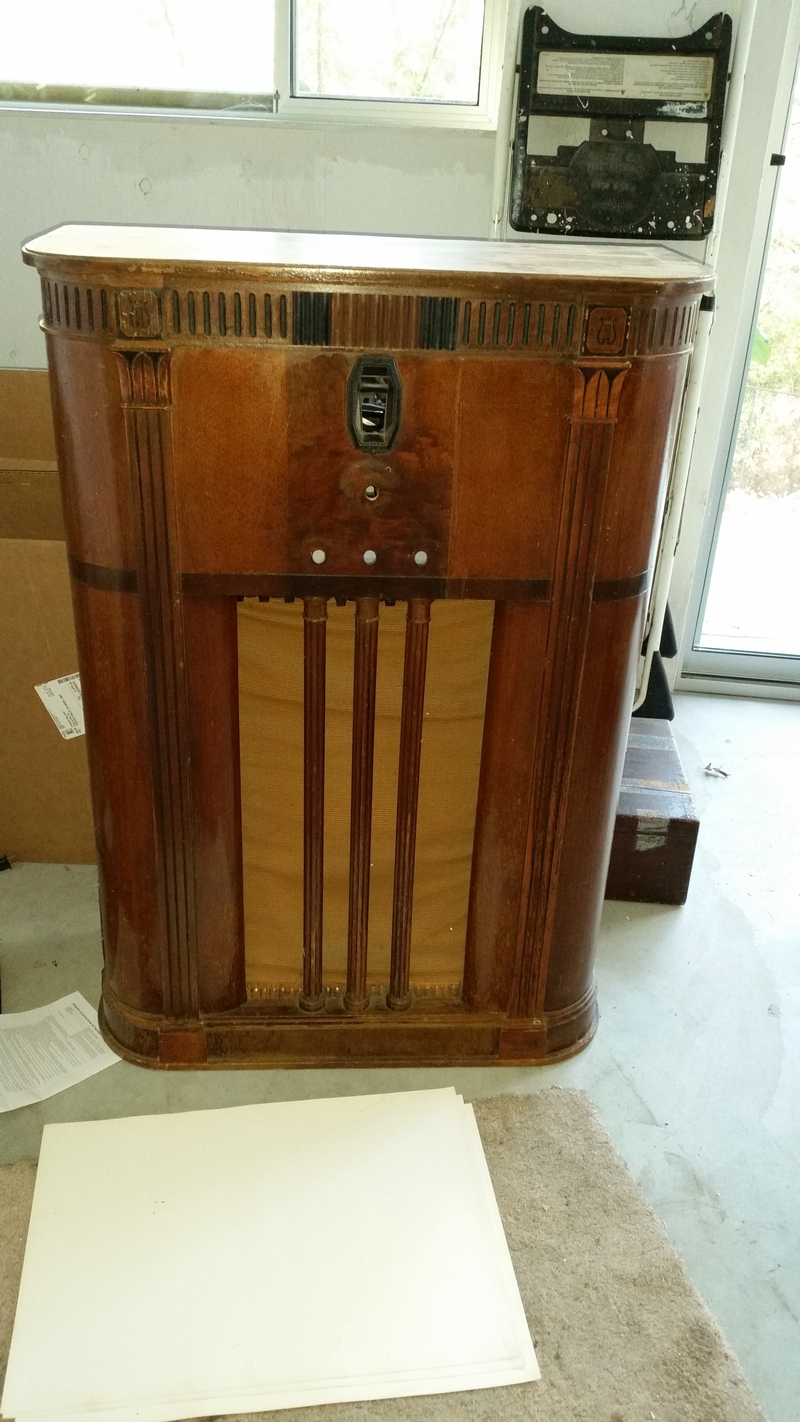
I don't hold with furniture that talks.
Posts: 1,378
Threads: 45
Joined: Nov 2017
City: Menlo Park
State, Province, Country: CA
In the last thrilling episode, our heroine had been rescued at last from incarceration in "The Pit of Despair"....
And so to action, but what action? Eager to have a working radio that really represented what it was when manufactured, a plan began to form. Restoration would use original parts where possible (excepting capacitors) and follow original designs. Repairs would use original or similar materials in keeping with the period of construction.
1) Full schematic and info ordered from "The Philco Repair bench" Mr Schwark was extremely helpful in ensuring the correct info was supplied. Other sundry info was trawled from the internet with regard to techniques, tips tricks etc.
2) Everything was drawn up, with full scale diagrams of component placing, block capacitor IDs etc and a checklist created to help track progress. A notebook was kept for additional notes and drawings.
3) A full assessment of the chassis and components was in order....
4) A friend offered me a substantial collection of Erektor set parts, which did not seem significant at the time.
Electrically, we started somewhere here:
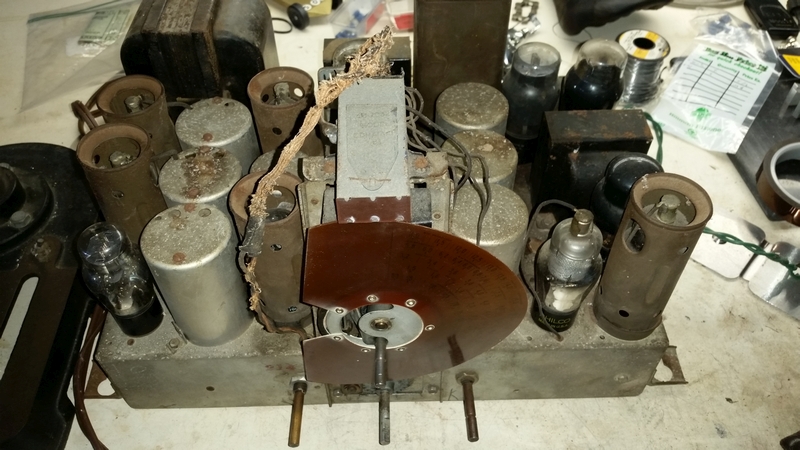
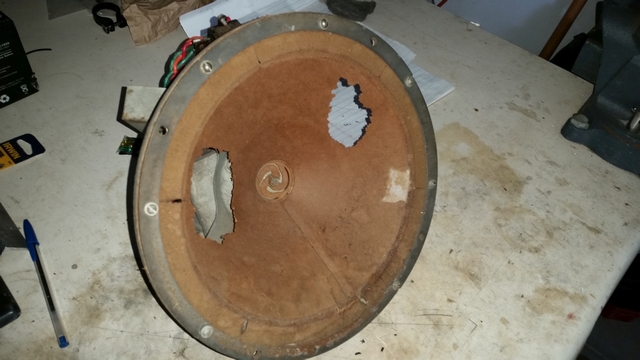
This is a picture of what was present once I had brushed off the loose, err, stuff around the back, the wires to the speaker voice coil had been eaten away.
In episode 4, What cannot be seen becomes apparent...
I don't hold with furniture that talks.
Posts: 1,378
Threads: 45
Joined: Nov 2017
City: Menlo Park
State, Province, Country: CA
Episode 4:
Underneath, things look reasonable but with work to do:
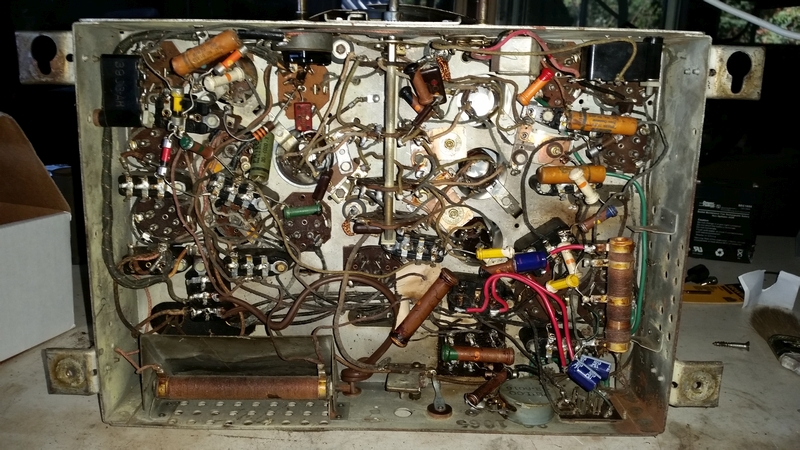
It was once the multimeter was brought to task that the full extent of the situation became apparent, and the scope of the project expanded beyond all previous expectations. In addition to the anticipated repairs, far more serious issues were apparent:
1) Both primary sections of the speaker output transformer were open.
2) The interstage phase-splitter audio transformer primary was open.
3) The shadow meter was open circuit (instructions for repair were provided in my schematic packet).
4) The volume control pot was bad.
At first, I thought ebay might be the salvation - lots of Philco speakers available. All sorts of transformers. But the right ones? Much harder. I nearly snagged a U2 speaker, but the asking price was too rich, well in excess of $100 plus shipping - and for what exactly? I had waded into very deep waters.
I enquired with a transformer repair service. They responded with a reasonable asking price for the job, but too much to justify at the time. A Hammond O/P transformer with configurable taps was ordered for the speaker. It is still in its box. But what to do about that interstage unit?
Meanwhile,to keep things moving, orders were sent out for cloth covered wire, capacitors and other bits and pieces as I contemplated the problems of the difficult stuff. This all gave rise the question: Just what am I trying to accomplish with this radio?
Episode 5 "The Curious case of the Project within a Project" will follow after this brief word from our sponsors...
I don't hold with furniture that talks.
Posts: 1,378
Threads: 45
Joined: Nov 2017
City: Menlo Park
State, Province, Country: CA
Thanks Terry,
This story still has plenty of installments remaining before we catch up to the present - stay tuned!
Cheers
Ed
I don't hold with furniture that talks.
Posts: 2,573
Threads: 337
Joined: Jun 2013
City: lawrenceville nj

wounder if the movie is going to be better then the book 
Some day, and that day may never come, I will call upon you to do a service for me. But until that day, accept this justice as a gift
mafiamen2
Posts: 1,378
Threads: 45
Joined: Nov 2017
City: Menlo Park
State, Province, Country: CA
Episode 5 "The curious case of a project within a project"
Faced with a damaged interstage audio transformer (missed one on ebay thanks to bad timing), I started thinking about the project differently. Nobody was chasing me to have it finished, after all. I wanted it to be as close to a working 1934 radio as it could be, and if original parts weren't available, lets explore rebuilding with original methods. Remember that Erector set? Meccano to me, and it seems much of it had come with someone from the UK.
Having never seen the inside of an audio transformer before, the silly notion occurred to me that I could rewind one, and the Meccano might provide the means... I started tinkering, and looking on-line for some hints.
One wet sunday afternoon, I opened up the case for the transformer, and started taking notes of wire layout and core build - for instance there's a paper gap between the E and I sections to prevent saturation, since the driver runs in class A. Then the tedious process of unwinding, layer by layer, began. Turns and layers were counted:
Primary: 17 layers 32 AWG wire, 130 turns each
Secondary 24 layers 34 AWG wire, 180 turns each
The primary wire was very fragile, with signs of corrosion near the center of the bobbin.
The original former looked in OK shape. I measured the old separating papers with a micrometer, and bought high quality tracing paper to use for the rewind. What had I started? Definitely "in at the deep end" now.
Meanwhile, the winder was tinkered in to shape, and the various bits screwed to a piece of handy plywood. A cheap mechanical counter was added. Here's a picture:
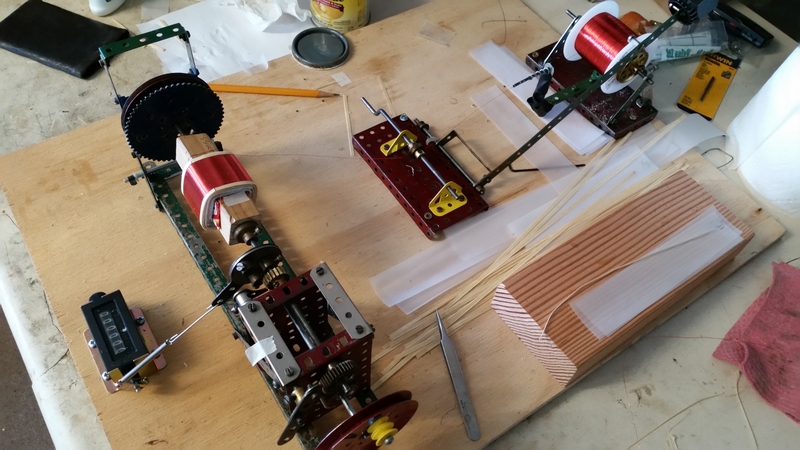
We're all set up in this picture. Quite a bit of learning was needed before getting to this point - the fine wire is hard to handle and one must prevent it from crossing over, keeping the turns neatly side by side. Practice runs helped a lot. After each layer wind the wire was coated with shellac, and a new paper coated with shellac and wrapped over the top. For thicker wires, it was necessary to ad end papers to keep a regular surface, otherwise the wire would fall off the stack at the edges. I found that out the hard way about 4 layers in to the secondary wind.
I lost count of the hours spent here, with unravelling, equipment build, learning and rewinding, but it took many afternoons.
I don't hold with furniture that talks.
Posts: 1,378
Threads: 45
Joined: Nov 2017
City: Menlo Park
State, Province, Country: CA
And here is the end result:
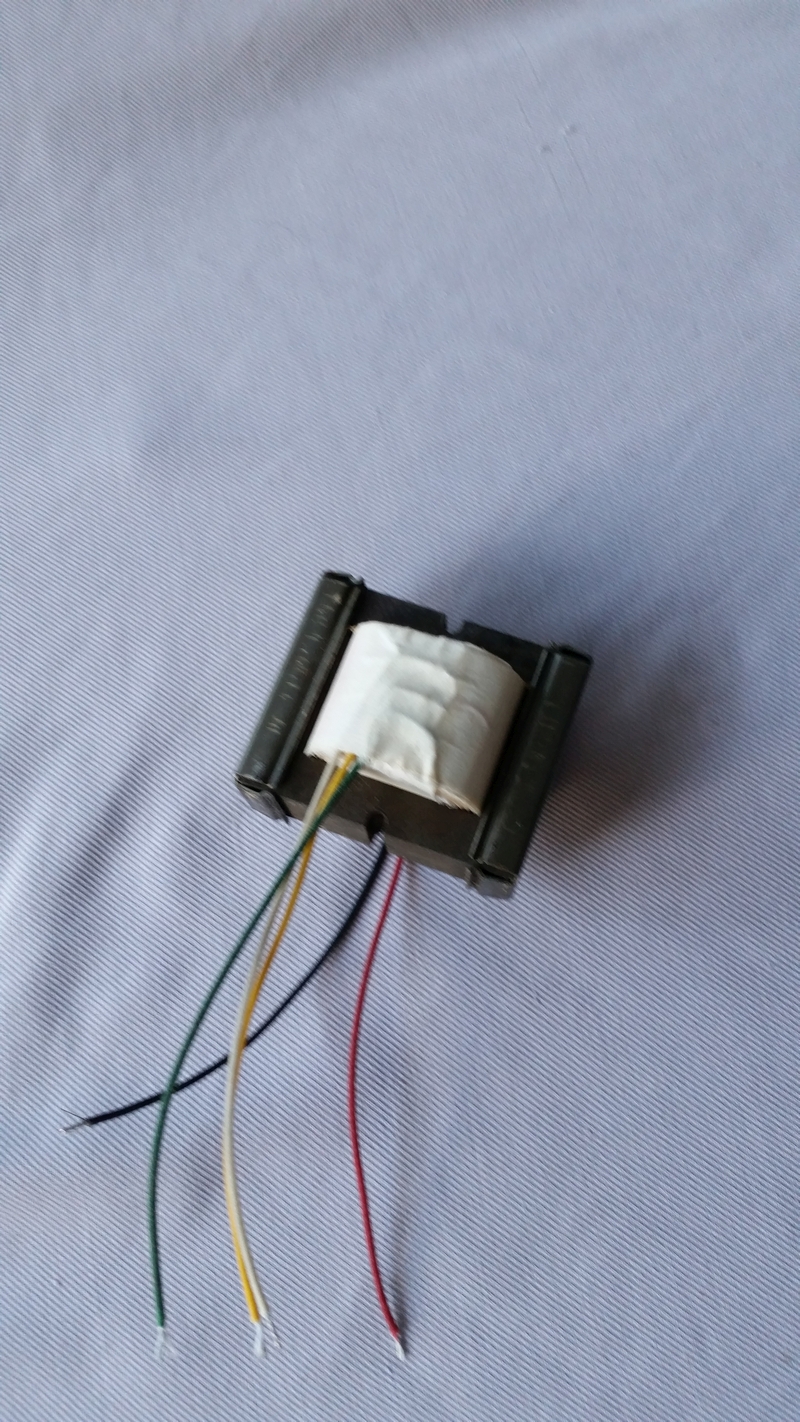
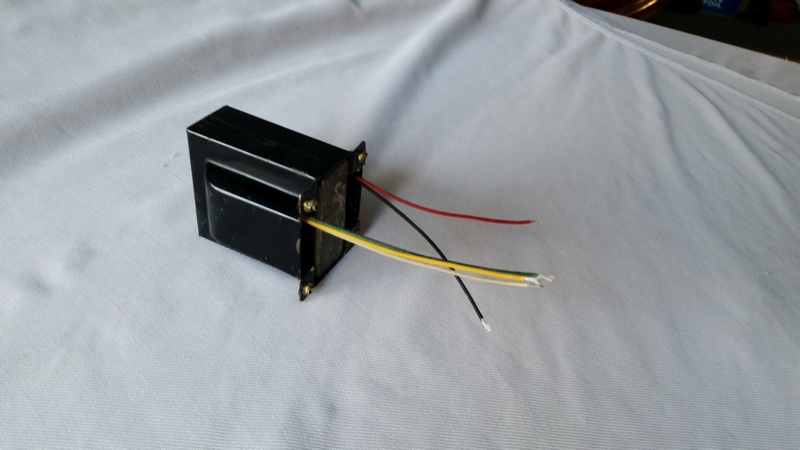
I don't hold with furniture that talks.
Posts: 1,378
Threads: 45
Joined: Nov 2017
City: Menlo Park
State, Province, Country: CA
Alongside the rewinding, I had also started to clean up the chassis, scraping, scrubbing and derusting in a few spots.
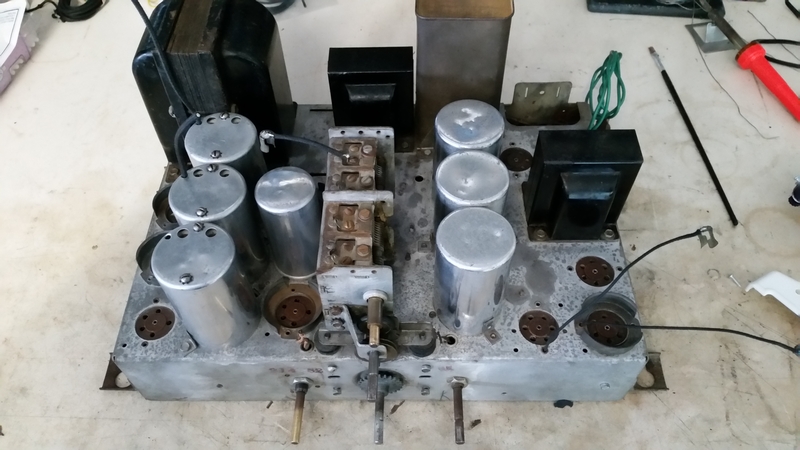
The cans over the IF transformers were removed, allowing a new top cap wires to be brought out for the IF valves on the left side. At the right rear of the chassis, there is still a big hole where the electrolytics used to live. I found some motor caps of appropriate rating, made a clamp and fitted them in place:
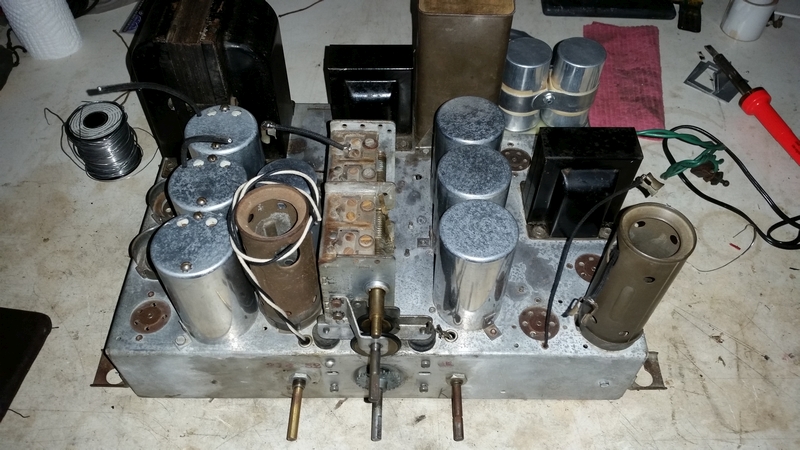
Other wiring was replaced with new cloth covered wire, and I started working through the block capacitors. Here again, the repair man, many moons ago, had been at work. Some block caps had been clipped out of circuit and new caps added. Wiring was returned to the factory positions once the blocks were rebuilt and replaced.
An experiment occurred to me - paper caps go bad due to moisture absorption, so I measured one taken from a block which indicated ~1 - 2 Megohms on the DMM, and then baked it in the oven for a while. On the DMM, at least, it appeared recovered, showing no leakage, and correct capacitance again. A proper high voltage test would make an interesting comparison, but it made me wonder if the entire block could be baked to effect a recovery, and how reliable it would be?
I don't hold with furniture that talks.
Posts: 16,483
Threads: 573
Joined: Oct 2011
City: Jackson
State, Province, Country: NJ
Ed
Impressive effort with transformers, I still outsource mine - hate the job. My rewind exercises are limited to RF coils, preferably without criss-cross winding.
As for the caps, a single cap could be possibly recovered if shows no signs of leakage for which you have to use a real cap tester that does test leakage at high voltage or a Megger, which does same. However, with the recovered paper cap being, well, a paper cap, it is a matter of time (and, if one is not hit by a bus untimely, well within one decade so even an old fart has a chance to see it happen) before it is to its old tricks again.
With the tar block - how do you intend to bake a tar block? it is potted. With a tubular cap porous paper makes the vapor escape possible, but with the block it is entirely different matter.
AMAF the block might still work, the caps' leakage if small does not mean a whole lot, and the tar prevents a lot of moisture entrapment. However you will find out the caps are out of spec, often 100% so. It might matter or it might not.
People who do not drink, do not smoke, do not eat red meat will one day feel really stupid lying there and dying from nothing.
Posts: 1,378
Threads: 45
Joined: Nov 2017
City: Menlo Park
State, Province, Country: CA
Thanks morzh,
The speculation on the cap was just that, speculation ;). It is very likely that they will return to leaky, and with whatever internal degradation may have taken place - corrosion products and salts/acids evolved in the paper over time - the failure would probably return sooner rather than later. I'm certainly not advocating this as a restoration practice!
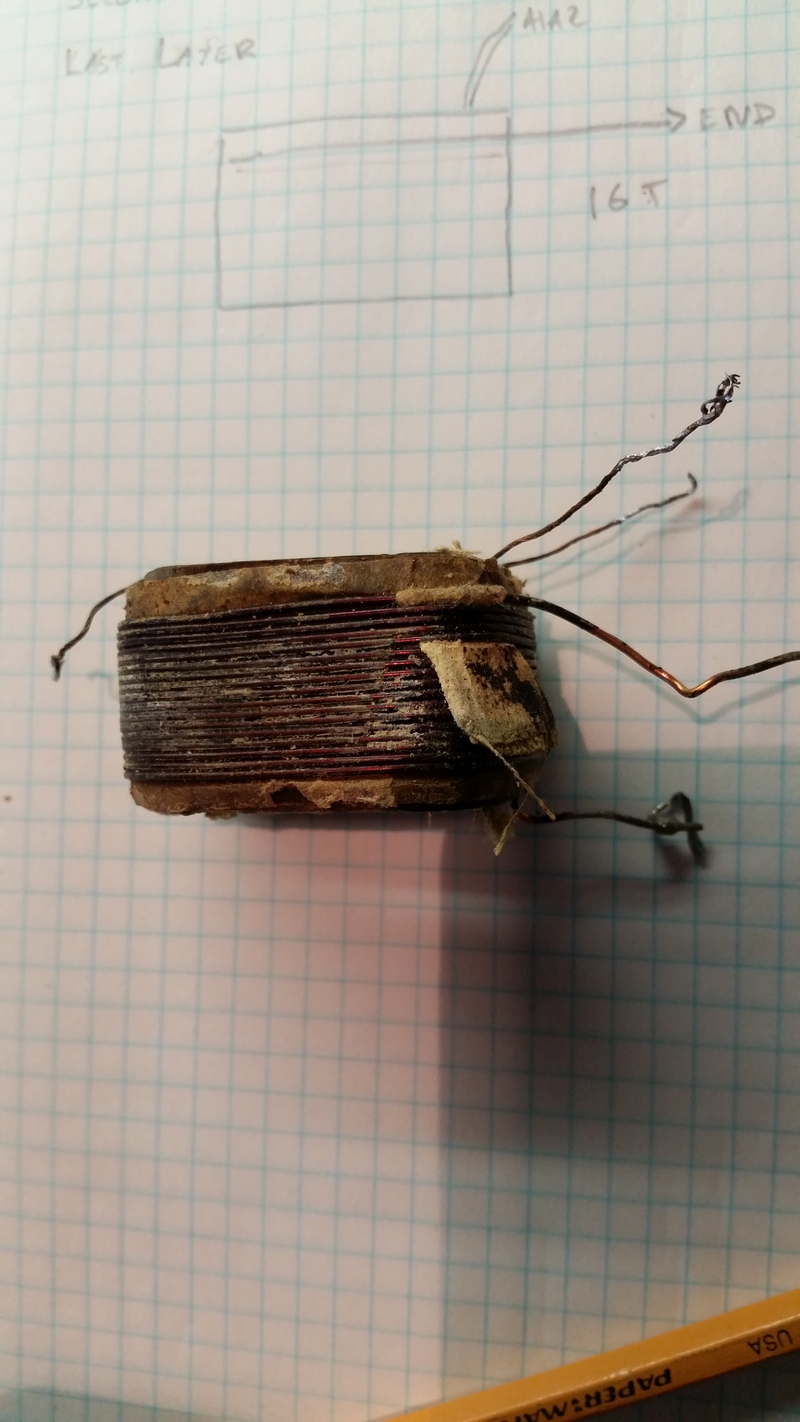
The job of rewinding certainly is a challenge. I'm now finishing up the O/P transformer. Primary is done (#35 wire, 20 layers of 140 turns each with center tap). The secondary will be next. That is 18 AWG - incredibly beefy considering the voice coil of the speaker!
In Episode 6, "Coneheads" I'll cover restoration of the speaker.
I don't hold with furniture that talks.
Posts: 16,483
Threads: 573
Joined: Oct 2011
City: Jackson
State, Province, Country: NJ
I kinda doubt the 16 speaker needs to be driven by a secondary of 1mm wire. But if you could fit it in.....sure.
I restuffed many a paper capacitor, and not once I saw any oxidation/corrosion inside. So I do not think this is the problem. I understand, the chemical quality of paper that was impregnated with oil somehow changes over time, and I think it is irreversible, even if it looks like it's been restored. But innards always looked shiny and nice.
People who do not drink, do not smoke, do not eat red meat will one day feel really stupid lying there and dying from nothing.
Posts: 1,378
Threads: 45
Joined: Nov 2017
City: Menlo Park
State, Province, Country: CA
You are right about the wire - but that is what came off when I unwound it - it's huge!
Interesting discussion about caps BTW. 
I don't hold with furniture that talks.
Users browsing this thread: 2 Guest(s)
|
|
Recent Posts
|
|
Need Help to ID this radio 11 tube Philco
|
| Yes the 16B as morzh pointed out. Specifically its the January 1935 model version of the 16B. There are a couple earli...klondike98 — 11:51 PM |
|
48-482 rear panel help
|
| Welcome to the Phorum, keithchip! How far you take a radio on cabinet restoration is a matter of personal preference. ...GarySP — 11:28 PM |
|
48-482 rear panel help
|
| I've recently finished the internal restoration of a locally purchased Philco 48-482. The cabinet is in ok shape except ...keithchip — 10:28 PM |
|
Need Help to ID this radio 11 tube Philco
|
| Welcome to the Phorum, Ken! Lots of help here for all of your restoration questions. Take care and BE HEALTHY! - Gar...GarySP — 07:59 PM |
|
Need Help to ID this radio 11 tube Philco
|
| Thank you.
I went to your online library and found 2 schematics.
I will download and compare to components!Ken D. — 06:31 PM |
|
Need Help to ID this radio 11 tube Philco
|
| It is a 16B tombstone.morzh — 06:13 PM |
|
Zenith H725
|
| David - sorry, I reread your post and finally saw THD - now the % figures make sense. Thanks for explaining.
The PSU...EdHolland — 06:06 PM |
|
Need Help to ID this radio 11 tube Philco
|
| Hi Everyone,
New member but have been reading this for awhile for tips!
Vaccum tubes were before my time so bear with ...Ken D. — 06:03 PM |
|
My Philco 37-116 Restore
|
| Thank you MrFixR55, I appreciate your comments very much. I do not detect much hum if any so I will be staying with the ...dconant — 05:15 PM |
|
My Philco 37-116 Restore
|
| Hi DConant
Yes, you can replace chokes with resistors. You do stand the risk of increased hum. the solution is to inc...MrFixr55 — 04:23 PM |
|
Who's Online
|
| There are currently no members online. |

|
 
|


![[-] [-]](https://philcoradio.com/phorum/images/bootbb/collapse.png)


