40-155T Add Aux Input Questions
Posts: 6
Threads: 2
Joined: Jun 2021
City: Columbia
State, Province, Country: SC
Hello everyone,
Back during the pandemic, I purchased a 40-155T with the intent to restore. I was in over my head, so I ended up paying a local radio enthusiast to restore it. I build a little AM xmitter to listen to my music, but it has since died.
I've got a few AA5 restorations under my belt now, and I have added aux input to one of them. This Philco sounds better than all of them, and I'd like to add an input to this one. I've read a number of threads about this on this forum, and had a few questions.
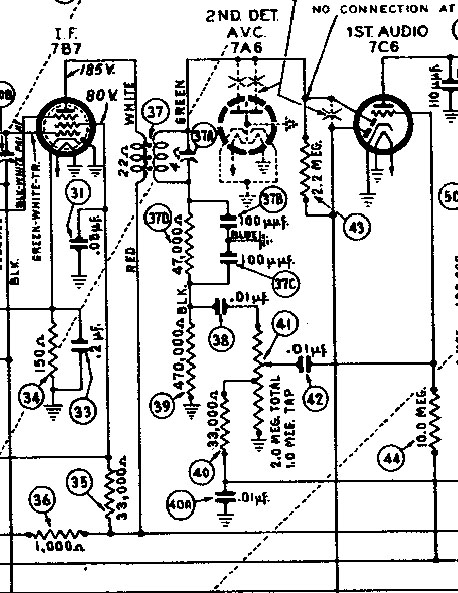
Here's the volume area of my schematic:

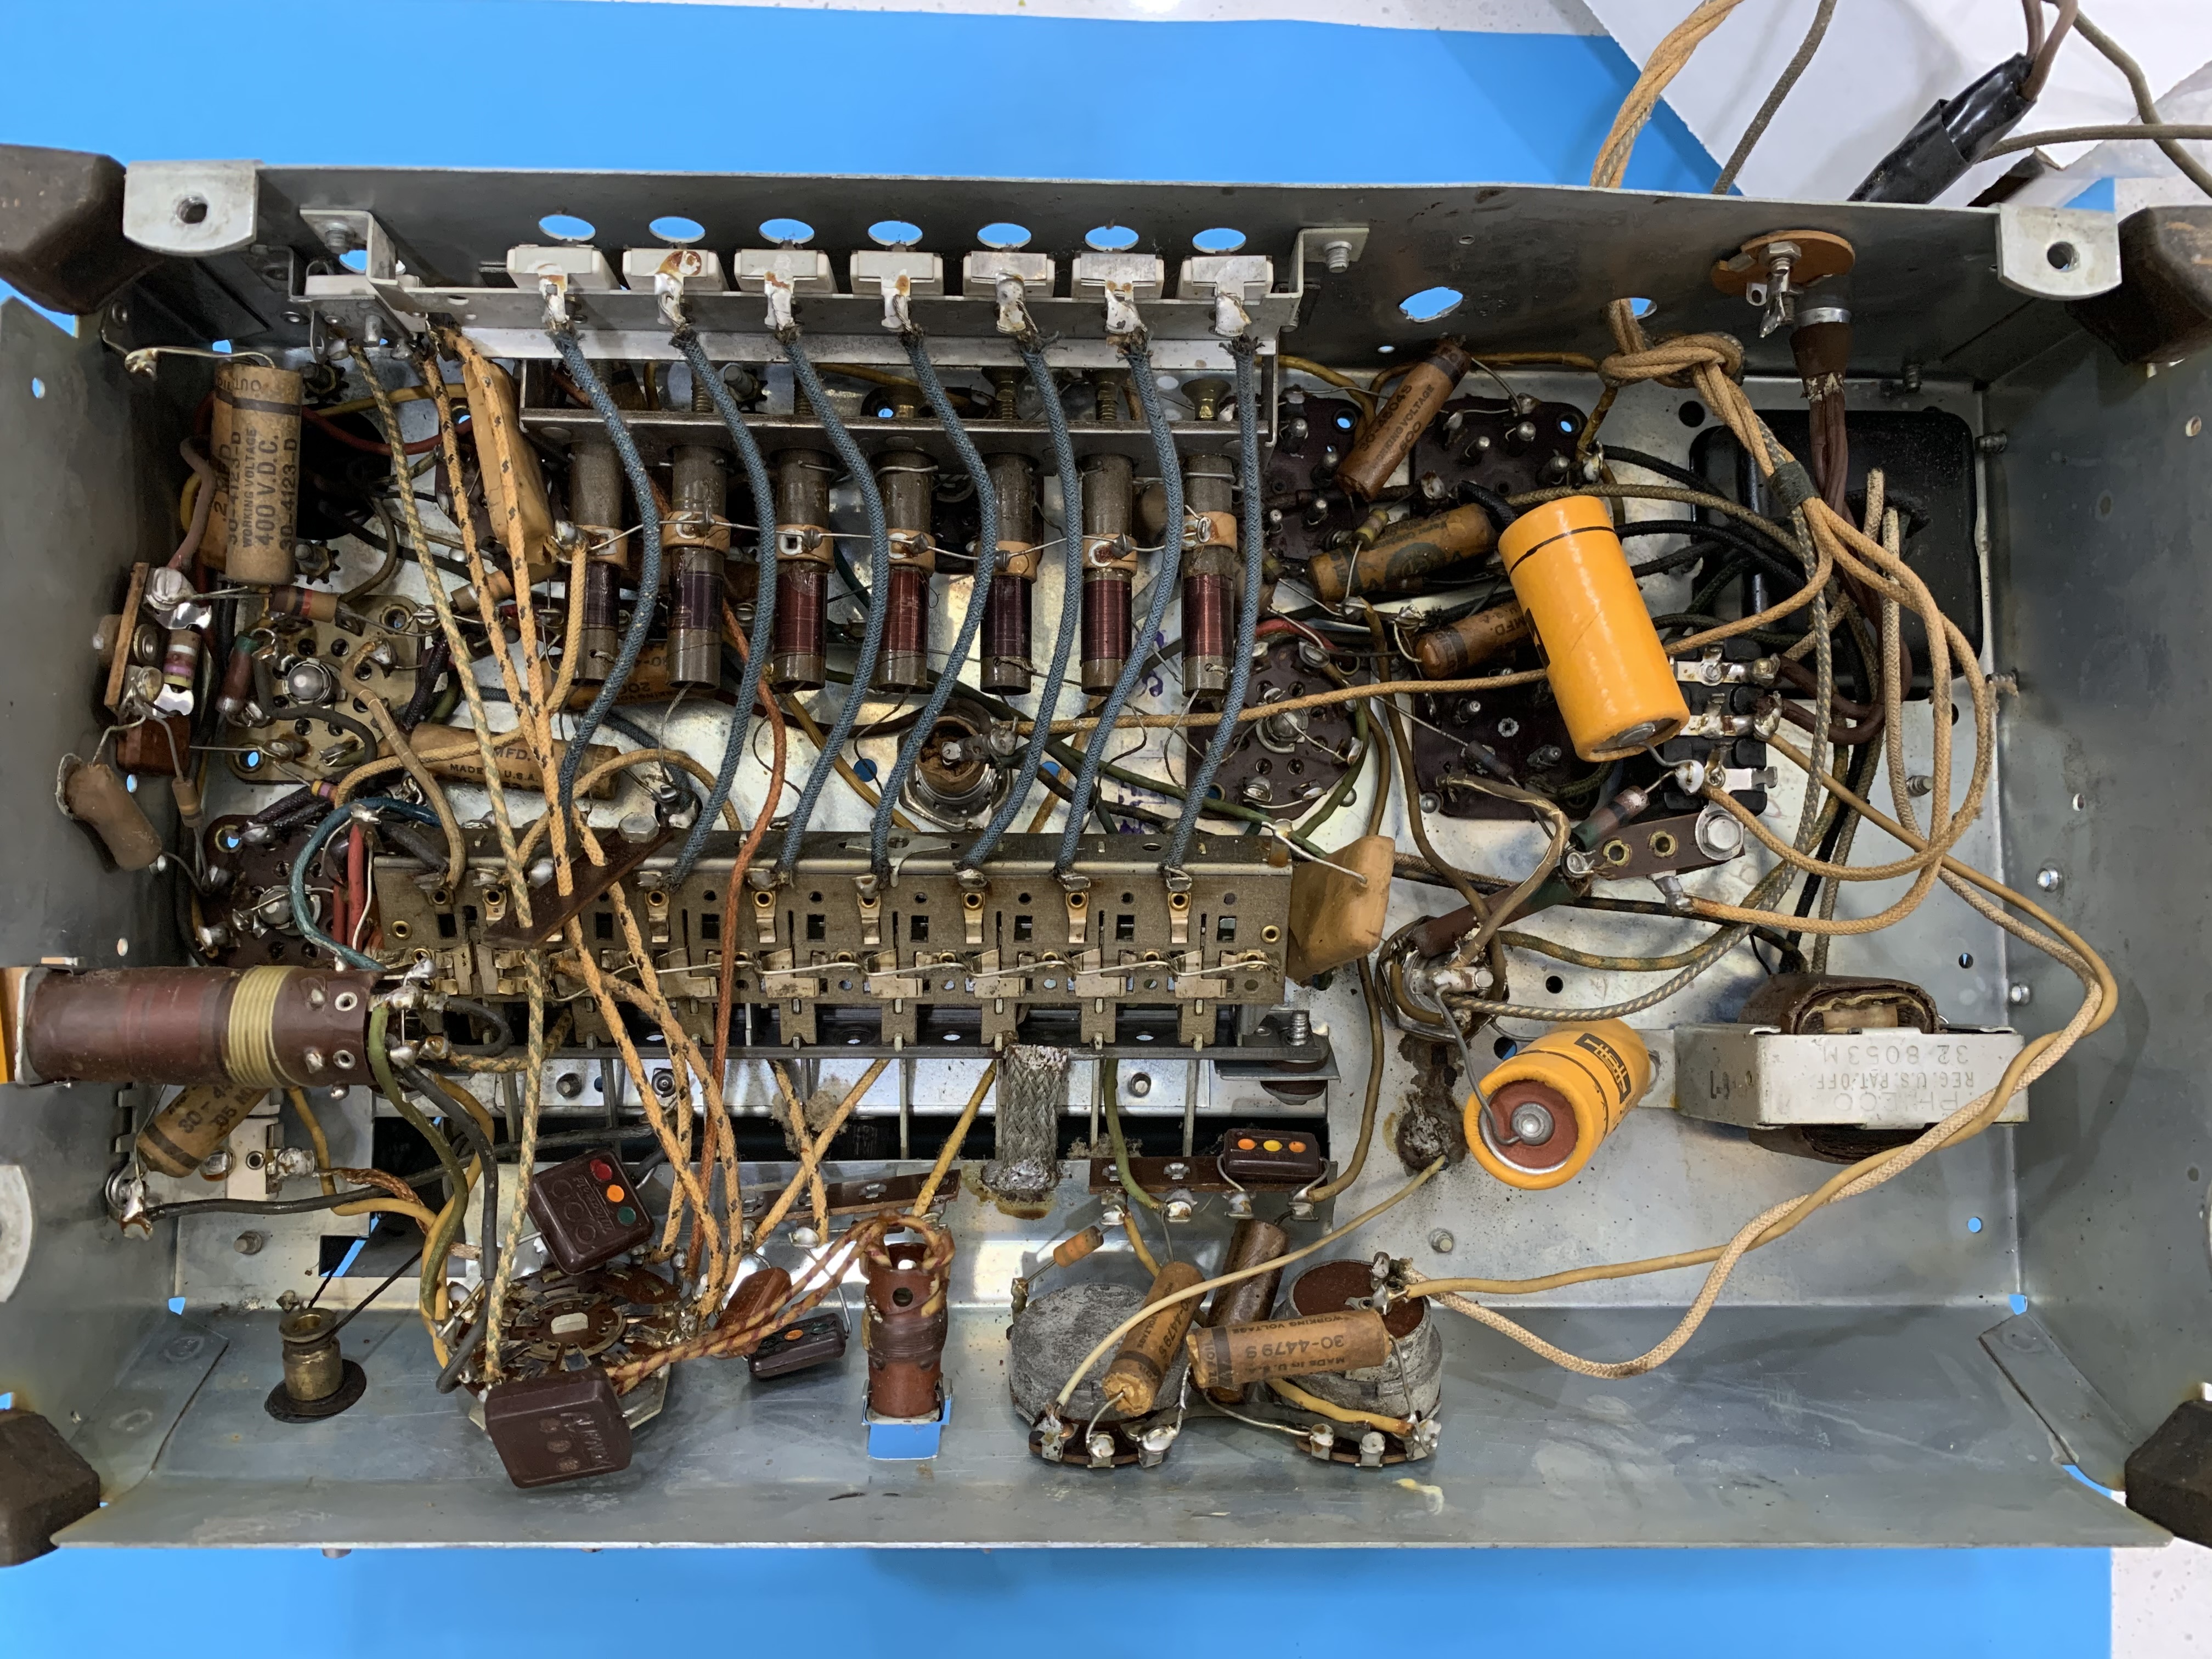
Here's the underside of the chassis prior to the enthusiast's restoration:

So, here are my questions:
- The restorer noted one of the pushbutton switches was bad. Is there any way to use That as the switch to stop the radio signal while using the input? Seems like an elegant solution.
- If that's not an option, this radio has the aircraft and police band -- is that an option to disconnect that band, and use that as the "switch" ?
- If those aren't options, where should I put the switch?
- The aux input I installed on the AA5 wired into the top and the bottom of my volume pot. This volume pot has an additional leg (see chassis photo). Anything I need to differently?
- This youtuber restored a 39-30, and states you don't need a switch on a transformer set? Is this right? Do I even need a switch at all?
- [Video: https://youtu.be/DRFx2QOy4MI?t=845]
Thanks for any advice and help!
David
Posts: 1,114
Threads: 14
Joined: Feb 2013
City: Irvington, NY
I don't know why it would make any difference if the radio was AC/DC or transformer powered as far as the switch is concerned. Its only purpose would be to mute the radio audio and replace it with the external source.
In any case its not a good idea to connect ANY external input to an AC/DC hot chassis set. You are connecting the external source to one side of the AC line. Definitely not a good idea and a real shock hazard.
Regarding your 40-155, its a transformer set so an external input not a problem. I would connect across the top and bottom of the volume control and set the radio to a band with no received signals. If you want to listen to radio, just disconnect the external source to prevent loading down the radio audio by the other source.
Posts: 6
Threads: 2
Joined: Jun 2021
City: Columbia
State, Province, Country: SC
Greetings -
I may have answered some of my own questions. The Bandswitch looks more complicated than I want to monkey with. I do still wonder if the bad pushbutton is an option.
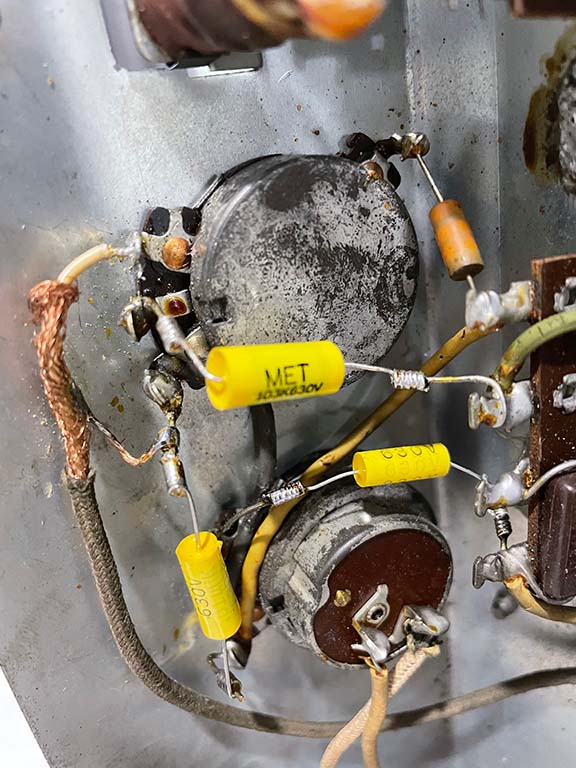
Also, I inspected the restored volume control, and noticed something odd - the wired connected to the top of the pot appears to have the shielding connected to the bottom of the pot. When I got this radio, it wasn't operable, and it looked like someone was trying to add a phono input, and gave up, so the original posts' pic may show a miswired solution.
Can anyone tell me why the wire is connected the way it is? Why would the shielding be connected?
Thanks!

Posts: 1,114
Threads: 14
Joined: Feb 2013
City: Irvington, NY
The shield is grounded to the low end of the volume pot which is correct. You want the shield connected to ground to prevent hum pickup. What does the other end of the shielded cable connect to?
(This post was last modified: 03-18-2022, 03:59 PM by Mondial.)
Posts: 6
Threads: 2
Joined: Jun 2021
City: Columbia
State, Province, Country: SC
Greetings,
I followed it back to a terminal strip underneath the pushbutton coils. where it connects with a capacitor and some other wires. I know that's no help at all for you to try and help me.
When I push the bad pushbutton, and turn the band selector to the aircraft/police band, it's very quiet, and my music sounds good jumpered in to the volume. I think I'll solder it in, and call it a win.
I think I'll settle for that, as I'm afraid I'll mess up something if I install a switch somewhere.
Posts: 1,218
Threads: 11
Joined: Jul 2020
City: Greenlawn
State, Province, Country: NY
Hi Tgr131,
First off, It looks like your enthusiast friend did rather nice work. I like the coil on the end of the new cap. Looks like it would act as a "socket", holding it in place. This technique would minimize heating existing joints.
Your technique would work. In fact, my RCA 14BT1 battery "farm" Set (1.5 / 90V Batteries) had the phono jack installed by RCA in the exact manner.
Better fidelity can be obtained by breaking into the audio circuit by installing a SPDT switch as follows:
Break the connection between C38 (the input to the Audio Amp) and the junction between R39 and R37D (the output of the Detector). Connect the common pole of the SPDT Switch to C38. Connect one switchable leg to the junction of R37D and R39. Connect the other leg to the Audio Jack that you are using. Use shielded cable if necessary but ground the shielded cable between the switch, detector output and audio amp input at only 1 point to prevent ground loops. If the audio jack is not grounded to the chassis, connect the ground terminal to the shielded cable and ground at the other end of the shield. I will try to attach drawings.
Many Radios of this vintage had this feature as several manufacturers (RCA in particular) offered "Phono Adaptors" for radios. These Phonos had no Audio Amplifiers, as the Radio was to be used for this. The proposed TV sets between 1939 and the end of consumer electronic production due to WWII also used the radio as an audio amplifier. RCA sold a kit (Type 240X1)to add the above switch to the back of the cabinet. All of this legitimizes this modification, assuming this is done with period parts.
My Philco 41-255 did something different. they advertised "FM and TV sound the Wireless Way" Ther is a pushbutton on the presets for "TV FM Phono" I do not know the frequencies used, but each of these required a built in "Wireless Oscillator".
Direct connection always produces better sound than using a transmitter, no matter how good the transmitter is.
Best Regards,
John, MrFixr55
"Do Justly, love Mercy and walk humbly with your God"- Micah 6:8
"Let us begin to do good"- St. Francis
Best Regards,
MrFixr55
Posts: 6
Threads: 2
Joined: Jun 2021
City: Columbia
State, Province, Country: SC
John,
Thanks for the advice!
I was admiring my friends work last night! A lot to learn from. Puts my solder joints to shame - I need to go practice. 
David
Posts: 6
Threads: 2
Joined: Jun 2021
City: Columbia
State, Province, Country: SC
John -
So this may be more of a "learning exercise" or thought experiment at this point, as the junction is under the coil assemblies for the pushbuttons, and I keep looking at my friends nice work and not wanting to bungle it. I do want to learn, and understand the process. I may yet give it a go.
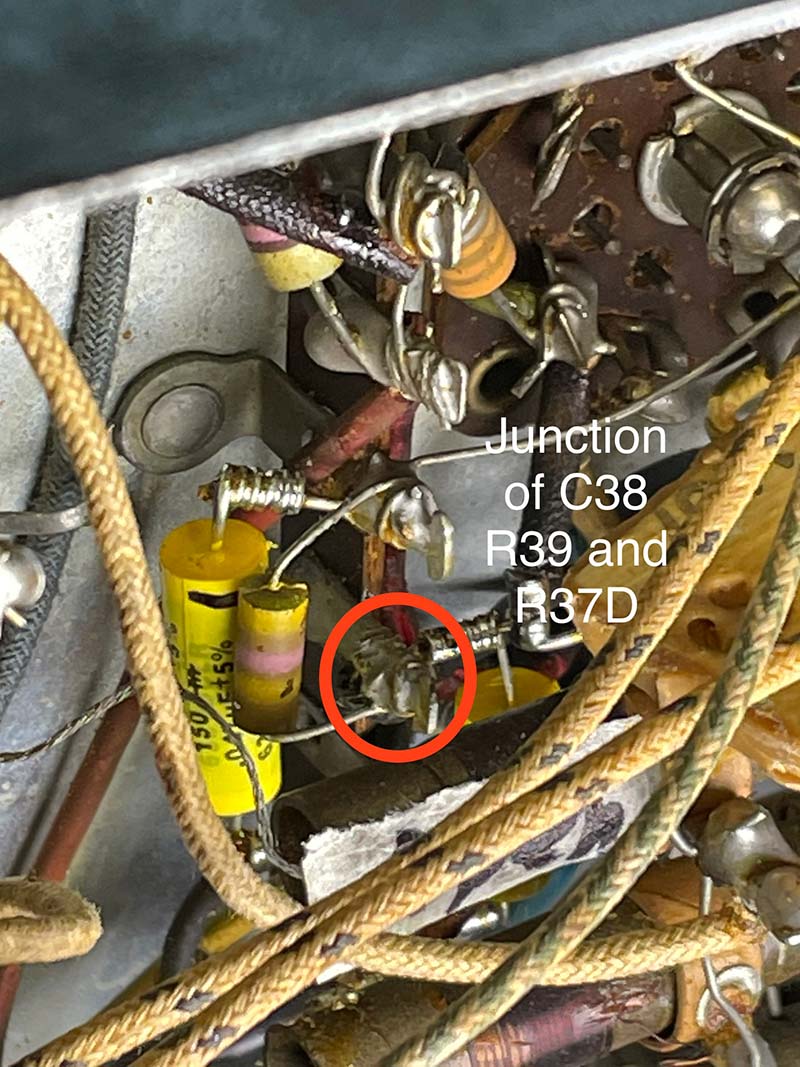
I believe I've found the junction (see attached photo).
R39 is on the left. C38 is on the bottom right, barely visible. The other end connects to a different terminal lug, which connects to the wire that leads to the top of the volume pot. (this was the wire in the previous post that I "didn't know where it went  )
What confused me was R37D, but I think I understand now. I was looking for a 47k resistor, but it appear that's inside of the 2nd IF assy, and the black wire is actually what I should be looking for. It's connected to the Junction as well. Do I have that right?

The other question I have is about "shielded wire". I was planning to use an off the shelf aux cable, with L/R tied together through 100 ohm resistors, and possibly another 500k resistor and a .02uf cap (tied to top of pot) , and the ground wire tied to bottom.
Clipping this in with test leads, this generally works well for the aux audio, but decreases the volume for the radio stations and introduces hum if the jack is not plugged into a source. I assume I've introduced a "ground loop" that you mentioned, but I don't quite understand the concept yet, or how to look for them and solve them.
Thanks for your patience and sharing your expertise. 
David
Users browsing this thread: 1 Guest(s)
|
|
Recent Posts
|
|
Need Help to ID this radio 11 tube Philco
|
| It is a 16B tombstone.morzh — 06:13 PM |
|
Zenith H725
|
| David - sorry, I reread your post and finally saw THD - now the % figures make sense. Thanks for explaining.
The PSU...EdHolland — 06:06 PM |
|
Need Help to ID this radio 11 tube Philco
|
| Hi Everyone,
New member but have been reading this for awhile for tips!
Vaccum tubes were before my time so bear with ...Ken D. — 06:03 PM |
|
My Philco 37-116 Restore
|
| Thank you MrFixR55, I appreciate your comments very much. I do not detect much hum if any so I will be staying with the ...dconant — 05:15 PM |
|
My Philco 37-116 Restore
|
| Hi DConant
Yes, you can replace chokes with resistors. You do stand the risk of increased hum. the solution is to inc...MrFixr55 — 04:23 PM |
|
Zenith H725
|
| 1.7-3.9 %, a modified Sine wave inverter is around 25%. Most generators from big box stores run 10% at a 50% load. What ...David — 04:06 PM |
|
My Philco 37-116 Restore
|
| I am having a heck of a time doing the alignment on the AM band. I can't seem to dial in the 1500 KC oscillator. I can h...dconant — 03:35 PM |
|
Zenith H725
|
| David - I think I understand but what units are you discussing (Low of 1.7, high of 3.9)?
Budget constraints for Ham ...EdHolland — 01:43 PM |
|
My Philco 37-116 Restore
|
| You're doing great.
I wish I could be more involved, but my mind is right now preoccupied with the reason I am here in ...morzh — 12:21 PM |
|
My Philco 37-116 Restore
|
| Hope you guys are still with me.
I have moved on to the alignment. I completed the IF alignment which was pretty muc...dconant — 10:47 AM |
|
Who's Online
|
There are currently 728 online users. [Complete List]
» 1 Member(s) | 727 Guest(s)
|
|
|

|
 
|


![[-] [-]](https://philcoradio.com/phorum/images/bootbb/collapse.png)


