


Welcome Guest! Be sure you know and follow the Phorum Rules before posting. Thank you and Enjoy! (January 12, 2025) x

Thread Closed

38-09 Electrolytic question
#1

https://philcoradio.com/library/download...l.%202.pdf

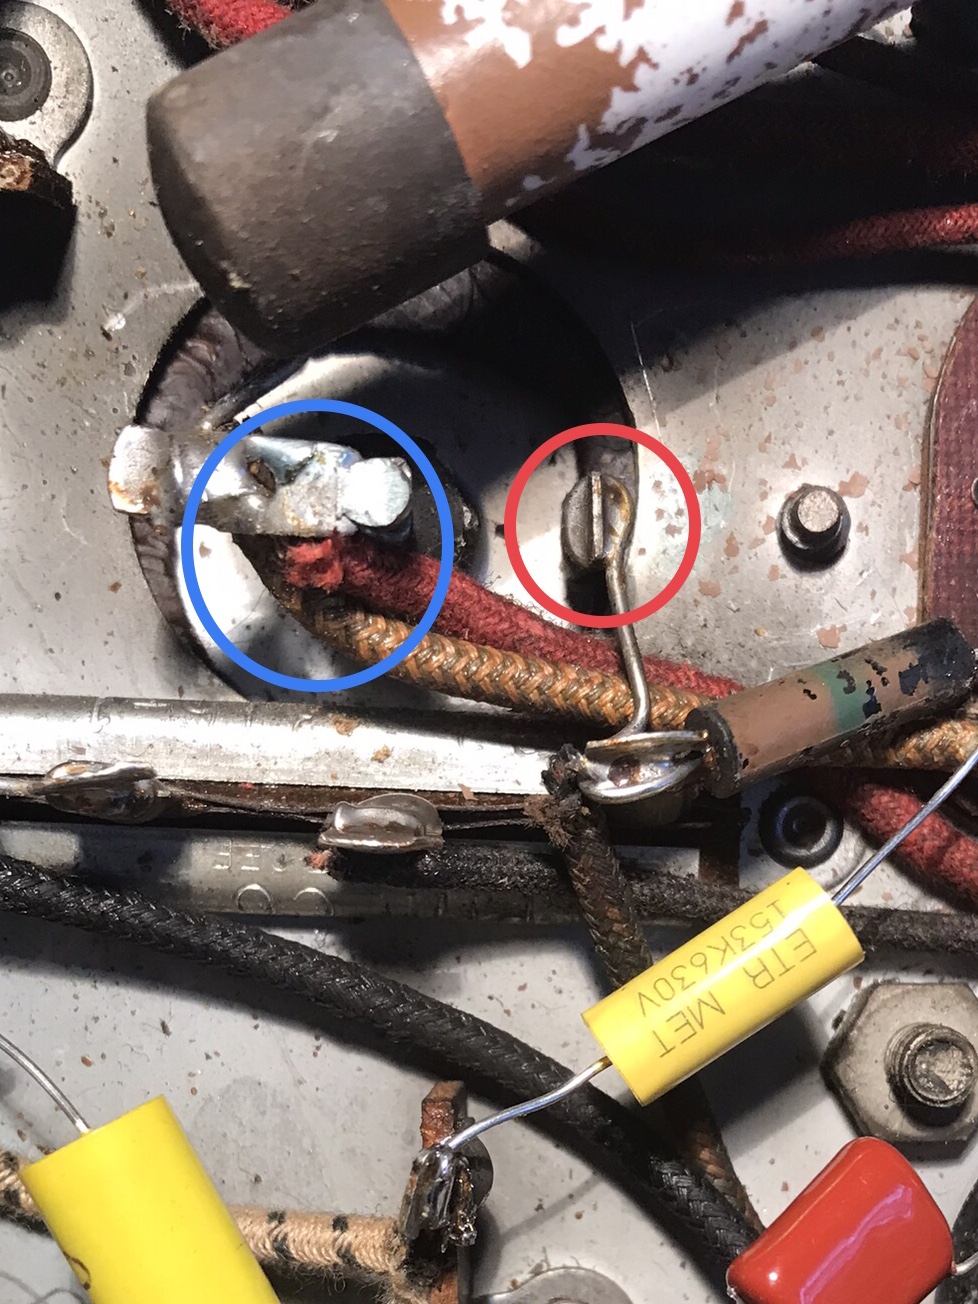
I’m working on a Philco 38-09 and I have a question regarding one of the electrolytic caps, part #45. The enclosed photo showing the blue circle is the 25 mfd cap with two wires attached to it. The two-tone yellow/green wire goes to the field coil and the red goes to Pin 6 of the 5Y4 tube where it is connected with a black wire that goes to the power transformer. I’m assuming that is my + connection for my replacement cap and the red circle is my - connection.

I’m still new to this hobby and I hoped someone could confirm whether I’m correct and enlighten me as to the purpose of why this cap is connected to the 5Y4 tube and not directly into the power transformer.     

#2

The one going to the rectifier tube's filament, field coil and transformer - PLUS
The other one is minus.

People who do not drink, do not smoke, do not eat red meat will one day feel really stupid lying there and dying from nothing.
#3

Red circle is the - side and blue the +. You may want change the 38-09 to 38-9 it's less confusing.

When my pals were reading comic books
I was down in the basement in my dad's
workshop. Perusing his Sam's Photofoacts
Vol 1-50 admiring the old set and trying to
figure out what all those squiggly meant.
Circa 1966
Now I think I've got it!

Terry
#4

I can see a Candohm...

People who do not drink, do not smoke, do not eat red meat will one day feel really stupid lying there and dying from nothing.
#5

Thanks Morzh and Terry.
#6

Hi Hamilton, the answer to your question regarding 5Y4 pin 6 is pin 6 is an unused pin so is being used as a termination point. You will see this often especially for B+ or B-.
#7

Perfect thanks Rod. Appreciate the explanation.


Users browsing this thread: 1 Guest(s)
[-]
Recent Posts
54C Complete Teardown/Rebuild
Hello Roy, here is this one sincerely Richardradiorich — 12:45 AM
54C Complete Teardown/Rebuild
Richard, Had grabbed it already but thank you just the same.  I find myself wanting to find some way to block out the...glyphmon — 12:03 AM
54C Complete Teardown/Rebuild
Hello roy, here is a link to the schematic . Sincerely Richardradiorich — 11:54 PM
54C Complete Teardown/Rebuild
Richard, The Silvertone 2014 also is a transformerless set, so I am incorporating a 1:1 600 ohm audio isolation transfo...glyphmon — 11:37 PM
Preliminary work on wife's Silvertone 2014
Did an alignment today which was interesting.  IF alignment went great, almost all was already spot-on.  Adjusting on th...glyphmon — 11:35 PM
54C Complete Teardown/Rebuild
The main problem with adding a Bluetooth input is that this set lacks a traditional power transformer to isolate it from...radiorich — 11:19 PM
54C Cabinet Refinish
I started stripping this cabinet before it got super chilly out because I knew I wasn't going to be able to work on ...glyphmon — 11:18 PM
54C Complete Teardown/Rebuild
While I'm waiting to wrap up the final steps on my wife's Silvertone 2014, I started disassembly on the next project.  O...glyphmon — 11:07 PM
Preliminary work on wife's Silvertone 2014
Hello roy, that great news glad it worked out for you !! Sincerely Richardradiorich — 10:50 PM
Preliminary work on wife's Silvertone 2014
Safety caps arrived today.  Soldered one in and had a successful first power-up.  No magic smoke escaped and it tunes in...glyphmon — 09:53 PM

[-]
Who's Online
There are currently 1720 online users. [Complete List]
» 1 Member(s) | 1719 Guest(s)
Avatar

>