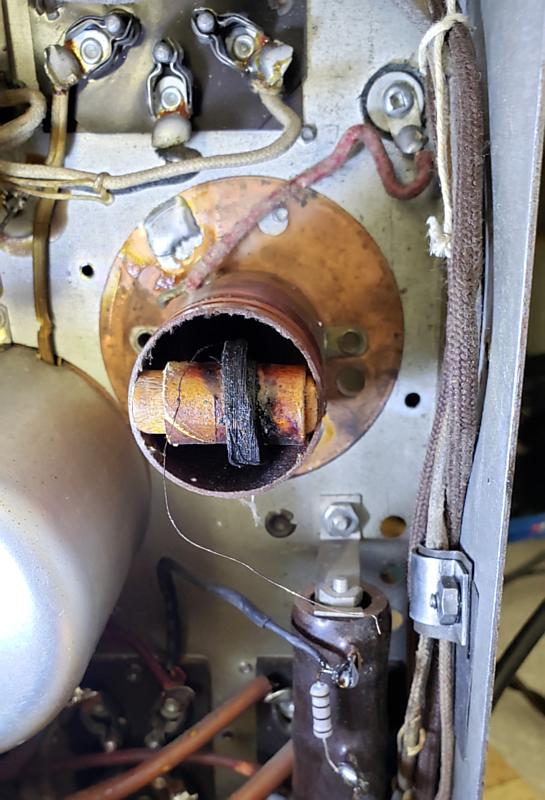
After testing, the receiver turned on. But it didn't work right away. Testing all voltages revealed no abnormalities. The audio amplifier worked. Connecting the antenna (as if with a finger ) directly to the grid of the first amplifier allowed radio stations to be received. Further testing revealed an open circuit in the matching coil of the first RF circuit.
I had to remove the shield, which required drilling out the rivets. And yes, the coil was broken. Judging by its scorched appearance, this was caused by a lightning strike on the antenna.
But the open circuit was found and repaired. After that, the receiver worked quite reliably. To increase sensitivity, it was necessary to adjust the tuning capacitors of the RF coils.
In our opinion, the receiver doesn't work very well; a lack of gain in the audio path is clearly noticeable. Indeed, the very insensitive push-pull triode output stage is trying to operate directly from the grid detector. There is no additional gain stage. Therefore, the final volume was quite mediocre.
And yes, the aforementioned Philco-20A, whose circuit is largely identical, performs much better. At least the sound level is impeccable. This is precisely because the audio circuit includes an additional phaseinvertor driver after the detector.
If you want to work, lie down and sleep, and everything will pass.
(This post was last modified: 12-05-2025, 01:23 PM by Vlad95.)
This is what the chassis looks like after restoration.
Now it's time to finish assembling the cabinet. Work has already begun, all the defects have been repaired and eliminated. The finishing materials just arrived, so the project is nearing completion.
If you want to work, lie down and sleep, and everything will pass.
So, this grandfather of radio is completely finished inside. It's time to get his clothes done.
First, here's what the cabinet looked like before restoration.
If you want to work, lie down and sleep, and everything will pass.
First, all body defects needed to be repaired. Using a medical syringe, we repaired the plywood delaminations, reglued all joints, and glued back any loose decorative parts.
Unfortunately, complete authenticity is impossible here, using bone glue, as in the original, is technologically difficult and unreliable. Therefore, regular modern carpenter wood glue was used.
If you want to work, lie down and sleep, and everything will pass.
The case is completely glued together. The damage to the veneer on the front panel has been repaired.
Now the last step before final finishing is puttying and final sanding.
If you want to work, lie down and sleep, and everything will pass.
The project is nearing completion.
Replacing the protective grille. Precise placement of the grille is crucial to ensure the correct texture lines and even tension.
To achieve this, the grille was pre-stretched and pinned to a foam board. The speaker board was glued in place with wood glue.
After the glue dried, the grille was further stapled and trimmed.
All parts are ready for the final step—assembling the chassis and speaker into the cabinet.
If you want to work, lie down and sleep, and everything will pass.
(This post was last modified: 01-07-2026, 09:28 PM by Vlad95.)




 ) directly to the grid of the first amplifier allowed radio stations to be received. Further testing revealed an open circuit in the matching coil of the first RF circuit.