Posts: 5,654
Threads: 56
Joined: Sep 2008
City: Sandwick, BC, CA
Bob;
Did you find some figured walnut for the top layer to mimic the original? I'm thinking that if one could find one of those router plate attachments for a Dremmel that would work, with the right sort of bit, preferably a trim bit with a bearing to follow the side of the cutouts. Of course cutting them out by hand, followed by a file, emory boards, etc. works too, but you have to be carful not to file too much, and keep the file parallel to the cutouts.
Regards
Arran
Posts: 5,584
Threads: 291
Joined: Nov 2012
City: Wilsonville
State, Province, Country: OR
What I found is not quite like the original but does have a grain pattern that has a little curl around where the grill cut out is.
I did a search for a Dremmel bit like that but did not find one. I do have a router and could get a trimmer bit for it but thought I’d have better control over the Dremmel tool.
Posts: 5,584
Threads: 291
Joined: Nov 2012
City: Wilsonville
State, Province, Country: OR
The chassis now has replacement 500k ohm resistors although the performance of the radio did not change in any significant way. I also put in the new 2A5 tube. That produced a slight increase in volume over the weaker tube but also not so much that you would notice unless you were looking for it. I do also have to change out the volume/on-off pot. The schematic calls for a 10k pot but the one that is in the set is a 70k pot. You do not get any real volume out of the set until you get to the very end of the turn on the shaft when the ohms values reaches the smaller values.
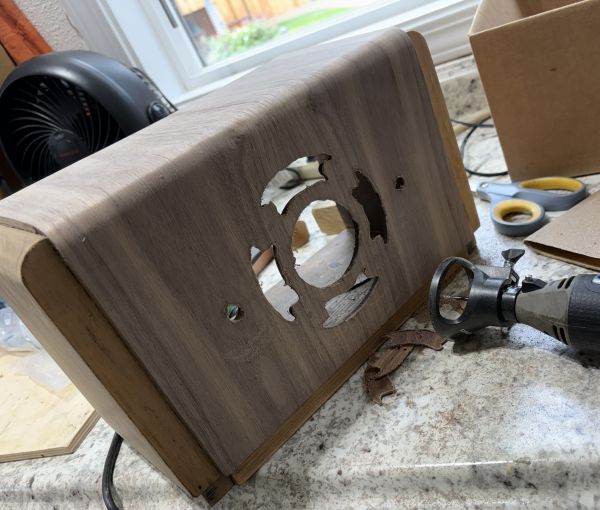
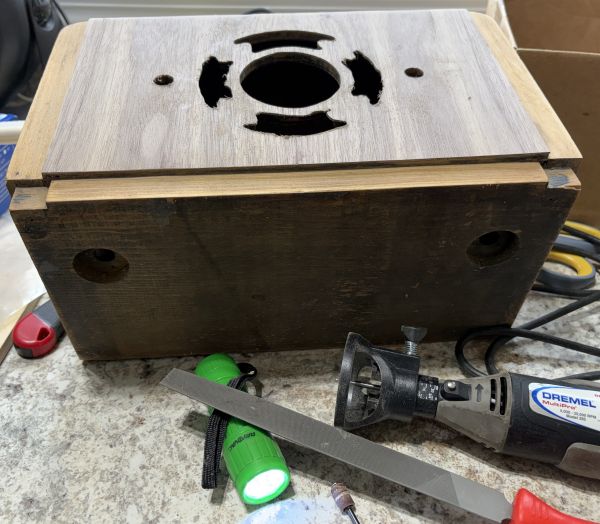
On the cabinet front, the final layer of veneer went on using the same method as the first layer. Trimming of the outer edges was accomplished with a sharp razor box cutter. Going with the grain was easy, just need to be careful not to split the wood into the section you are keeping. Against the grain, I laid a ruler along the edge line and scored the veneer and then carefully broke it off. A final trim with the razor knife and sand paper was all that was needed. Cutting out the grill opening was a different story. I first tried drilling a small hole from the inside of the cabinet where I could see the cutout. I did this in the center of the largest opening and was glad I did because the surface of the veneer on the show side split with the grain in ways that you would not want if you were near a place where it mattered. I switched to the Dremel tool with a very small cutting tool, about a millimeter wide, and the router attachement. This allowed the Dremel to be placed on the face of the cabinet keeping the tool perpendicular to the cut. I used it to rough cut a major portion of the cutouts and then using a bright flashlight, magnifying glasses and slow careful cuts I took the cutting tool right up the the edge of the existing cutout on the under layment wood. Yes, I grazed the wood occasionally but by going slow and taking small cut out you can get it very close. A file and some sandpaper finished it off. In the bottom photo the center hole and the top cutout are finished, the rest are still in rough cut form. I also tried a drum sanding bit on the Dremel. That worked OK but because of the size of it I had a hard time actually seeing how close I was to the original cutout so I opted to use the small cutting bit.
Posts: 3,189
Threads: 226
Joined: May 2008
City: Omak
State, Province, Country: WA
Hello bob,
Man I see you also love your Dremel I use mine for everything I have a router base for mine also have a set router bits too and even drill press .
Sincerely Richard
Posts: 5,584
Threads: 291
Joined: Nov 2012
City: Wilsonville
State, Province, Country: OR
Didn’t realize there was a Dremel drill press fixture. I used to have a drill press that you strapped in your corded power drill. Worked ok for things I did but wasn’t really a precision tool.
Posts: 711
Threads: 46
Joined: Sep 2009
City: Lapeer, MI
State, Province, Country: USA
Bob, This is looking good. I'm too ham-fisted for wood work. Nice job! Joe
Courage will follow when Faith takes the lead.
Posts: 5,584
Threads: 291
Joined: Nov 2012
City: Wilsonville
State, Province, Country: OR
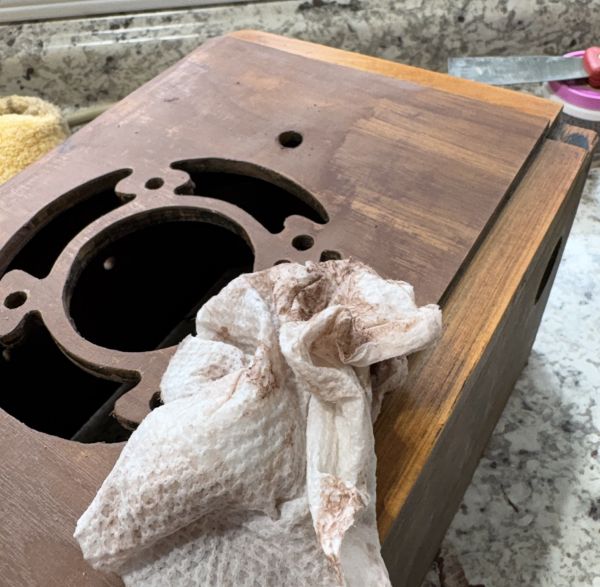
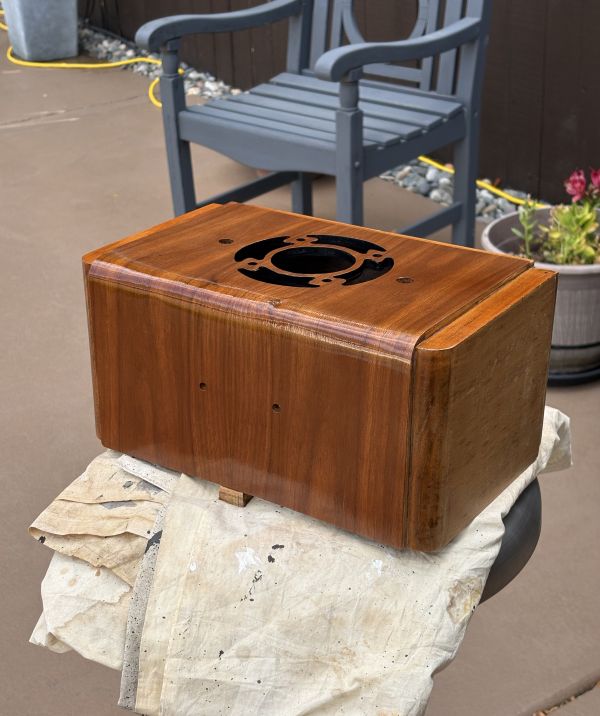
Back to work on the Gilfillan. I did some grain filling using Timbermate (walnut color). Made a slurry up with some additional water (its water soluble) and spread it around the walnut veneer. I then used a slightly damp paper towel to "sand off" the excess. It always looks like the grain is totally filled when I finish this, but it never is. After a coat of medium brown toner and several coats of clear gloss lacquer in my "spray booth" its starting to look better. I did paint the inside of the grill cut out with a flat black acrylic which will get glossy with the lacquer. Still needs a few more coats and then I'll put the black lacquer on the sides and bottom.
Posts: 5,584
Threads: 291
Joined: Nov 2012
City: Wilsonville
State, Province, Country: OR
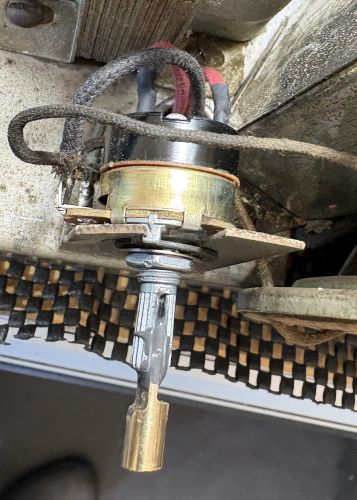
Still working on the finish of the cabinet but also got a chance to swap out the on/off/volume control pot. A 70K ohm pot was installed sometime in the past and the schematic calls for a 10k. It also was not operating very well. My only real issue was the shaft of the 10k pot I had was too short. Some 1/4" brass rod, a little filing and JB Weld and its longer, not pretty but longer. The 10k pot dramatically improves the control over volume.
Posts: 1,797
Threads: 55
Joined: Feb 2015
City: Roseville, MN
Bob,
Is there a reason you haven't put the black lacquer on first? I usually do because it's easier to mask off and then the black gets the clear coats.
Posts: 5,584
Threads: 291
Joined: Nov 2012
City: Wilsonville
State, Province, Country: OR
Good question Rod. For me, taping off the front and top was easier than trying to tape the sides on this radio because of the 1/8 in step up from the side piece to the front and top. I have gone on and added the black lacquer. I'm using Deft gloss clear and Rustoleum Black Gloss Lacquer. So far they seem compatible.
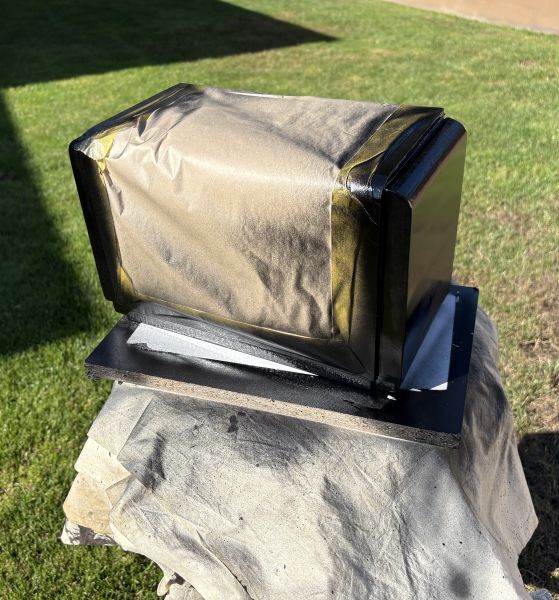
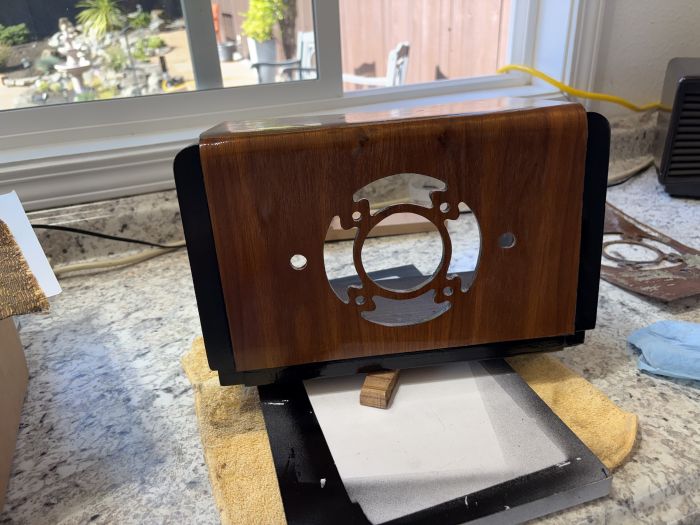
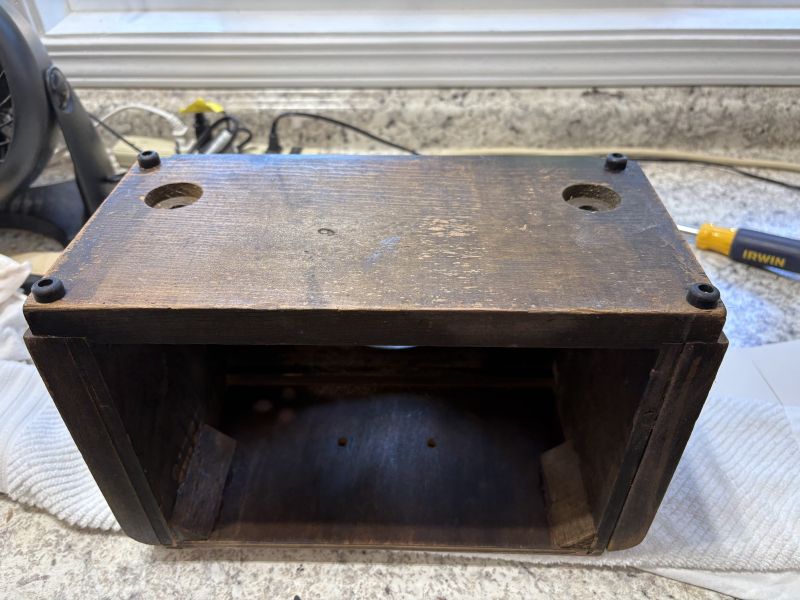
Next, I'll add a few more clear coats to everything, let it cure for a week or so and then rub out the finish to knock the gloss back a bit. The set had some rubber feet that were nailed onto it but which had deteriorated. I think these were original but can't be certain. Usually I just put a felt "stick on" at each corner but found these small rubber feet that screw on and look similar to what was there.
Posts: 1,519
Threads: 69
Joined: Nov 2012
City: Kansas city, MO.
From what that cabinet looked like when you started,
I think you have did a great job on the restoration.
Posts: 18,427
Threads: 622
Joined: Oct 2011
City: Jackson
State, Province, Country: NJ
Looks very good.
People who do not drink, do not smoke, do not eat red meat will one day feel really stupid lying there and dying from nothing.
Posts: 1,797
Threads: 55
Joined: Feb 2015
City: Roseville, MN
For those interested, I discovered some time ago that 3 coats of Extra Dark Walnut lacquer gives an almost black, woody finish. You can always stop at 2 coats.
Posts: 5,584
Threads: 291
Joined: Nov 2012
City: Wilsonville
State, Province, Country: OR
Thanks guys.
Vandyke Brown can also look almost black if you do several coats.
Posts: 1,797
Threads: 55
Joined: Feb 2015
City: Roseville, MN
But to use Vandyke Brown you must first watch 10 episodes of Bob Ross' painting class.
Users browsing this thread: 3 Guest(s)
|
|
Recent Posts
|
|
Philco 45-6365 Universal IFT Instruction Manual
|
| The Philco Parts Catalog for 1942 shows it as usable for 175 kHz, 260 kHz, and 465 kHz. The instructions will show how t...DaleHCook — 11:19 AM |
|
Stromberg Carlson 1500 Squeal
|
| Hello Rob,
I agree with you—I have one here at my house that I need to check out. It’s way over-engineered just to make...radiorich — 11:05 AM |
|
My Atwater Kent 84
|
| Well getting around to restoring my AK84. Mike was a big part in me being able to snatch this one a few years ago. I won...462ron — 10:57 AM |
|
Plug Voltages Needed For A 1943 CRV-20130 Power Supply
|
| The engine is a B&S 23 inch cast Iron holds 2 quarts of oil. The Generator is a 4 pole 1800 rpm mine was made in 195...David — 10:51 AM |
|
Philco 45-6365 Universal IFT Instruction Manual
|
| Dale: Modified topic as suggested. It is not for a specific project. I found it in a box of stuff I recently purchased...GRG — 10:34 AM |
|
Plug Voltages Needed For A 1943 CRV-20130 Power Supply
|
|
That looks a lot like an aircraft connector of some kind ...
That is a MIL-5015 style connector, used in a wide v...DaleHCook — 10:19 AM |
|
Philco P45-6365 Universal Transformer Instruction Manual
|
| I would suggest changing the topic from "P45-6365 Universal Transformer" to "45-6365 Universal IFT."...DaleHCook — 10:08 AM |
|
Stromberg Carlson 1500 Squeal
|
| And life just keeps getting more complicated. By dconant.
Dittos'Jimradio — 08:01 AM |
|
Plug Voltages Needed For A 1943 CRV-20130 Power Supply
|
| That looks a lot like an aircraft connector of some kind, even if it's a U.S.N power supply. I have a book somewhere abo...Arran — 02:56 AM |
|
Plug Voltages Needed For A 1943 CRV-20130 Power Supply
|
| hello david,
I have a similar generator in my collection that features a cast iron, single-cylinder Briggs & Stratt...radiorich — 01:00 AM |
|
Who's Online
|
There are currently 1389 online users. [Complete List]
» 1 Member(s) | 1388 Guest(s)
|
|
|

|
 
|