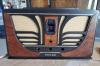
Hi MRM,
A couple of things here:
First off, you may have more than one problem with this set. This is not uncommon as you may have an issue that killed the set, then the issues that occurred during storage. You state that there is smoke coming from the output transformer (OPT). You also state that the 10K Resistor is crazy hot. Is the resistor that is hot the one labeled 12 on the schematic? More later. First:
For a 6F6, the transformer should have a primary impedance of 7000 Ohms. The following would be a better replacement:
https://www.amplifiedparts.com/products/...nder-champ
Use the *K Primary and 4 Ohm speaker connections. This should work and it's only $23.00.
The P-T291 is meant for Push Pull amps.
You state that the transformer currently installed has 4 connections on the top. This is because on these versions of Philco, the terminal board mounted on top of the transformer is not only for the transformer primary, it also connects the field coil to the radio.
There should be only 3 wires coming from the radio to the speaker. The green wire is from the plate of the 6F6 (Pin 3) to one leg of the speaker primary (the blue wire if using the Fender Champ transformer from Amplified Parts). The white wire is from the Screen of the 6F6 (Pin 4), the "+" Terminal of the 8uF cap, and other B+ Points connects to the other primary wire (the red one on the above replacement; the brown one is not used and should be taped off), and one terminal of the speaker field coil. The green / white wire connects the other terminal of the field coil to the rectifier cathode resistor #12, and the "+" terminal of the 25uF cap.
There are 4 wires coming out of the speaker field coil. The 2 wires that have about 1100 Ohms between them are the speaker field. The other 2 which have a very low resistance are known as the "hum bucking coil. These are in series with the speaker voice coil when connected to the secondary of the output transformer. If there is too much hum, reverse either the field coil primary connections or the hum bucking coil connections. The connections with the least hum are the correct ones.
Re the 10K resistor, is this the one marked 12? Did you replace the 4uF cap, "11" on the diagram? If not, do that NOW. These old caps have a tendency to short, in this case to chassis ground, dissipating 250V across the 10KOhm resistor and making the plate and screen voltages to be zero volts.
When replacing the electrolytic capacitors, remove all connections from the original caps. While it is not the best workmanship to have "flying connections" (not using a terminal when replacing the original electrolytic with one mounted under the chassis), it is much worse to leave all connections in place to the original cap and just add the new cap to the original connections (called "bridging" or paralleling a cap).
So, right now, you have 2 issues; the crackling noise and smoke with only the output tube in place, and the 10K resistor heating up. The resistor heating up could cause crackling noise but won't smoke the output transformer. a shorted 6F6 (Plate to suppressor) could smoke both the OPT and the Candohm, but you replaced that already to no avail.
So, replace the OPT, verify correct connections for the OPT, voice coil, hum bucking coil and field coil. Verify that you replaced all 3 electrolytics (11, 11A and 45) and that the Positive terminals of the old electrolytic caps are completely disconnected. Measure the junction of Cap #11 and the 10K resistor #12. This should be around 200V, maybe more. Check the plate of the 6A8 (Pin 3). This should be around 180V. Check the screen of the 6A8 (Pin 4). This should be around 100V. Any major difference is consistent with miswiring, shorted caps or bad tubes.
Hope this helps. Keep trying. You will get this!