started (at last) to refinish my 47-1230
Posts: 336
Threads: 13
Joined: Apr 2011
City: Montreal, Qc
I've had this radio for quite a while. Last summer I focused on making the amp work like a champ.
This summer, I've been pretty much busy at work, and spent vacations working on the house.
Today I removed the chassis, speaker, grill cloth and started work on my cabinet. At last.
I figured I'd post pictures of the progress...
This is before removing anything:
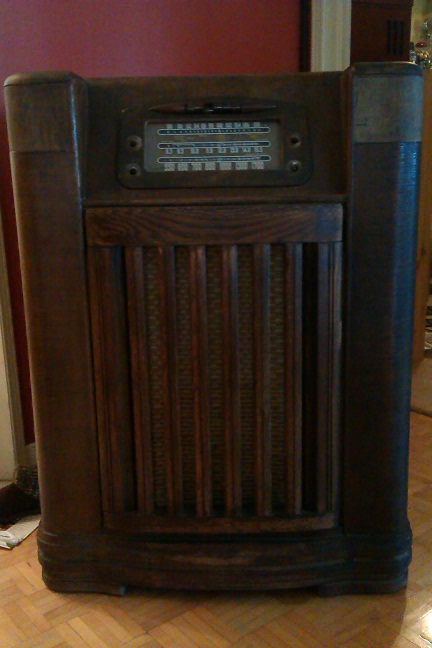
This is before starting to strip it:

I know it looks pretty good on pictures, but the finish was pretty damaged in several area; it seemed like it was badly exposed to sunlight. I think someone tried to SAND the top at some point, and to use furniture stripper on the side. I'll see how it turns out.
I started to strip with "circa 1850" with 0 steel wool - I tried it last summer on a smaller radio and was satisfied with the results, but it seems to take a lot longer than I anticipated to strip everything out.
I worked on it about 2-3 hours already. I think I spent about half my circa1850 bottle and 3/4 of my steel wool pack.
I got done was most of the top, and most of the grill area: I decided it would be a good idea to focus on the most visible areas first...
Other than patience, are there anything I should be aware of?
-Mars
(This post was last modified: 09-02-2012, 08:42 PM by Marsupial.)
Posts: 336
Threads: 13
Joined: Apr 2011
City: Montreal, Qc
I ran out of circa1850, and every stores in the area are closed for labour day. I guess I am out of luck to finish today.
Patience is generaly rewarded so I won't rush into trying something weird to finish it now.
I still had time to make some progress, which in turn leads to questions... lol.
This is the dial glass area. It is pretty dark before stripping. I am no expert woodworking. I guess I need to add toner once stripped, to recolor it?
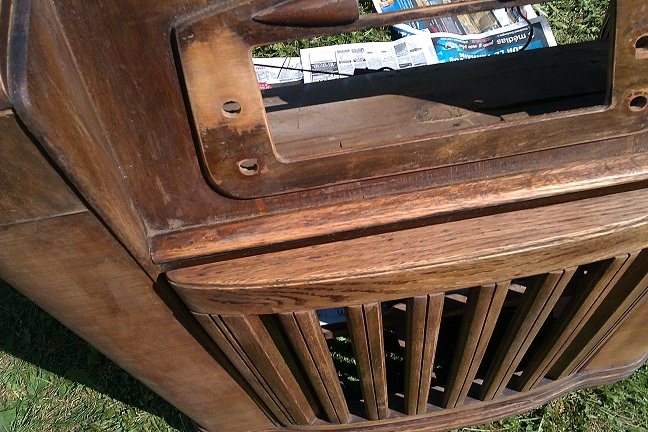
Those are the two sides of the top of the console:
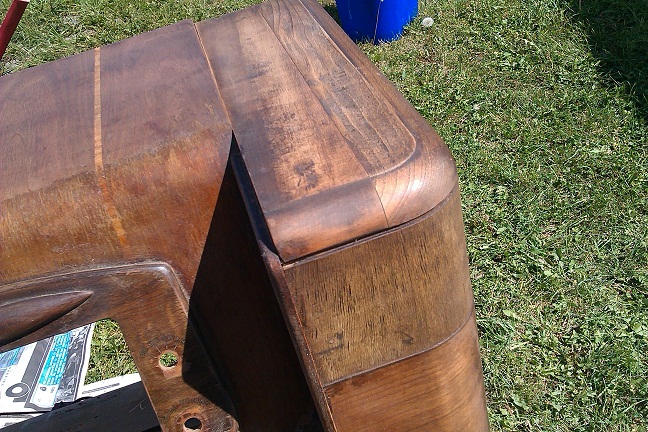
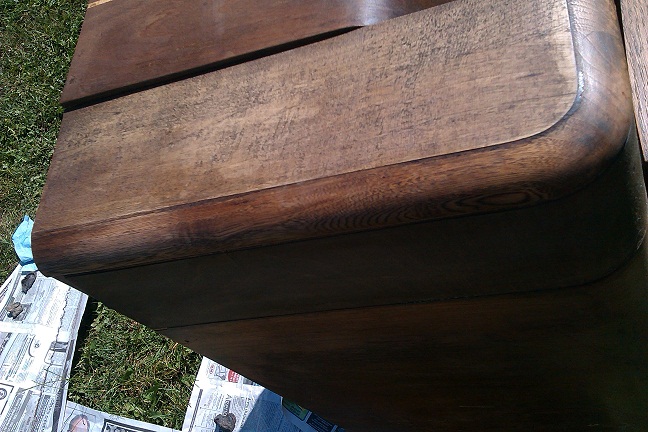
I always have had the feeling someone tried to sand this down, how can I know for sure?
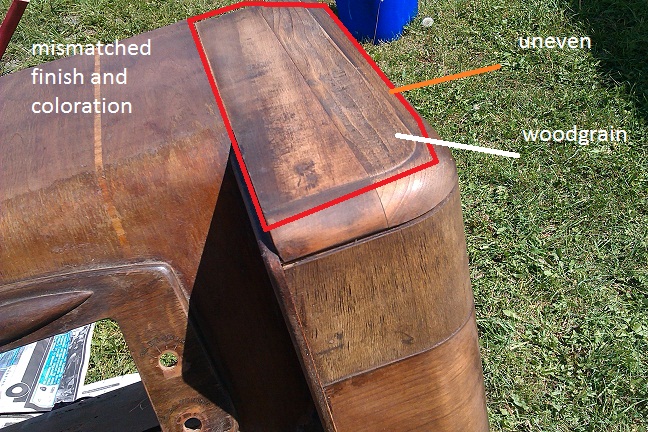
here's some indications that it might have been done - I think it was "refinished" somewhere in its 65 year history, maybe sanded and re-varnished.
As shown in this picture, there seems to be incoherent finish in that area. Also, the bevel is uneven. I barely had anything to strip out.
Should I bother about it? I am tempted to just refinish it dark and leave it as it being part of that radio's history.
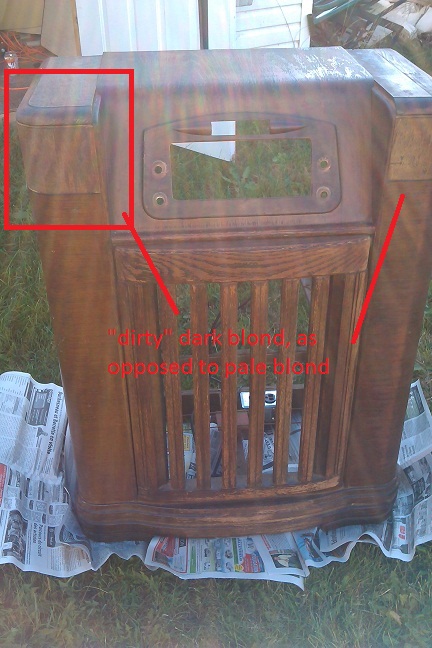
Another question: tones. I think the top, dial glass area and bottom are darker than the rest, plus there is a band that is blond/pale.
1- what colorations should I look for? How to re-dye those?
2- the "blond area" seems to have been mistreated by the years; one side is a lot darker than the other. Paint stripper didn't change anything. Is there a way to clean it?
-Mars
(This post was last modified: 09-03-2012, 01:07 PM by Marsupial.)
Posts: 4,928
Threads: 54
Joined: Sep 2008
City: Sandwick, BC, CA
Mars,
I would get some old fashioned paint and varnish remover, paint it over the entire cabinet, and let it sit for five to ten minutes so it has a chance to soak in and do it's job. Then I would scrape it off with putty knife, reapply, then scrub with a stiff brush, nylon scouring pad, or more steel wool. Then I would wash the cabinet down with lacquer thinner and steel wool.
That wooden escutcheon around the dial was finished with some sort of shading lacquer or tone spray, it looks like some cheap blond wood underneath. Perhaps the other solid wood portions of the cabinet were finished the same way like the speaker grill, maybe not the same shade though. I wonder about the shoulders on the top of this cabinet though, if it has been messed with did they once have veneer on them? You really need a photo of an original unmolested cabinet to show what was what.
Regards
Arran
Posts: 336
Threads: 13
Joined: Apr 2011
City: Montreal, Qc
I have been suggested a mixture of acetone and lacquer thinner. I know the circa1850 isn't strong enough to thin down the lacquer on the radio, so something more robust will need to be used, or a lot of patience... but I ran out of circa1850 so I don't mind buying something else if I can get "the good product"...
If I look at this old ebay auction for a 47-1230
http://www.ebay.ca/itm/1947-Philco-Tube-...0809623053
we clearly see there was veneer, its even chipped. What's the best course of action at this point? get new veneer, cut it to size and glue it, then toner and lacquer?
What would I need as far as veneer goes?
and as far as toner? I never used toner before.
The wood escutcheon was dark, what seems to be the same dark as the foot area - different material I hope someone with better knowledge of those models would chime in. One thing for sure, it was very dark. How do I refinish that? Toner?
People on the forums all suggested to refinish the radio, but now that I am at it, I realize I know nothing about refinishing.
-Mars
(This post was last modified: 09-03-2012, 11:50 PM by Marsupial.)
Posts: 13,776
Threads: 580
Joined: Sep 2005
City: Ferdinand
State, Province, Country: Indiana
Yes, toning lacquer is the only way you will be able to duplicate the factory colors.
I would suggest Perfect Brown on the foot, trim areas, grillebars and escutcheon; Medium Walnut everywhere else.
You would spray Medium Walnut over the entire cabinet, then mask off the areas you want to leave Medium Walnut, leaving the trim exposed - and then spray a coat or two of Perfect Brown on the trim.
Perfect Brown is a color of Mohawk Ultra Classic toning lacquer, while Medium Walnut is Mohawk Tone Finish.
I do not know if Mohawk products are available in Canada, however.
--
Ron Ramirez
Ferdinand IN
Posts: 336
Threads: 13
Joined: Apr 2011
City: Montreal, Qc
Are you sure the grillbars were that dark? They seemed pretty much similar to most of the cabinet. What are the trims you are talking about? I am uncertain to follow.
What would you do to the blond bands? same medium walnut?
I don't think we have mohawk product, but I guess I'll be able to find similar product. Any other product you would recomment?
-Mars
Posts: 13,776
Threads: 580
Joined: Sep 2005
City: Ferdinand
State, Province, Country: Indiana
You might want to go with Medium Walnut on the grillebars, then; that would be OK.
When I refer to "trim" I mean the bottom, what you call the "foot", and the curved white wood near the top, between the top pieces and the side pieces. At the upper corners, if you will.
What you refer to the "blond areas" will look different, even under the Medium Walnut toner, since it appears to be a different type/pattern of veneer.
And don't forget Perfect Brown on the escutcheon.
Don't use a lot of Perfect Brown; just enough to get a contrast without making it too dark.
--
Ron Ramirez
Ferdinand IN
Posts: 336
Threads: 13
Joined: Apr 2011
City: Montreal, Qc
Thanks for the clarifications!
As far as the top section is involved, I think the veneer of the 2 sides had been completely removed by a prior owner. I guess the proper course of action would be to put new veneer?
How would I go about that? How do I know what type of veneer to get, and how do I manage to have the "correct" cut for it?
-Mars
Posts: 4,928
Threads: 54
Joined: Sep 2008
City: Sandwick, BC, CA
The veneer in question looks like it may be straight cut French walnut, I think, it doesn't look like quarter sawn veneer nor does it look like they bothered trying to bookmatch the grain on the right and left shoulder, which they often did. Normally they would have used two layers of veneer going over solid wood, there would be a layer of maple, beech, or poplar, on top of the solid wood with the grain of that veneer running perpendicular to the solid wood, then the finish layer of walnut veener would have it's grain running perpendicular to the underlying veneer. The biggest issue you may have with re-veneering the shoulders is that one shoulder seems to be warped or have some sort of water damage. If you were good with carpentry I could offer some suggestions on how to fix that warpage but I don't know what to suggest otherwise.
Regards
Arran
(This post was last modified: 09-04-2012, 05:04 PM by Arran.)
Posts: 336
Threads: 13
Joined: Apr 2011
City: Montreal, Qc
Should I bother putting two layers of veneer, or one layer would be ennough?
-Mars
Posts: 1,411
Threads: 71
Joined: Oct 2007
City: Linn Creek, MO
Mars, the short answer is two layers.
To start with, you have base wood or core. Then a layer of thin wood with the grain running perpendicular to the core, this layer is called the "cross banding" or simply "Banding". The purpose of the banding is to stabilize the core, to prevent warping and splitting/cracking. Finally you have the veneer.
Steve
M R Radios C M Tubes
(This post was last modified: 09-04-2012, 08:31 PM by Steve Davis.)
Posts: 336
Threads: 13
Joined: Apr 2011
City: Montreal, Qc
So, the first layer is of a different material. What do I need to look for when I get to the hardware store?
Sorry I am a total noobie at that, but thanks to you guys, I'm learning 
-Mars
Posts: 1,411
Threads: 71
Joined: Oct 2007
City: Linn Creek, MO
Mars, banding is about twice as thick as normal veneer, this is what you need http://www.constantines.com/search.aspx?...tegory=166
Steve
M R Radios C M Tubes
(This post was last modified: 09-05-2012, 12:25 PM by Steve Davis.)
Posts: 336
Threads: 13
Joined: Apr 2011
City: Montreal, Qc
Thanks Steve, I'll look about getting this locally, otherwise I guess I'll have to order online. I know they have veneer in only one of the local hardware stores.
-Mars
Posts: 336
Threads: 13
Joined: Apr 2011
City: Montreal, Qc
Before I go to the store...
to go over the toner, what kind of lacquer should I get?
Also, I have read online of aerosol toners and lacquers... are they any good?
-Mars
Users browsing this thread: 1 Guest(s)
|
|
Recent Posts
|
|
HiFi (Chifi) tube amp build - but my own design.
|
| Well, maybe - maybe not :lol: It's been an interesting project so far! Something so simple, yet so cranky. The 1st one ...TV MAN — 05:12 PM |
|
1949 Motorola 5A9M
|
| Haven't thought of Burgess batteres in a while
https://www.radionostalgia.ca/lib/Images/battery/us/burgess1D.jpgi
...Vlad95 — 03:50 PM |
|
Philco Model 16 wiring question
|
| Measure the voltages first, just in case.morzh — 02:19 PM |
|
1949 Motorola 5A9M
|
| Haven't thought of Burgess batteries in a while Mr. Fixer. Boston Edison always used Burgess in their Bright Star yellow...Paul Philco322 — 02:17 PM |
|
1949 Motorola 5A9M
|
| Thanks Sam. I'll let you know. I can probably scare some up from the local radio club.klondike98 — 02:07 PM |
|
Philco 89 Code 123 Osc Coil
|
| Hello,
I thought I would post my findings on my bad oscillator tickler coil. There were 27 turns on the outer coil b...dconant — 12:38 PM |
|
Philco Model 16 wiring question
|
| Thanks Morzh. So it appears I did wire it incorrectly and I have to switch the wires between pins 2 and 4.bobclausen — 09:24 AM |
|
Philco 46-1209 strange behavior
|
| No, it's not a problem, just during certain condition it could show up.
Yes, an internal tube short could do that too.
...morzh — 09:13 AM |
|
HiFi (Chifi) tube amp build - but my own design.
|
| You sound guys are never satisfied. :crazy: :clap:RodB — 09:10 AM |
|
HiFi (Chifi) tube amp build - but my own design.
|
| I got some new ceramic octal tube sockets installed and also tried some different coupling caps.
The results:
The go...TV MAN — 08:42 AM |
|
Who's Online
|
| There are currently no members online. |

|
 
|


![[-] [-]](https://philcoradio.com/phorum/images/bootbb/collapse.png)


