Posts: 25
Threads: 5
Joined: Jul 2013
City: Adairsville, GA
Hi All,
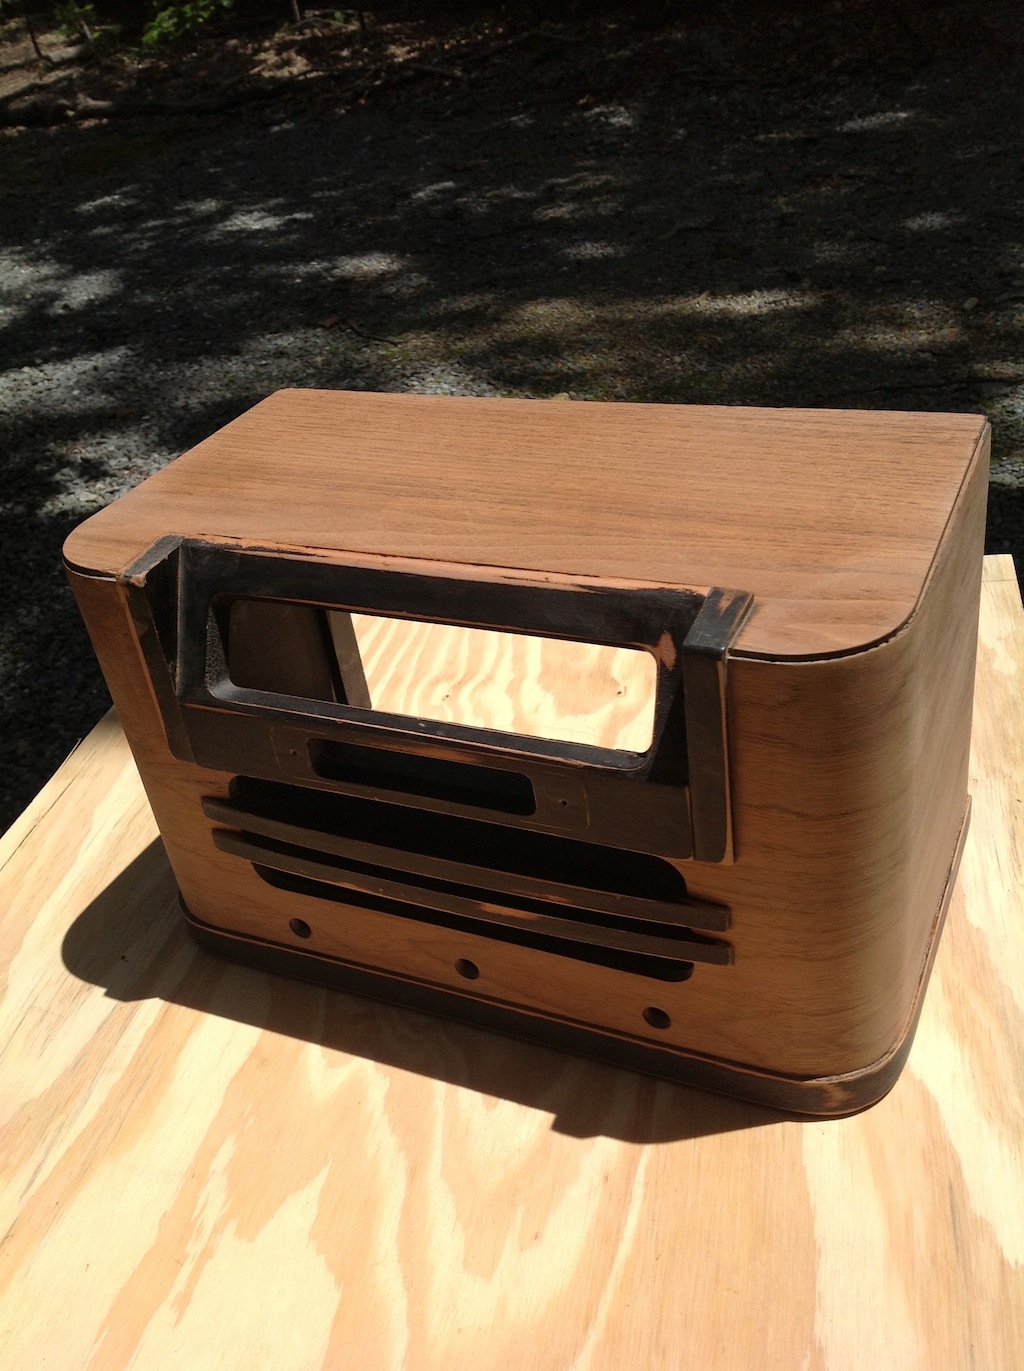
While I’m waiting on a part for my 42-327, I started on the cabinet. Lots of scratches and it looked like someone had tried to use black paint to create a faux wood grain to cover scratches. Didn’t look good. So I started sanding and it began to look like beneath was a walnut veneer – but I’m not expert on wood.
Bottom line, I just sanded the whole thing. The black trim I can just use a matte black spray, but I want to refinish the rest so it matches or comes close to original color yet shows the real wood grain. I know to use a sealer first and I want to use Mohawk toner. However, I have no idea what shade or shades to buy. So here’s my question. Does anyone know what colors or shades of Mohawk toner to use to come close to the original brown – yet let the wood grain show?
(This post was last modified: 07-16-2013, 03:27 PM by Vic Gibson.)
Posts: 13,776
Threads: 580
Joined: Sep 2005
City: Ferdinand
State, Province, Country: Indiana
Medium Walnut Tone Finish will match the original color well - and, unlike other Tone Finish colors, the Medium Walnut color isn't loaded with pigment so it won't look like paint after three coats.
But try to apply no more than two, as successive coats will make the cabinet look darker and more reddish.
If you want it to look as it did originally, use gloss instead of matte.
You will need to apply clear lacquer when done with the Medium Walnut and black. Again, gloss was the original finish.
Oh, next time, don't rely on sanding to strip a cabinet - use a chemical stripper, or a 50/50 mix of acetone and lacquer thinner. Use thick rubber gloves and do this work outdoors! The veneer on a cabinet is quite thin and it is easy to sand right through to the substrate if you aren't careful. Keep all sanding to a minimum - in fact, don't sand at all if you can keep from it.
--
Ron Ramirez
Ferdinand IN
Posts: 25
Threads: 5
Joined: Jul 2013
City: Adairsville, GA
Thanks Ron, really great advice! Great Phorum. I guess using black, I can skip anymore sanding on the trim. I hate chemicals - but then, I hate sanding as well... believe it or not, to sand I actually use an Air Trend helmut, a large fan and go outside. OK, I concede, next time acetone and lacquer thinner. Now to order some toner. PS: I better get this radio working - now I'm committed.
Vic
Posts: 5,650
Threads: 56
Joined: Sep 2008
City: Sandwick, BC, CA
I have one of these that is largely original, except the top, and I think medium walnut is the right shade, but it has to be dye based not pigment based. The trim was a gloss black I think, or a very very dark brown but it looks black to me. Don't forget to use a grain filler, it had it originally. These are actually good performers for AC/DC sets, well worth fixing up, but I think that Philco must have had a bad batch of dials as the paint on mine was flaking badly, some others do as well, yet there are others that are perfectly fine.
Regards
Arran
Posts: 25
Threads: 5
Joined: Jul 2013
City: Adairsville, GA
Thanks for the tip Arran. This will be the first refinish I attempt. Mohawk has a million choices. It appears Tone Finish Toners are pigment based and the Ultra Classic line is dye based - for transparency. So I'm guessing Ultra Classic is the way to go for the wood. As for the trim, the Tone Finish Toners line have a black gloss. And according to Mohawk, all their clear lacquers work with Ultra Classic.
As for grain filler - Mohawk has a sanding sealer but I also have a Minwax sanding sealer on hand - would that work?? Now to find an online dealer that has the full line.
But then I look back at Ron's post and he is saying Tone Finish doesnt have a lot of pigment. So maybe it would work. This refinish stuff seems complicated...
(This post was last modified: 07-17-2013, 09:21 AM by Vic Gibson.)
Posts: 5,650
Threads: 56
Joined: Sep 2008
City: Sandwick, BC, CA
Krylon fast drying spray paint will work for the black portions, but I don't know if the Minwax sanding sealer will be compatible with Mohawk lacquers.
Regards
Arran
Posts: 13,776
Threads: 580
Joined: Sep 2005
City: Ferdinand
State, Province, Country: Indiana
If someone can confirm for me that Mohawk's Medium Brown Walnut Ultra Classic is the same shade as Medium Walnut Tone Finish, the I am going to switch to the Ultra Classic version when I run out of Medium Walnut Tone Finish.
For areas of cabinets that need to be very dark, I tried a can of Extra Dark Walnut Ultra Classic, and that is what I will use henceforth instead of the Tone Finish version.
--
Ron Ramirez
Ferdinand IN
Users browsing this thread: 1 Guest(s)
|
|
Recent Posts
|
|
54C Complete Teardown/Rebuild
|
| Hello Roy,
here is this one
sincerely Richardradiorich — 12:45 AM |
|
54C Complete Teardown/Rebuild
|
| Richard,
Had grabbed it already but thank you just the same. I find myself wanting to find some way to block out the...glyphmon — 12:03 AM |
|
54C Complete Teardown/Rebuild
|
| Hello roy,
here is a link to the schematic .
Sincerely Richardradiorich — 11:54 PM |
|
54C Complete Teardown/Rebuild
|
| Richard,
The Silvertone 2014 also is a transformerless set, so I am incorporating a 1:1 600 ohm audio isolation transfo...glyphmon — 11:37 PM |
|
Preliminary work on wife's Silvertone 2014
|
| Did an alignment today which was interesting. IF alignment went great, almost all was already spot-on. Adjusting on th...glyphmon — 11:35 PM |
|
54C Complete Teardown/Rebuild
|
| The main problem with adding a Bluetooth input is that this set lacks a traditional power transformer to isolate it from...radiorich — 11:19 PM |
|
54C Cabinet Refinish
|
|
I started stripping this cabinet before it got super chilly out because I knew I wasn't going to be able to work on ...glyphmon — 11:18 PM |
|
54C Complete Teardown/Rebuild
|
| While I'm waiting to wrap up the final steps on my wife's Silvertone 2014, I started disassembly on the next project. O...glyphmon — 11:07 PM |
|
Preliminary work on wife's Silvertone 2014
|
| Hello roy,
that great news glad it worked out for you !!
Sincerely Richardradiorich — 10:50 PM |
|
Preliminary work on wife's Silvertone 2014
|
| Safety caps arrived today. Soldered one in and had a successful first power-up. No magic smoke escaped and it tunes in...glyphmon — 09:53 PM |
|
Who's Online
|
There are currently 1404 online users. [Complete List]
» 1 Member(s) | 1403 Guest(s)
|
|
|

|
 
|





