Would you believe it actually works?
Posts: 2,111
Threads: 373
Joined: Jun 2010
City: Dover, OH
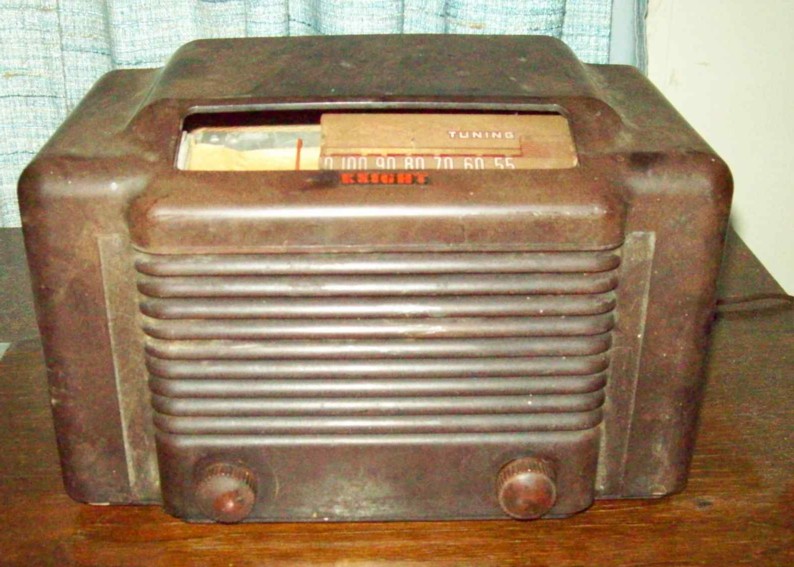
I picked up this little Knight model 5015 in the flea market area of an antique engine show Saturday. I almost missed this little guy completely until I walked over to check out some other items on the table. Price was $10, though I pondered about it due to the radio missing about a third of the dial scale and the sun bleached appearance of the cabinet. I took pity and bought it though, seeing that the cabinet had no chips or cracks. I brought it home and since the cord looked good, I decided to try it out. To my surprise, instead of the angry hum I expected when I brought it up to full power, I had a fully working little table radio! Still working great so far after I cleaned and reseated the tubes. Sometimes these old sets will surprise you!
No matter where you go, there you are.
Posts: 7,323
Threads: 270
Joined: Dec 2009
City: Roslyn Pa
It still might surprise you!!!
Terry
Posts: 761
Threads: 56
Joined: Jul 2013
City: Kentucky
That'll be a sharp looking radio once you get it fixed up. What kind of plans do you have for the dial glass?
The artist formerly known as Puhpow! 8)
Posts: 1,106
Threads: 88
Joined: Jun 2011
City: Tacoma
State, Province, Country: Washington
When I have a dial like that, I take what's left of it, scan it in, and start working on it with Photoshop. I use cut and paste to fill in the missing area, then deal with the numbers and markers. When I've finished the basic look, I clean up the rough spots (lots of fun.. NOT!) I can then print my creation onto a transparency with a color laserjet. This transparency is then trimmed and attached to a pre-cut piece of plexiglas (or glass if you prefer) and installed in the radio.
Posts: 18,427
Threads: 622
Joined: Oct 2011
City: Jackson
State, Province, Country: NJ
...And then I start picking my own brain with a small hook through the nose 
Gosh, Brenda, you do have some patience. Half way through that process I probably would reach for a hefty dose of cyanide..... 
Posts: 2,111
Threads: 373
Joined: Jun 2010
City: Dover, OH
I have to agree a bit with Morzh, but this is still a good tip. Anyways, the little radio is still working without so much as a bit of static I guess these were built by Travler, which explains why the rectifier and output tube both have that name on them. Only thing I am keeping an eye on is the dial light and the 50L6 as those are both the first things to burn out in a set like this. I know you can't run these without a dial lamp or you burn out the rectifier tube!
No matter where you go, there you are.
Posts: 2,128
Threads: 18
Joined: Oct 2008
City: Merrick, Long Island, NY
Your problem should be able to be rectified for less than a doller.
Posts: 2,353
Threads: 92
Joined: May 2010
City: Clayton, NC
From Brenda's excellent comments on a variety of things I believe that she is one of the sharper knives in the drawer.
Posts: 1,106
Threads: 88
Joined: Jun 2011
City: Tacoma
State, Province, Country: Washington
But why is it that when I see the phrase "would you believe?", I hear it in my head in Don Adams' voice?
Posts: 481
Threads: 18
Joined: Jan 2013
City: Mesa, AZ
^^^^^^^^HAHAHAHAHAHAHA!!!!!!!!!!!
Posts: 2,353
Threads: 92
Joined: May 2010
City: Clayton, NC
Posts: 761
Threads: 56
Joined: Jul 2013
City: Kentucky
Brenda, I did something similar awhile back. I can't recall the make of the radio, but it had a dial that originally came with very nice letters and numbers. Someone had tried to restore it, and had removed the factory printing and had tried to hand paint the dial. It looked horrible. I went to Hobby Lobby looking for stick on letters.... when I saw that Testors sells a make-your-own decals kit for car models.
I bought it, downloaded a photo of an original radio, loaded it into photoshop, created a new image with a transparent background, then cut and pasted the image of the dial onto the transparent image. Next, I printed it on the decal paper that came in the kit. It actually came out so well, it looked factory! I was really surprised, because I'd sort of lost hope. This particular dial was yellow plastic, sort of like a Philco. I think it was a GE.
I never thought of it, but it would work on glass too.. so thanks for the tip. The hardest part was getting the size correct. I think I printed it on regular paper about 50 times before I finally got it right.
The artist formerly known as Puhpow! 8)
(This post was last modified: 09-12-2013, 07:09 AM by Jamie.)
Users browsing this thread: 1 Guest(s)
|
|
Recent Posts
|
|
Philco 71 Code 125
|
| Hello,
I am in need of a schematic for this radio. Mine has the three separate circular tube shields and a shadow me...dconant — 08:06 AM |
|
Stromberg Carlson 1500 Squeal
|
| And life just keeps getting more complicated.dconant — 07:57 AM |
|
54C Complete Teardown/Rebuild
|
| Hello Roy,
here is this one
sincerely Richardradiorich — 12:45 AM |
|
54C Complete Teardown/Rebuild
|
| Richard,
Had grabbed it already but thank you just the same. I find myself wanting to find some way to block out the...glyphmon — 12:03 AM |
|
54C Complete Teardown/Rebuild
|
| Hello roy,
here is a link to the schematic .
Sincerely Richardradiorich — 11:54 PM |
|
54C Complete Teardown/Rebuild
|
| Richard,
The Silvertone 2014 also is a transformerless set, so I am incorporating a 1:1 600 ohm audio isolation transfo...glyphmon — 11:37 PM |
|
Preliminary work on wife's Silvertone 2014
|
| Did an alignment today which was interesting. IF alignment went great, almost all was already spot-on. Adjusting on th...glyphmon — 11:35 PM |
|
54C Complete Teardown/Rebuild
|
| The main problem with adding a Bluetooth input is that this set lacks a traditional power transformer to isolate it from...radiorich — 11:19 PM |
|
54C Cabinet Refinish
|
|
I started stripping this cabinet before it got super chilly out because I knew I wasn't going to be able to work on ...glyphmon — 11:18 PM |
|
54C Complete Teardown/Rebuild
|
| While I'm waiting to wrap up the final steps on my wife's Silvertone 2014, I started disassembly on the next project. O...glyphmon — 11:07 PM |
|
Who's Online
|
There are currently 1573 online users. [Complete List]
» 1 Member(s) | 1572 Guest(s)
|
|
|

|
 
|