My Next Project - Butterfly Radio
Posts: 761
Threads: 56
Joined: Jul 2013
City: Kentucky
A friend and I made that. Actually, he did the making... I used photoshop and a picture of an original top to determine the sizes and spacing, then I drew a lifesized replica on a piece of paper. My friend used a router and a bandsaw to create the parts for me. I believe it's as close to a duplicate of an original as possible.
The top piece was originally tongue and groove, and he could've replicated that too. Problem is, the original tongue is broken off inside the groove on my cabinet. We tried chiseling it out, and we tried melting the glue but we were afraid of doing more damage to the cabinet. So the new top will be braced with some triangle wood stock. It should work out fine. I'll be working on it tomorrow.
The artist formerly known as Puhpow! 8)
(This post was last modified: 10-07-2013, 07:25 PM by Jamie.)
Posts: 4,928
Threads: 54
Joined: Sep 2008
City: Sandwick, BC, CA
I think that the best method of repairing the joints at the top is to convert whats left of the groove into a rabbet joint by chiseling what's left of it out. It's end grain so a sharp chisel can clean it up quite nicely. Even easier, if the rest of the cabinet is already coming apart, is to take the sides off and clean it up what's left with a table saw. I remember reading that the type of joint used was called a lock joint, sometimes called a locking rabbet, meaning that it can only come apart in two directions, a double lock joint can only come apart in one direction. They used to use things like this because of the crappy hide glues they had at the time, they needed the extra surface area for strength. They used to use another called a glue joint to join the edges of the two flat boards together, much for the same reasons, you see those used in old table tops.
Regards
Arran
(This post was last modified: 10-07-2013, 08:52 PM by Arran.)
Posts: 761
Threads: 56
Joined: Jul 2013
City: Kentucky
Arran, sorry for taking so long to respond, but I needed to look up the terminology so I could give you a decent response and explain what we did.. . Your suggestion is exactly what my friend suggested and actually tried to do. He was only able to convert one side to a rabbet joint. On the other side, it was not possible.
To explain further.... Whats left of the cabinet is surprisingly strong, considering that the original top was violently ripped out. The sides are soldily attached to the bottom. I don't think if would be possible to remove them without damage.
The problem was the top edges of the sides and front -
On one side, and in the front, the tongue is still glued into the groove, but broken off cleanly from the original top. Any attempt to chisel the top edge off was going to result in a split down the entire side. So it was decided to sand it smooth and leave it be.
On the other side, someone had done a very rough job at attempting to chisel out the tongue. They started in the center and worked out about 3 inches in each direction. The edge was uneven and looked like a screwdriver had been used as a chisel. As a result, about six inches of the top of the groove was missing (see bottom photo on first page).
My friend used a sharp chisel to remove the rest of the top edge of the groove and smoothed out the previous work. This resulted in us having to add 1/4" to the width of the new top... and move the slots off center accordingly. But, the good news is that the new top can be square, there is no "notch" on the corner (again, as seen in bottom photo).
So, one side will be sort of a rabbet joint, and the other side will be glued, edge to side, then braced from beneath with triangle stock. (Actually, I plan to reinforce the entire top piece from underneath using triangle stock.) The only downside to this is that the seam will be 1/4" closer to the edge of the radio on one side. I'm not happy about that, and I plan to try to hide it as much as possible during the finishing stage. There is nothing that can be done though... short of making new sides.
I don't know what happened to this radio. Someone broke the original top out of it. The chassis is fine and shows no signs of any violence or abuse, which doesn't add up. These radios were well made, and to break the tongue off of the top piece, all the way around, required a lot of force. I can only imagine that someone smashed it with a baseball bat, or stood on it. The attempted repair job was quite crude, and it brings to mind a fourteen-year-old boy trying to hurry and fix his Dad's radio before he gets home from work..
...anyways, I am working on it today and I'll post some progress later..
The artist formerly known as Puhpow! 8)
(This post was last modified: 10-08-2013, 12:42 PM by Jamie.)
Posts: 4,928
Threads: 54
Joined: Sep 2008
City: Sandwick, BC, CA
At first glance I thought that maybe the cabinet was water damaged, which would be a more normal reason as to why a top would come off, hence why I suggested trying to remove the sides for a repair. But it looks like the grilles in the front are pretty solid, something they would not be if the radio was water damaged. If there were room I would add a solid block from back to front, on the inside corner to support the top, then glue it and screw it into the side, then it will never come out.
Regards
Arran
Posts: 761
Threads: 56
Joined: Jul 2013
City: Kentucky
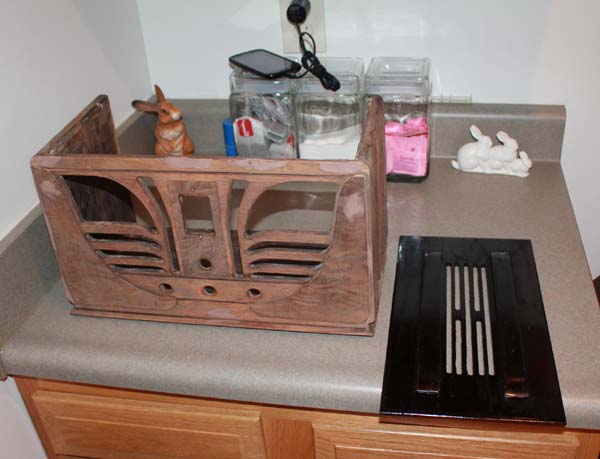
I finally made a little progress today. Here is the radio with veneer repairs complete and timbermate wood filler added to the needed areas. Surprisingly, it didn't need much of either.
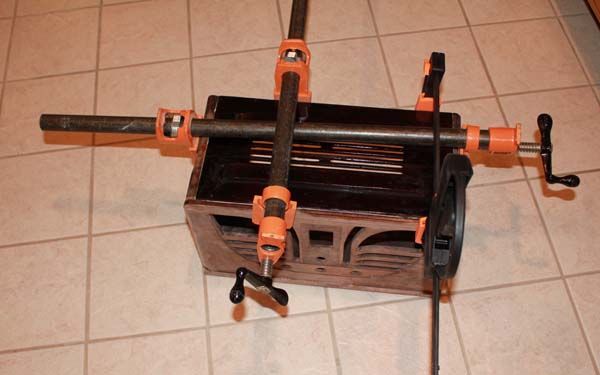
Time to take a deep breath and jump in. Top is glued and clamped into place. I'm sure you've noticed that it's been sprayed with lacquer. That was for my own piece of mind... it'll be redone when the cabinet is finished. Still got a ways to go before then..
The artist formerly known as Puhpow! 8)
Posts: 2,575
Threads: 337
Joined: Jun 2013
City: lawrenceville nj
Looking good keep them coming
Posts: 4,492
Threads: 424
Joined: Jun 2011
City: Boston
State, Province, Country: Massachusetts
A friend with a woodshop is a friend indeed. I had a high school pal, his Dad was a machinist but also was a great woodworker, had a very nice shop. A handy guy to know.
I am lucky to know a couple of great furniture guys who take pity on me and help me out some times, actually they are intrigued by the whole antique radio thing and the cabinets are usually small jobs for them.
Violently ripped top, makes you wonder, the story behind the radio? You should get an award for bringing this baby back.
I am enjoying the thread.
Paul
You will be pleased with it when it is done.
Tubetalk1
Posts: 761
Threads: 56
Joined: Jul 2013
City: Kentucky
Well thanks guys! It is very encouraging to read your responses. I am glad that others are interested. Once the glue dries, it won't be long before I get it finished. You should see some major progress tomorrow. Paul, I wish I knew the story behind this radio... it's something I think about as I work on it.
Anyways, it won't ever be perfect.. but it will be the best I can do. As soon as I get my schematic from Chuck, I'll start on the chassis.
The artist formerly known as Puhpow! 8)
PuhPow,
I think I can offer some recent history on your radio. I'm positive that this is the radio I almost bought at the Bouckville Antique Show in Bouckville, New York this August. This is a huge week long event. I've been kicking myself for not buying it, I was thrown off by the odd top and thought that chassis had to be the wrong one for the cabinet as it was so crowded without any ventilation. It had the added jacks on the rear of the chassis and I figured this was more of a project than I wanted to get into. I think the seller only wanted $40.00 for it. I wish I would of had a smartphone to do a little onsite research I to realize the hidden gem in it. Good luck with it, can't wait to see the finished product.
Dick Stachowiak
East Syracuse, NY
Posts: 761
Threads: 56
Joined: Jul 2013
City: Kentucky
Thanks for the info Dick... It has to be the same radio, because I doubt there is another 45 in the same condition. In September, I bought the radio from a dealer who lives in North Carolina. So it somehow made it's way from NY to NC in a month.
I held my breath and removed the clamps this morning. All is fine. Last night I took Arran's advice and added some wood blocks under the inside edges. I'm thinking of adding some small wood screws for extra strength. The downside of screws is that, because of the confined area in the cabinet, it will be very difficult to drill straight holes. I could use self tapping wood screws, but they can cause the wood to split. The cabinet seems very solid as it is, and the clamps only had to pull one side in about 1/4".. sooooo.. I dunno.. we will see..
Right now, Timbermate wood filler has been added to a couple of tiny gaps around the edge of the top, and a couple of places where the lacquer fisheyed on the new wood... As soon as it dries, I'll sand it smooth. I plan to spray toner as soon as the temperature allows.
The artist formerly known as Puhpow! 8)
(This post was last modified: 10-10-2013, 09:27 AM by Jamie.)
Posts: 761
Threads: 56
Joined: Jul 2013
City: Kentucky
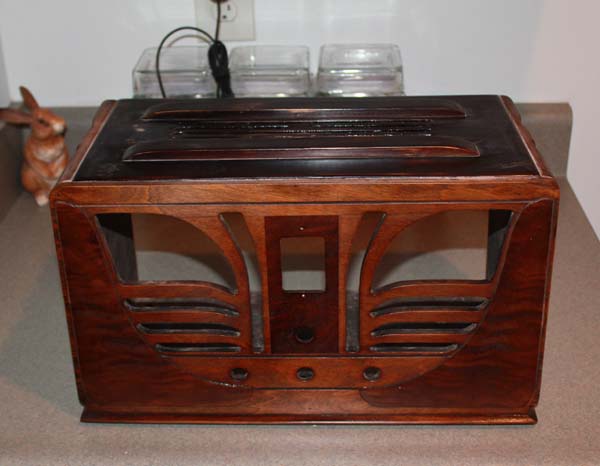
Update time... I had trouble deciding what color to use on the carved front. I ended up going with one light coat of perfect brown. Just enough to bring out the grain, even things up and not darken it too much. Here is the radio after shooting the front panel with perfect brown Mohawk.
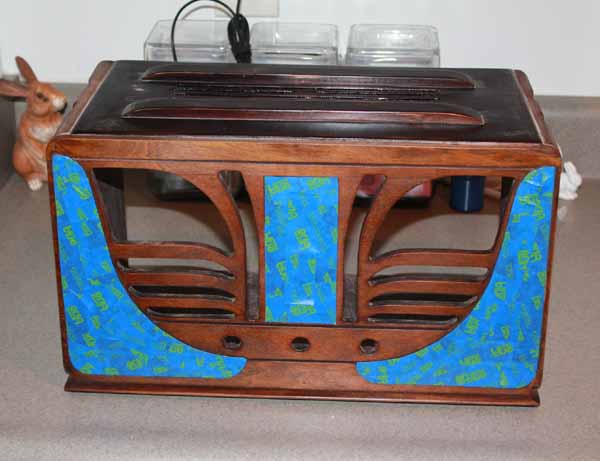
All taped up and ready for the second color. I don't know if this is how Philco did it. If so, I hope the guy who had to tape these everyday of his life was well compensated. I usually use Frog Tape, but 3M Scotch's has some new fangled super sticky edge tape.. and I decided to give it a whirl..hope it works out!
The artist formerly known as Puhpow! 8)
(This post was last modified: 10-10-2013, 01:17 PM by Jamie.)
Posts: 761
Threads: 56
Joined: Jul 2013
City: Kentucky
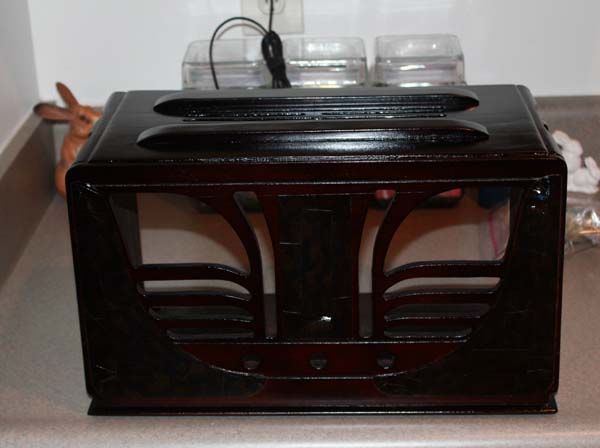
A couple of coats of Extra Dark Walnut on the entire cabinet.
I searched every photo and every post about 45's that I could find... some people do these 45's in ebony or black, but from what I can tell, extra dark walnut is the original color. So that's what I went with.. if it's wrong? .. then it's wrong.. I like it and that's what matters. Extra Dark Walnut it is..
While this dries, I going to run up to the store and grab some gold/yellow paint for the stripes... see ya in a few..
The artist formerly known as Puhpow! 8)
Posts: 2,575
Threads: 337
Joined: Jun 2013
City: lawrenceville nj
hmm think the rabbits tell him what to do ??
Posts: 761
Threads: 56
Joined: Jul 2013
City: Kentucky
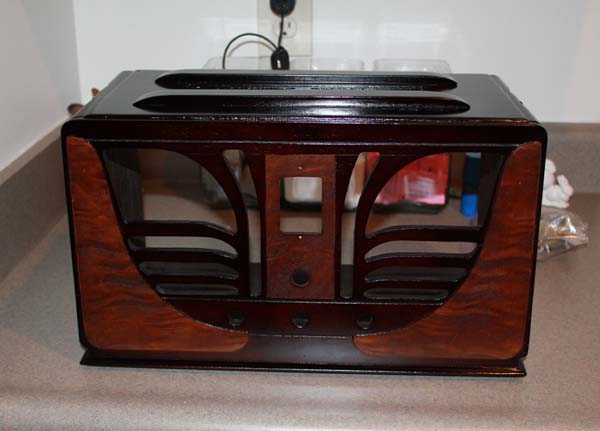
Voila! .. Tape removed. Looks good to me. Next up, pre-cat clear, a decal, more clear, then the yellow/gold stripes. Hope it looks good to you guys. My camera doesn't take the greatest photos.
The artist formerly known as Puhpow! 8)
Posts: 13,776
Threads: 580
Joined: Sep 2005
City: Ferdinand
State, Province, Country: Indiana
Good job so far.
Be aware that the stripes are not gold. They are more of a cross somewhere between tan and ivory, with perhaps a hint of yellow.
--
Ron Ramirez
Ferdinand IN
Users browsing this thread: 1 Guest(s)
|
|
Recent Posts
|
|
Rogers Majestic R-646
|
| Today I finished inspecting all the parts. The result is not very pleasing.
The first positive news:
1) The power tr...Vlad95 — 11:40 PM |
|
HiFi (Chifi) tube amp build - but my own design.
|
| Well, found muh culprit. After using socket test adapters and finding voltages all ok, swapping 6V6s, no avail, swapped ...TV MAN — 11:18 PM |
|
HiFi (Chifi) tube amp build - but my own design.
|
| Well, maybe - maybe not :lol: It's been an interesting project so far! Something so simple, yet so cranky. The 1st one ...TV MAN — 05:12 PM |
|
1949 Motorola 5A9M
|
| Haven't thought of Burgess batteres in a while
https://www.radionostalgia.ca/lib/Images/battery/us/burgess1D.jpgi
...Vlad95 — 03:50 PM |
|
Philco Model 16 wiring question
|
| Measure the voltages first, just in case.morzh — 02:19 PM |
|
1949 Motorola 5A9M
|
| Haven't thought of Burgess batteries in a while Mr. Fixer. Boston Edison always used Burgess in their Bright Star yellow...Paul Philco322 — 02:17 PM |
|
1949 Motorola 5A9M
|
| Thanks Sam. I'll let you know. I can probably scare some up from the local radio club.klondike98 — 02:07 PM |
|
Philco 89 Code 123 Osc Coil
|
| Hello,
I thought I would post my findings on my bad oscillator tickler coil. There were 27 turns on the outer coil b...dconant — 12:38 PM |
|
Philco Model 16 wiring question
|
| Thanks Morzh. So it appears I did wire it incorrectly and I have to switch the wires between pins 2 and 4.bobclausen — 09:24 AM |
|
Philco 46-1209 strange behavior
|
| No, it's not a problem, just during certain condition it could show up.
Yes, an internal tube short could do that too.
...morzh — 09:13 AM |
|
Who's Online
|
| There are currently no members online. |

|
 
|


![[-] [-]](https://philcoradio.com/phorum/images/bootbb/collapse.png)


