42-380 escutcheon related
Posts: 8
Threads: 2
Joined: Feb 2014
City: Kingwood Texas
Hello All,
Joining the Phorum due to dad giving me a 42-380. It is a delight for me; my grandfather bought it new!
I have a couple of initial questions if someone can advise:
1) The first thing I did was purchase a repro escutcheon. The original was severely distorted & broken.
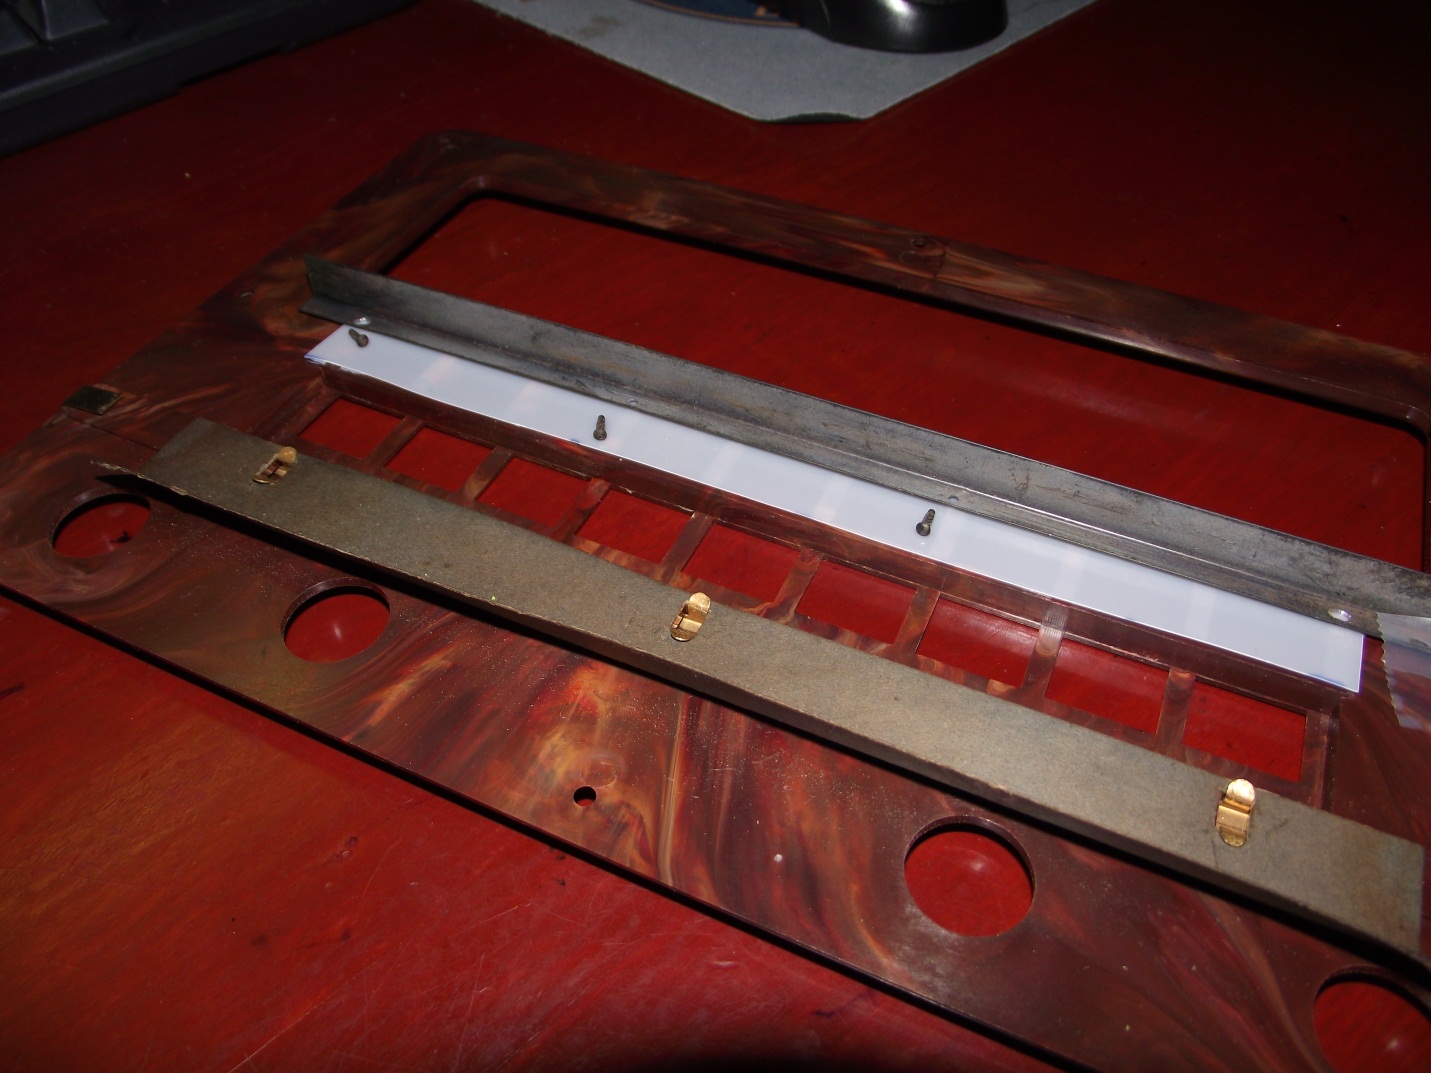
In my zest I removed the brass plate for the dial labels & the angled cardboard piece that goes on the backside of the escutcheon.
Problem 1) - I did not note if the cardboard angle faces up or faces down. I installed it on the upside & the escutcheon doesn't seem to want to install. Before I fatigue the brass again to flip it around I wanted to ask what is the proper position for the cardboard piece.

Note: Picture with correct installation added after original posting.
2) Second question - Push button copper "spring". Unlike the other buttons the left end button does not have the rectangular spring. Is that proper?
The
TIA for you time
Gary
(This post was last modified: 04-28-2014, 11:18 PM by gfleduc.)
Posts: 298
Threads: 22
Joined: May 2012
City: Chattanooga
State, Province, Country: TN
1) Mine does not have a cardboard piece on the backside of the escutcheon, so I 'm afraid I can't help you there. Perhaps you can post some pictures of it.
2) I believe this is right. Mine also did not have the copper spring on the On/Off button, which is the one on the left.
It's not how bad you mess up, it's how well you can recover.
Posts: 13,776
Threads: 580
Joined: Sep 2005
City: Ferdinand
State, Province, Country: Indiana
The copper springs are designed to block light from the little tabs above each pushbutton *except* for the button that is pushed in. Notice when you push the button for the AM band, the "B'D'CST" tab lights up above that button.
When you push the OFF button, this turns the set off, so it cannot be illuminated; therefore, no copper spring is needed for this button.
--
Ron Ramirez
Ferdinand IN
Posts: 8
Threads: 2
Joined: Feb 2014
City: Kingwood Texas
Hi Eric I will post a picture - Later I can give you details - you can fabricate one.
I have not gotten the picture posting working - I can send to you directly if you wish
Hi Ron - thank-you for the button detail - glad to know a piece is not missing - today on ebay I saw someone has a 42-380 chassis for sale; that one had no copper spring on the left end - so your note really nails it for me. Thanks again
Gary
gfleduc@msn.com
Posts: 8
Threads: 2
Joined: Feb 2014
City: Kingwood Texas
Posting this for sharing / reference purposes:
I am missing 3 of the orginal escutcheon mount screws; specification: Phillips oval head - #3 x 3/8", Wood Screws, BRASS
Ref: over all length .405". I did a ton of searching on the internet and could not find any. I found one vendor who has nickel screws; Blacksmith Bolt & Rivet Supply. I painted those with brass paint it was a great match.
By the way - by mistake I ordered 40 screws if someone needs any...
Posts: 8
Threads: 2
Joined: Feb 2014
City: Kingwood Texas
Question- On the back of the escutcheon, above the push buttons, trapped by a small angled metail detail is a sheet of plastic ~ 5/8" wide x 7-1/4" long. When new is this item translucent or clear?
Posts: 8
Threads: 2
Joined: Feb 2014
City: Kingwood Texas
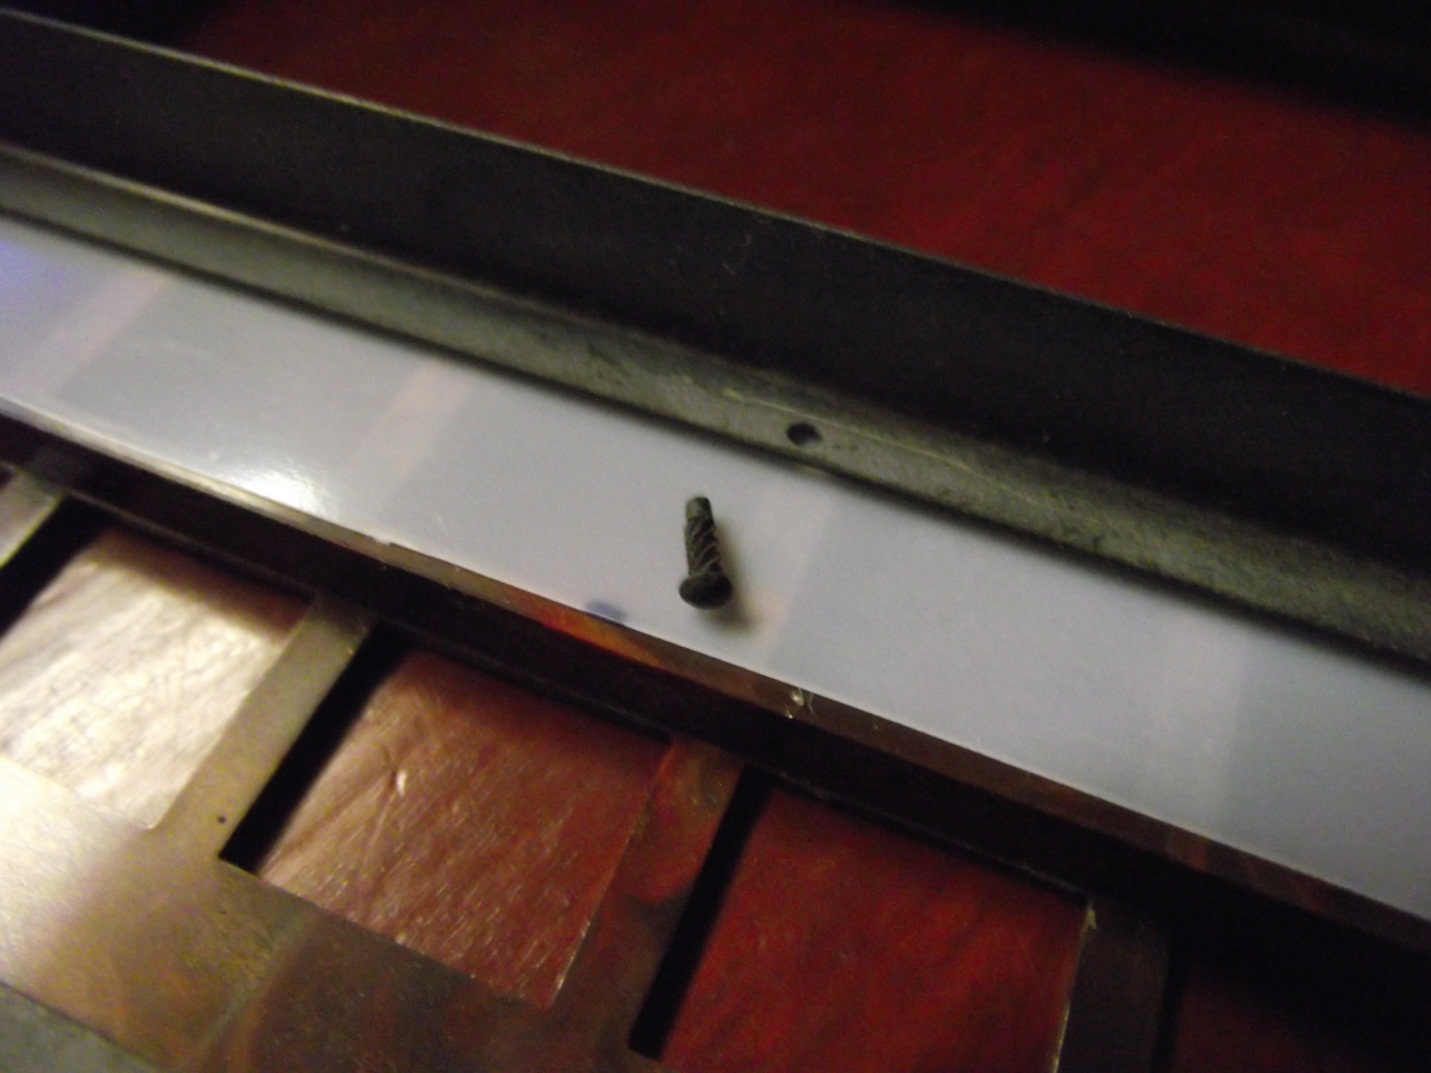
Using a reproduction escutcheon one has to transfer or replace the white vellum paper and angled metal piece on the back. When doing mine, I found one of the four drive screws was missing.
The drive screws are tiny ~ 1/16” dia x 3/16” long.
Replacement screws can be purchased @ SpencerAircraft.com
P/N MS21318-2 or alt part # AN535-00-3
I have now have extras if you need one.
FYI – install hole = .052 diameter, that is a #55 drill

(This post was last modified: 04-28-2014, 11:12 PM by gfleduc.)
Posts: 18
Threads: 8
Joined: Aug 2016
City: Copan, OK
(04-28-2014, 10:42 PM)gfleduc Wrote: Using a reproduction escutcheon one has to transfer or replace the white vellum paper and angled metal piece on the back. When doing mine, I found one of the four drive screws was missing.
The drive screws are tiny ~ 1/16” dia x 3/16” long.
Replacement screws can be purchased @ SpencerAircraft.com
P/N MS21318-2 or alt part # AN535-00-3
I have now have extras if you need one.
FYI – install hole = .052 diameter, that is a #55 drill
Mine is missing one of the 4 screws as well. I just got the 4 new screws. However I'm wondering how do you get the old screws out without damaging it? And do you just hammer in the new ones after you drill the hole?
Posts: 7,301
Threads: 269
Joined: Dec 2009
City: Roslyn Pa
I have a 41-300 that was missing all of the escutcheon screw. I grabbed a sack of Hillman #490114 at Lowes. They are #2's 3/8" long. Trying to match the originals may be a bit difficult with out getting them from another set. They could use a spot of paint as they are too bright.
When my pals were reading comic books
I was down in the basement in my dad's
workshop. Perusing his Sam's Photofoacts
Vol 1-50 admiring the old set and trying to
figure out what all those squiggly meant.
Circa 1966
Now I think I've got!
Terry
Posts: 5,170
Threads: 274
Joined: Nov 2012
City: Wilsonville
State, Province, Country: OR
(08-11-2016, 10:51 PM)spiderdrummer24 Wrote: do you just hammer in the new ones after you drill the hole?
Welcome to the Phorum!

no hammer.... screws screw in 
Posts: 18
Threads: 8
Joined: Aug 2016
City: Copan, OK
(08-12-2016, 02:39 PM)klondike98 Wrote: (08-11-2016, 10:51 PM)spiderdrummer24 Wrote: do you just hammer in the new ones after you drill the hole?
Welcome to the Phorum!

no hammer.... screws screw in  Ok but how do you unscrew them and screw them in? They have no groove
Posts: 5,170
Threads: 274
Joined: Nov 2012
City: Wilsonville
State, Province, Country: OR
hmmm....now you have me stumped 
Posts: 736
Threads: 26
Joined: Jun 2013
City: Hayward, California
(08-14-2016, 11:06 PM)spiderdrummer24 Wrote: (08-12-2016, 02:39 PM)klondike98 Wrote: (08-11-2016, 10:51 PM)spiderdrummer24 Wrote: do you just hammer in the new ones after you drill the hole?
Welcome to the Phorum!

no hammer.... screws screw in  Ok but how do you unscrew them and screw them in? They have no groove
Very carefully  actually you might be right about tapping them.in with a hammer. I have seen screws like that before. Does it have a head that looks like a round nail haad and are the "threads" different than it's screws? They kind of go up the screw instead of around aND around? If so then they need to be tapped in carefully.
(This post was last modified: 08-15-2016, 06:42 PM by Warren.)
Posts: 7,301
Threads: 269
Joined: Dec 2009
City: Roslyn Pa
I suppose if you did break off a brass tab you could solder a new piece of brass in it's place ( fab a new tab). Hobby shops carry small pieces of sheet brass in a number thicknesses.
When my pals were reading comic books
I was down in the basement in my dad's
workshop. Perusing his Sam's Photofoacts
Vol 1-50 admiring the old set and trying to
figure out what all those squiggly meant.
Circa 1966
Now I think I've got!
Terry
(This post was last modified: 08-15-2016, 08:03 PM by Radioroslyn.)
Posts: 2,573
Threads: 337
Joined: Jun 2013
City: lawrenceville nj
Very carefully use a sharp pick. lift up then use pliers and twist off
Some day, and that day may never come, I will call upon you to do a service for me. But until that day, accept this justice as a gift
mafiamen2
Users browsing this thread: 3 Guest(s)
|
|
Recent Posts
|
|
The list of my radio & TV collection!
|
| A little light Saturday positive about our hobby in our feed...
My new every Saturday video about antique radio equipme...RadioSvit — 02:12 PM |
|
Model 70 Cabinet Trim
|
| musar ,
Well if you have any more questions feel free to post away .
Sincerely Richardradiorich — 08:56 PM |
|
Model 70 Cabinet Trim
|
| Although I have not made any cabinets or cabinet parts for a couple of years, I still have some parts left over, includi...Steve Davis — 06:26 PM |
|
philcorepairbench.com - shadow-meter
|
| Thanks Ron. But I can't find those articles.fenbach — 02:43 PM |
|
Model 70 Cabinet Trim
|
| Thank you, Gary. Before making my original post, I had clicked on "Steve Davis Cabinets" only to find that it...musar — 02:25 PM |
|
philco predicta
|
| Welcome to the Phorum, cgl18! I am not your resource for television repair, but lots of friendly help is available here...GarySP — 02:12 PM |
|
Model 70 Cabinet Trim
|
| Welcome to the Phorum, musar! You can send Steve Davis a private message (PM). The site is at the top of the Home page...GarySP — 02:09 PM |
|
Model 70 Cabinet Trim
|
| How do I contact him? The only contact information for him I could find when searching online was a telephone number th...musar — 10:38 AM |
|
philco predicta
|
| Hello, good afternoon, I would like to ask what the possible problem could be if I don't have an image on the screen. I ...cgl18 — 10:19 AM |
|
Philco model 38 code 121 not receiving signal.
|
| So one last question before I finish this radio. Regarding the speaker and output transformer. I salvaged the original o...Stormlord5500 — 09:31 AM |
|
Who's Online
|
There are currently 1063 online users. [Complete List]
» 1 Member(s) | 1062 Guest(s)
|
|
|

|
 
|


![[-] [-]](https://philcoradio.com/phorum/images/bootbb/collapse.png)


