Posts: 4,435
Threads: 419
Joined: Jun 2011
City: Boston
State, Province, Country: Massachusetts
Once in a while they fall in your lap, not in mine that often. I got an email from a gentleman in NH who had found this set in a cottage he bought in 1984. He had used it and it had fallen into disrepair. It is in pretty good shape I am told and for the price of shipping, not much$ from NH, it is mine. Fellow could not bear to throw out. Fellow with the radio is a restorer, restored a WW2 training plane, a bi plane, open cockpit, they fly it now!
http://www.radiomuseum.org/r/philco_tran...250_i.html
So I hope it works out.
Paul
Tubetalk1
Posts: 2,128
Threads: 18
Joined: Oct 2008
City: Merrick, Long Island, NY
That's a fun set to work on, will look snazzy when you paint the cainet.
Posts: 4,435
Threads: 419
Joined: Jun 2011
City: Boston
State, Province, Country: Massachusetts
Snazzy is my goal.
Paul
Tubetalk1
Posts: 1,531
Threads: 242
Joined: Sep 2012
City: West Bend, Wisconsin
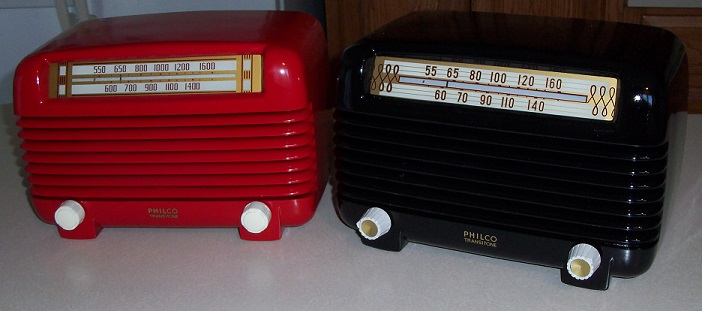
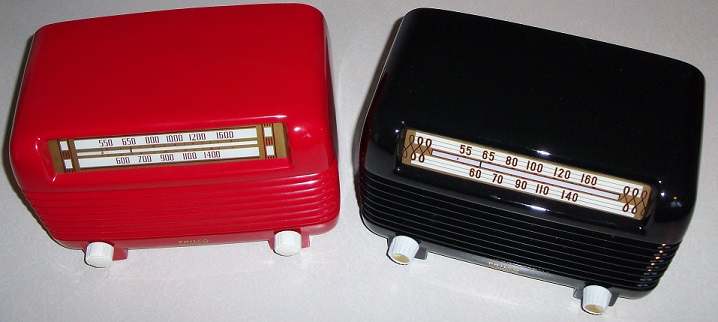
I have a 48-250 and a 49-504. These sets are very common, and, since they both needed new paint jobs to conceal crack repairs, I decided to spruce mine up a bit. Not factory correct colors, of course, but I think they look decent. These two sets actually get more compliments than any other radio in my collection. Go figure.


Greg V.
West Bend, WI
Member WARCI.org
Posts: 4,435
Threads: 419
Joined: Jun 2011
City: Boston
State, Province, Country: Massachusetts
I hope to get as nice, very sharp.
Paul
Tubetalk1
Posts: 4,435
Threads: 419
Joined: Jun 2011
City: Boston
State, Province, Country: Massachusetts
Set arrived today, in fine shape, labela intact, dial glass Ok but shows a tiny bit of flaking, original back, and service label from Carl's TV Radio Natick Ma.
A nice litttle set.
Paul
Tubetalk1
Posts: 4,435
Threads: 419
Joined: Jun 2011
City: Boston
State, Province, Country: Massachusetts
BTW Greg, what do you do? Fine steel wool, spray can paint? What Type?
Paul
Tubetalk1
Posts: 465
Threads: 31
Joined: Sep 2009
City: Lapeer
State, Province, Country: MI
Greg, Those are beauties! 
Joe
Matthew 16:26 "For what does it profit a man if he gain the whole world, yet lose his own soul?"
Posts: 1,531
Threads: 242
Joined: Sep 2012
City: West Bend, Wisconsin
Congrats on the radio, Paul! I usually start with sandpaper, sanding with various grits getting finer each time, to get most of the old original paint off. Once it's nice and smooth, I spray it with a light grey primer. Then wet sand it, and spray with enamel paint. It takes longer to dry, but the enamel paint is more durable and more concealing than lacquer, IMO. Neither of those radios are clear coated. Just the enamel paint finish.
Greg V.
West Bend, WI
Member WARCI.org
Users browsing this thread: 1 Guest(s)
|
|
Recent Posts
|
|
Road Trip for a Philco 46-480
|
| Good morning, folks! I’ve finished the cabinet and the electrical restoration, and have detailed those in their respecti...jrblasde — 10:56 AM |
|
Studebaker/Philco AC-2687 car radio
|
| Arran,
Thanks for checking you manuals.
I appreciate that. Let me know what you find.
PhilPdouglaski — 08:46 AM |
|
Studebaker/Philco AC-2687 car radio
|
| I have some car radio service manuals, Riders I think (not to be confused with the big blue binders), so I may see if on...Arran — 01:20 AM |
|
Philco model 40-100
|
| Greetings;
Here is an update, I found a listing on fleabay for a similar chassis to yours, and it has a photo of what...Arran — 12:58 AM |
|
Philco model 40-100
|
| Greetings;
I think I may have found a clue as to what is missing, from a search I made, there is a rear view of the c...Arran — 12:12 AM |
|
Philco model 40-100
|
| I recently acquired a Philco model 40-100 farm (battery) radio. The radio was in very good condition except the red on f...mhamby — 05:59 PM |
|
Studebaker/Philco AC-2687 car radio
|
| Hello, Richard
the radio is an AC-2687 Studebaker model. The Philco model is S -5323 and the chassis p/n is S-5523Pdouglaski — 11:52 AM |
|
48-482 rear panel help
|
| The 48-482 is an AC only set as well, featuring a power transformer. While the transformer shouldn’t get “hot”, it is ye...jrblasde — 11:12 AM |
|
Studebaker/Philco AC-2687 car radio
|
| I gave a Chrysler/MoPar car radio from 1954, it was made by Philco, and it uses two chassis, one has the power supply an...Arran — 11:06 AM |
|
48-482 rear panel help
|
| Hello keithchip. You could make a hardboard back for the set, but make sure you provide plenty of ventilation holes in ...GarySP — 11:04 AM |
|
Who's Online
|
There are currently 2349 online users. [Complete List]
» 2 Member(s) | 2347 Guest(s)
|
|
|

|
 
|


![[-] [-]](https://philcoradio.com/phorum/images/bootbb/collapse.png)


