11-28-2017, 01:46 PM
Episode 5 "The curious case of a project within a project"
Faced with a damaged interstage audio transformer (missed one on ebay thanks to bad timing), I started thinking about the project differently. Nobody was chasing me to have it finished, after all. I wanted it to be as close to a working 1934 radio as it could be, and if original parts weren't available, lets explore rebuilding with original methods. Remember that Erector set? Meccano to me, and it seems much of it had come with someone from the UK.
Having never seen the inside of an audio transformer before, the silly notion occurred to me that I could rewind one, and the Meccano might provide the means... I started tinkering, and looking on-line for some hints.
One wet sunday afternoon, I opened up the case for the transformer, and started taking notes of wire layout and core build - for instance there's a paper gap between the E and I sections to prevent saturation, since the driver runs in class A. Then the tedious process of unwinding, layer by layer, began. Turns and layers were counted:
Primary: 17 layers 32 AWG wire, 130 turns each
Secondary 24 layers 34 AWG wire, 180 turns each
The primary wire was very fragile, with signs of corrosion near the center of the bobbin.
The original former looked in OK shape. I measured the old separating papers with a micrometer, and bought high quality tracing paper to use for the rewind. What had I started? Definitely "in at the deep end" now.
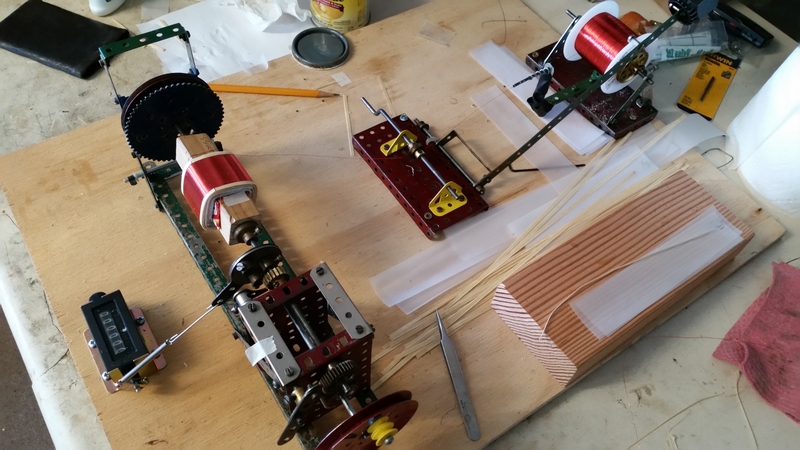
Meanwhile, the winder was tinkered in to shape, and the various bits screwed to a piece of handy plywood. A cheap mechanical counter was added. Here's a picture:

We're all set up in this picture. Quite a bit of learning was needed before getting to this point - the fine wire is hard to handle and one must prevent it from crossing over, keeping the turns neatly side by side. Practice runs helped a lot. After each layer wind the wire was coated with shellac, and a new paper coated with shellac and wrapped over the top. For thicker wires, it was necessary to ad end papers to keep a regular surface, otherwise the wire would fall off the stack at the edges. I found that out the hard way about 4 layers in to the secondary wind.
I lost count of the hours spent here, with unravelling, equipment build, learning and rewinding, but it took many afternoons.
Faced with a damaged interstage audio transformer (missed one on ebay thanks to bad timing), I started thinking about the project differently. Nobody was chasing me to have it finished, after all. I wanted it to be as close to a working 1934 radio as it could be, and if original parts weren't available, lets explore rebuilding with original methods. Remember that Erector set? Meccano to me, and it seems much of it had come with someone from the UK.
Having never seen the inside of an audio transformer before, the silly notion occurred to me that I could rewind one, and the Meccano might provide the means... I started tinkering, and looking on-line for some hints.
One wet sunday afternoon, I opened up the case for the transformer, and started taking notes of wire layout and core build - for instance there's a paper gap between the E and I sections to prevent saturation, since the driver runs in class A. Then the tedious process of unwinding, layer by layer, began. Turns and layers were counted:
Primary: 17 layers 32 AWG wire, 130 turns each
Secondary 24 layers 34 AWG wire, 180 turns each
The primary wire was very fragile, with signs of corrosion near the center of the bobbin.
The original former looked in OK shape. I measured the old separating papers with a micrometer, and bought high quality tracing paper to use for the rewind. What had I started? Definitely "in at the deep end" now.
Meanwhile, the winder was tinkered in to shape, and the various bits screwed to a piece of handy plywood. A cheap mechanical counter was added. Here's a picture:
We're all set up in this picture. Quite a bit of learning was needed before getting to this point - the fine wire is hard to handle and one must prevent it from crossing over, keeping the turns neatly side by side. Practice runs helped a lot. After each layer wind the wire was coated with shellac, and a new paper coated with shellac and wrapped over the top. For thicker wires, it was necessary to ad end papers to keep a regular surface, otherwise the wire would fall off the stack at the edges. I found that out the hard way about 4 layers in to the secondary wind.
I lost count of the hours spent here, with unravelling, equipment build, learning and rewinding, but it took many afternoons.
I don't hold with furniture that talks.


![[-] [-]](https://philcoradio.com/phorum/images/bootbb/collapse.png)


