



03-28-2026, 01:58 AM
N00b Edit Already!: If this is a feature, could a moderator please move this to the Electronic Repair forum, since that's where I intended it to go and where it belongs?
I'm new to the forum, and new to this kind of restoration. I've got a pretty solid IT background and basic understanding of electronic components, but this will be my most in depth attempt at soldering and replacing components, so I beg your patience. I'll probably ask a lot of questions, but I promise to try to search for the answers first.
The radio I'm working on was owned by my grandfather. My father's memory of the radio was listening to the address announcing the attack on Pearl Harbor. He would have been 15 at the time. I had the radio serviced by a short-lived local repair shop that dealt in vintage/classic audio equipment about 20 years ago. To my knowledge, tubes were tested and replaced as necessary. They also replaced the electrolytics (I may want to verify some of the choices he made for mfd ratings with folks here later), and it looks like maybe one of the other capacitors. Most of the paper capacitors appear to remain which I know will need to be replaced.
The radio, at least up until the point that I removed the chassis from the cabinet did work, but I would say to an extent. I could tune in a few AM radio stations, but not much, and practically nothing on shortwave. Also, there was a fair amount of hiss/hum, and the noise did seem to increase with amount of time run. Doing a deeper dive inside makes it clear that there's a lot of brittle points with some wires basically snapping off where soldered. The insulation on the wires running to the speaker and field coil are in really rough shape, so I'm very tempted to be heavy handed in replacing wires as I go.
I gather from comments I've read that this is one of the PITA sets to work on because of the cramped nature of the chassis, so I get it that this being my first attempt will be a bit of trial by fire. I'm good with that. I have downloaded the section on the 37-620 from the library here and have been trying to mesh my understanding of what's in the radio with what's in the schematics and the diagram. Enough introduction.
Any case, my preliminary questions are just a few as I get ready to replace a lot of capacitors.
1 - This is a "Run 2" 37-620 apparently, because the "Double Bakelite Condenser" 3793-DG moved to the rear of the chassis. The thing in its place, an 8318-SU Bakelite looks the same, but replaces what appears to have been a standard paper 30-4380. What's the consensus on replacing the 8318-SU?
2 - Related to the above, one of the things I puzzled over for so long with the 8318-SU was that, though I read only lugs 1 and 3 are what are used in the capacitor, lug 2 has a few things connected to it as well. Am I correct in assuming that the middle lug is simply being used as a convenient place to bind other common components that is not electrically connected to the internal capacitor? If that's the case and I should replace the 8318-SU, I should be fine just to remove it from the mix and connect the other pieces together from the middle lug?
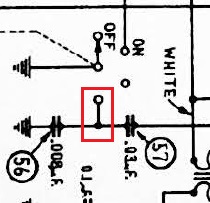
3 - Two of the things connected to one lug on the 8318-SU is another capacitor (part 56, a 30-4112) AND a short wire, the other end of which I'm not sure if I broke off in my prodding, or may have already been disconnected. I suspect it may be a connection to the tone control aspect of the power switch. (I certainly couldn't tell if the tone control had any effect on the stations that I could tune into.) On the power switch, there are two lugs, adjacent, and currently occupied that look to run to the rear of the chassis and tie into the power system as expected. There appear to be at least two others tighter to the chassis front and oriented further upward that have solder on them, but no wire connected. Thoughts? Excerpt from the schematic is attached.
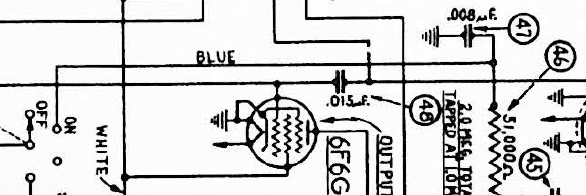
4 - I'm making my own map as I go along to match up connections as I swap stuff out since I feel like this is going to require a pretty extensive disassembly to reach the deep capacitors. Mounted to the side of the chassis on the opposite end as the power transformer, there is a long, non-conducting bar with a number of metal attachment points (guessing these may also be called lugs). Not sure the term for this long piece, but it appears to be just a place to tie components and wires together. On the very first location, to which resistor 46 and capacitor 47 are jointly attached, there is a wire, I believe originally blue, now faded, which, according the the schematics, is supposed to run to the "ON" position of the power switch, however, after a splice to a different section and color of wire, it chases down to a mount point on the chassis where the power transformer bolts down. The way I read the schematic is when the connection is to the chassis, this is shown as ground. This is more of just a verification that this is correct, still, seems odd that there's a splice with a different piece of wire, and that it needed to run so far around the chassis to attach. Excerpt from schematic attached.
5 - I see renovatedradios.com is a source for reproduction parts, including the grommets. I'm aware of the three that mount the tuning part of the chassis to the rest which of course are all degraded. It appears that there were supposed to be rubber grommets (or something similar) between the chassis and the cabinet, through with the screws that fasten them together pass. Only one remains, but there are holes for the others. Is it optimal to replace all of these (3 chassis + 4 cabinet) or do the ones beneath the chassis into the cabinet not really matter? I assume based on all of the electrical connections to the chassis itself, it is something that should be insulated from contact where possible.
6 - For the internal wiring that ultimately needs replacing, what specs should I be looking for in a replacement? Period-accurate isn't essential for me, though if there's something that preserves the aesthetic with contemporary quality, I'm good with that too. It looks there might be a couple different gauges in use, but not sure how essential that variation is. I'm guessing braided is more workable than solid.
7 - I'm going to probably replace the electrical cord as well - there's a bit of tape near the plug end and some frayed fabric outer insulation. That being said, I know there is the ground post on the rear of the chassis which the manual says should be connected to the nearest metal pipe or radiator - in the days of cast iron and copper pipes, for sure. It strikes me that this is ultimately the same ground that electrical systems try to duplicate with the earth ground rod and wire. Is it advisable to replace the cord with a three-wire (and three prong) replacement and internally connect the ground wire to the ground post on the rear of the chassis, or is that just crazy talk and I should stop working on this right away?
8 - I'm aware there's a separate forum here for the cabinet restorations BUT I figured I'd throw this out there in case a 37-620 tombstone owner is reading and/or answering. The Photo Finish isn't in absolutely destroyed but there are a lot of damaged patches. I know there's no good reproduction readily available for it. Would someone have (or be willing to take) and send in a message (or a reply) a high-resolution photo of the front of your 37-620 with sound Photo Finish? I'd be interested in trying to find a way to manipulate an image into something that could be printed professionally on a compatible medium.
I'm certain there will be more questions, but this is enough for a start. I can get the best photos I can to further the answering of any of these questions as necessary. Thank you in advance for any wisdom imparted. This community looks like a tremendous resource.
I'm new to the forum, and new to this kind of restoration. I've got a pretty solid IT background and basic understanding of electronic components, but this will be my most in depth attempt at soldering and replacing components, so I beg your patience. I'll probably ask a lot of questions, but I promise to try to search for the answers first.
The radio I'm working on was owned by my grandfather. My father's memory of the radio was listening to the address announcing the attack on Pearl Harbor. He would have been 15 at the time. I had the radio serviced by a short-lived local repair shop that dealt in vintage/classic audio equipment about 20 years ago. To my knowledge, tubes were tested and replaced as necessary. They also replaced the electrolytics (I may want to verify some of the choices he made for mfd ratings with folks here later), and it looks like maybe one of the other capacitors. Most of the paper capacitors appear to remain which I know will need to be replaced.
The radio, at least up until the point that I removed the chassis from the cabinet did work, but I would say to an extent. I could tune in a few AM radio stations, but not much, and practically nothing on shortwave. Also, there was a fair amount of hiss/hum, and the noise did seem to increase with amount of time run. Doing a deeper dive inside makes it clear that there's a lot of brittle points with some wires basically snapping off where soldered. The insulation on the wires running to the speaker and field coil are in really rough shape, so I'm very tempted to be heavy handed in replacing wires as I go.
I gather from comments I've read that this is one of the PITA sets to work on because of the cramped nature of the chassis, so I get it that this being my first attempt will be a bit of trial by fire. I'm good with that. I have downloaded the section on the 37-620 from the library here and have been trying to mesh my understanding of what's in the radio with what's in the schematics and the diagram. Enough introduction.
Any case, my preliminary questions are just a few as I get ready to replace a lot of capacitors.
1 - This is a "Run 2" 37-620 apparently, because the "Double Bakelite Condenser" 3793-DG moved to the rear of the chassis. The thing in its place, an 8318-SU Bakelite looks the same, but replaces what appears to have been a standard paper 30-4380. What's the consensus on replacing the 8318-SU?
2 - Related to the above, one of the things I puzzled over for so long with the 8318-SU was that, though I read only lugs 1 and 3 are what are used in the capacitor, lug 2 has a few things connected to it as well. Am I correct in assuming that the middle lug is simply being used as a convenient place to bind other common components that is not electrically connected to the internal capacitor? If that's the case and I should replace the 8318-SU, I should be fine just to remove it from the mix and connect the other pieces together from the middle lug?
3 - Two of the things connected to one lug on the 8318-SU is another capacitor (part 56, a 30-4112) AND a short wire, the other end of which I'm not sure if I broke off in my prodding, or may have already been disconnected. I suspect it may be a connection to the tone control aspect of the power switch. (I certainly couldn't tell if the tone control had any effect on the stations that I could tune into.) On the power switch, there are two lugs, adjacent, and currently occupied that look to run to the rear of the chassis and tie into the power system as expected. There appear to be at least two others tighter to the chassis front and oriented further upward that have solder on them, but no wire connected. Thoughts? Excerpt from the schematic is attached.
4 - I'm making my own map as I go along to match up connections as I swap stuff out since I feel like this is going to require a pretty extensive disassembly to reach the deep capacitors. Mounted to the side of the chassis on the opposite end as the power transformer, there is a long, non-conducting bar with a number of metal attachment points (guessing these may also be called lugs). Not sure the term for this long piece, but it appears to be just a place to tie components and wires together. On the very first location, to which resistor 46 and capacitor 47 are jointly attached, there is a wire, I believe originally blue, now faded, which, according the the schematics, is supposed to run to the "ON" position of the power switch, however, after a splice to a different section and color of wire, it chases down to a mount point on the chassis where the power transformer bolts down. The way I read the schematic is when the connection is to the chassis, this is shown as ground. This is more of just a verification that this is correct, still, seems odd that there's a splice with a different piece of wire, and that it needed to run so far around the chassis to attach. Excerpt from schematic attached.
5 - I see renovatedradios.com is a source for reproduction parts, including the grommets. I'm aware of the three that mount the tuning part of the chassis to the rest which of course are all degraded. It appears that there were supposed to be rubber grommets (or something similar) between the chassis and the cabinet, through with the screws that fasten them together pass. Only one remains, but there are holes for the others. Is it optimal to replace all of these (3 chassis + 4 cabinet) or do the ones beneath the chassis into the cabinet not really matter? I assume based on all of the electrical connections to the chassis itself, it is something that should be insulated from contact where possible.
6 - For the internal wiring that ultimately needs replacing, what specs should I be looking for in a replacement? Period-accurate isn't essential for me, though if there's something that preserves the aesthetic with contemporary quality, I'm good with that too. It looks there might be a couple different gauges in use, but not sure how essential that variation is. I'm guessing braided is more workable than solid.
7 - I'm going to probably replace the electrical cord as well - there's a bit of tape near the plug end and some frayed fabric outer insulation. That being said, I know there is the ground post on the rear of the chassis which the manual says should be connected to the nearest metal pipe or radiator - in the days of cast iron and copper pipes, for sure. It strikes me that this is ultimately the same ground that electrical systems try to duplicate with the earth ground rod and wire. Is it advisable to replace the cord with a three-wire (and three prong) replacement and internally connect the ground wire to the ground post on the rear of the chassis, or is that just crazy talk and I should stop working on this right away?
8 - I'm aware there's a separate forum here for the cabinet restorations BUT I figured I'd throw this out there in case a 37-620 tombstone owner is reading and/or answering. The Photo Finish isn't in absolutely destroyed but there are a lot of damaged patches. I know there's no good reproduction readily available for it. Would someone have (or be willing to take) and send in a message (or a reply) a high-resolution photo of the front of your 37-620 with sound Photo Finish? I'd be interested in trying to find a way to manipulate an image into something that could be printed professionally on a compatible medium.
I'm certain there will be more questions, but this is enough for a start. I can get the best photos I can to further the answering of any of these questions as necessary. Thank you in advance for any wisdom imparted. This community looks like a tremendous resource.


