Philco model 610 rebuild - by Tim P.
Posts: 1,212
Threads: 85
Joined: Jan 2014
City: Annapolis, IL
State, Province, Country: USA
I am near completion of the recap. I lack the 16mf and micas - in the mail. I had read a post by Gregb
http://philcoradio.com/phorum/showthread.php?tid=8852
where he had restuffed his wax capacitors. Since I didnt think those new yellow replacements would look right in this old radio, I decided to give it a shot myself.
Here are the results:
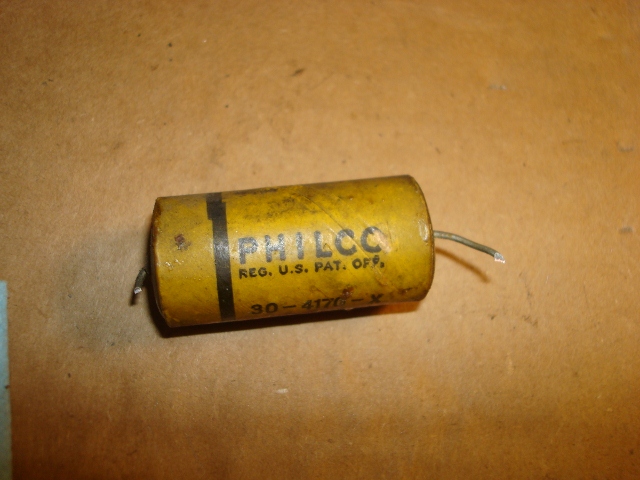
This is the big .1 mf cap you see first thing when you flip the chassis over.

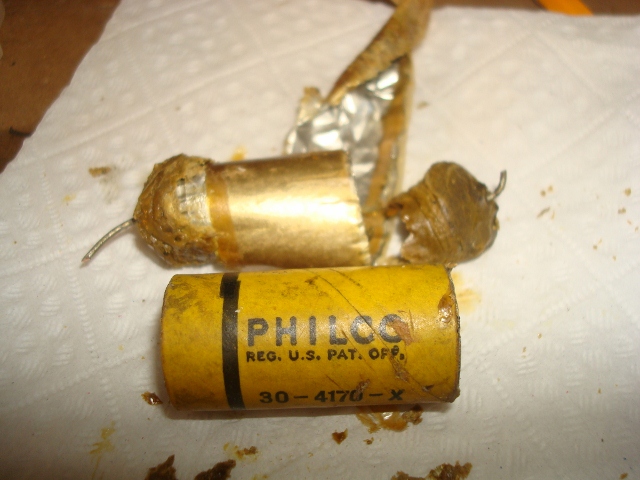
I warmed it in the oven for about 10 minutes. Using old gloves, I pulled one wire with pliers and got part of it out. Then, ofter re-heating, used a nutdriver to push the rest out. Be careful not to crush the cardboard shell. The wax cools quickly and sets up.

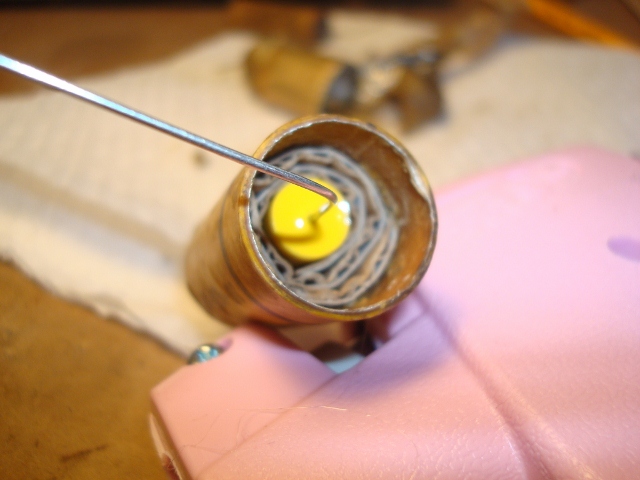
I wrapped the new cap with some cardboard to help center, then began potting with hot glue. I started with a thin layer to hold things in place, let cool, then flipped over and repeated. When that set, I finished filling.

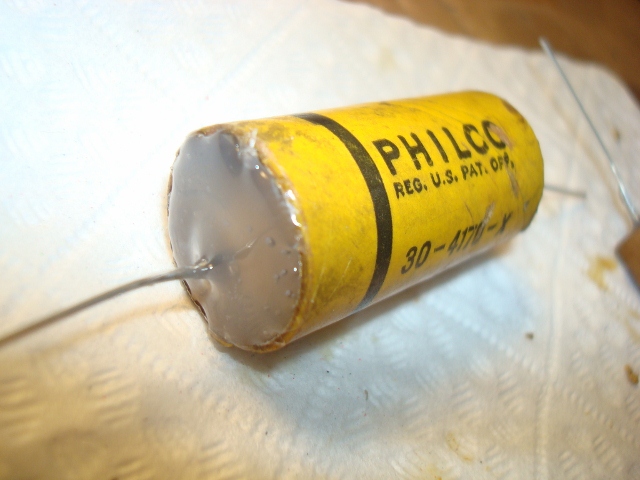
Here is the finished cap, ready for installation. It is difficult to tell it is not original. You can, however, look in the end and still see it has been replaced if you ever need to prove the point.

Notes:
1. Use an old metal pan or something 'cause wax will melt and it stinks. Wife dont like stinky things in her oven 
2. Patience. You may have to re-heat a time or two in order to finish. Wax resets quickly.
3. Reccomend not to pot the whole end at once. It takes longer for the glue to set, tends to run and puts more heat on the new cap. Do it in a couple of layers and it works much better. The 1st thin layer cools quickly, the insulates the cap from the big fill.
4. Rebuilding these does take a litte more time, but not a lot, and makes things look more correct.
If I could find the place called "Somewhere", I could find "Anything" 
Tim
Jesus cried out and said, "Whoever believes in me , believes not in me but in him who sent me" John 12:44
(This post was last modified: 03-27-2014, 11:02 AM by TV MAN.)
Posts: 16,533
Threads: 573
Joined: Oct 2011
City: Jackson
State, Province, Country: NJ
Tim
With most of those I was able to simply pull the wire by pliers together with the plug, both ends and then pushed the conents out.
Then when I was potting the new cap with hot glue, I used the fact that it melts the external wax on the tube for a long time (the glue keeps the temp for a while) to wipe the wax off as it is often black and dirty. It still leaves enouhg wax on for the paper to be waxy, and it is no longer that important as inside there is a fully sealed new film cap.
If the wires are not pullable just the way it is, 10-15 sec blow with heatgun on low or 5 secs on high do the trick.
Posts: 1,562
Threads: 56
Joined: Nov 2008
City: Sedona, AZ/Placentia/CA
I sealed mine up with some of the wife's beeswax. About the right color and melts at low temp. Heated a little up in a small cup on the stove and poured.
Best, Jerry
A friend in need is a pest! Bill Slee ca 1970.
Posts: 239
Threads: 10
Joined: Dec 2013
City: Columbia, SC
http://www.amazon.com/Brown-Colored-Glue...B00AF0MEAO
Here are some brown glue sticks described as 'plasticy.' All else being equal, would you use wax or hot glue?
Posts: 599
Threads: 24
Joined: Jan 2014
City: Edmonton AB CA
I just use the heat gun as morzh talks about and they come right apart and then give the tube a wipe with paper towel and it cleans all the dirty stuff off the tube. I like sealing with the bees wax as it looks more original but the hot glue is more durable. I dont like the look of the regular hot glue and had noticed one time that Micheals Crafts had different colours but when I went back and checked they only have the clear, black, and some purple and pink with sparkles, so I passed.
Gregb
Posts: 1,212
Threads: 85
Joined: Jan 2014
City: Annapolis, IL
State, Province, Country: USA
Thanks for the ideas. This is how we learn things. I'll try a few of those tricks next time around. I figure when the glue ages and gets some dust on it that it'll look about right. I might try the bee's wax once and see how it works. Just need to figure a way to get it into the glue gun  . I have a few wax caps laying around I can experiment with.
If I could find the place called "Somewhere", I could find "Anything" 
Tim
Jesus cried out and said, "Whoever believes in me , believes not in me but in him who sent me" John 12:44
(This post was last modified: 03-28-2014, 09:42 AM by TV MAN.)
Posts: 1,212
Threads: 85
Joined: Jan 2014
City: Annapolis, IL
State, Province, Country: USA
To be continued...
Unfortunalaly, I am going to have to box this one up with my notes and pics until fall/winter. All my parts came, my time went. Work calls and it will "own" me until fall, so I probably wont get to do much until then.
Thanks for the ideas and help so far.
If I could find the place called "Somewhere", I could find "Anything" 
Tim
Jesus cried out and said, "Whoever believes in me , believes not in me but in him who sent me" John 12:44
Posts: 214
Threads: 16
Joined: May 2010
City: Kokomo, IN
I don't quite fill mine with hot glue then I reuse the old wax to finish filling them you can tell they have restuffed because the new wire is smaller than the original wire .
(This post was last modified: 04-19-2014, 11:51 AM by vinzer.)
Posts: 1,212
Threads: 85
Joined: Jan 2014
City: Annapolis, IL
State, Province, Country: USA
This is one of my projects that had an abrupt end ... to be continued. Ok, a couple of years later, a new radio repair bench, some fresh test equipment, I am preparing to restart this restoration. This is next on my list once I get my Amp kit finished, and final calibration on the VTVM. Probably after Christmas. Just warming up the thread. 
If I could find the place called "Somewhere", I could find "Anything" 
Tim
Jesus cried out and said, "Whoever believes in me , believes not in me but in him who sent me" John 12:44
Posts: 16,533
Threads: 573
Joined: Oct 2011
City: Jackson
State, Province, Country: NJ
Well....nostalgic feeling about the times long gone 
People who do not drink, do not smoke, do not eat red meat will one day feel really stupid lying there and dying from nothing.
Posts: 1,212
Threads: 85
Joined: Jan 2014
City: Annapolis, IL
State, Province, Country: USA
Alwright - She's on the bench and here we go!  I sure am glad I took notes and have this thread running so I can remember where I am!  How time flies!
If I could find the place called "Somewhere", I could find "Anything" 
Tim
Jesus cried out and said, "Whoever believes in me , believes not in me but in him who sent me" John 12:44
Posts: 1,212
Threads: 85
Joined: Jan 2014
City: Annapolis, IL
State, Province, Country: USA
I finally advanced some on this rebuild.
It is very difficult to pick up a project like this after a couple of years.  I had to spend some time studying and looking at my notes,, pictures and such. Thank goodness for my notes and digital camera! I am still working on the bakelite blocks. I got the #32 with the 110pf caps rebuilt. I was told earlier that these were paper caps and should be replaced. I also replaced #43, which is also a 110pf cap, and looked just like the ones I dug out of the block. Interruptions have been very bad lately it has been hard to sit for more than 10-15 minutes without someone calling or coming in.


I need to find some washer/spacers that are bad on this tuner. I could search and spend a bunch of time looking, but I bet someone here can point me to where I can get some of these. Hardware stores don't have much. Help appreciated please.

If I could find the place called "Somewhere", I could find "Anything" 
Tim
Jesus cried out and said, "Whoever believes in me , believes not in me but in him who sent me" John 12:44
Posts: 1,475
Threads: 69
Joined: Nov 2012
City: Kansas city, MO.
Look here Tim. There down a ways on the list
http://www.renovatedradios.com/parts.html
Or you might find something at a hardware store. I like the ones I bought from here.
Posts: 16,533
Threads: 573
Joined: Oct 2011
City: Jackson
State, Province, Country: NJ
Look like regular mica caps. Wonder if in other blocks 110pF caps are indeed paper.
People who do not drink, do not smoke, do not eat red meat will one day feel really stupid lying there and dying from nothing.
Posts: 1,475
Threads: 69
Joined: Nov 2012
City: Kansas city, MO.
I had one that was paper but it was so long ago I don't remember what Philco radio it was in.
Users browsing this thread:
|
|
Recent Posts
|
|
philco predicta
|
| I found that where I have the 140v B+ there is 50v and the tuner receives 235v through the orange cablecgl18 — 04:14 PM |
|
Philco 91 code 221
|
| Chassis grounds thru rivets is another good place to look. Oh and the stator screws on the tuning cap where the leads at...Radioroslyn — 08:11 AM |
|
Philco 91 code 221
|
| Dirty tube pins and socket, cold solder joint, stray tiny strand of wire, clean the entire area around the oscillator tu...RodB — 08:43 PM |
|
Philco 91 code 221
|
| I have been restoring one of these sets and switched it on yesterday. It didn't exactly spring into life, but after a co...Philconut — 08:26 PM |
|
Philco 50-925 antenna connections
|
| That's super. Glad to hear you figured it out. Paul.Paul Philco322 — 11:11 AM |
|
Philco 50-925 antenna connections
|
| Hello Keith,
great news !!
Sincerely Richardradiorich — 02:14 AM |
|
Philco 50-925 antenna connections
|
| Finally, got the antenna fixed (repaired some broken wires) and have the radio playing. I've got four different schemat...keith49vj3 — 09:38 PM |
|
1949 Motorola 5A9M
|
| Bob, Nice radio. I’ve not seen one before. Keep us updated!Joe Rossi — 07:56 PM |
|
Phioco 90 Power Transformer Wire Colors
|
| Thanks for adding that information.klondike98 — 06:09 PM |
|
Phioco 90 Power Transformer Wire Colors
|
| Although I have used this site as a resource for a number of years this is my first post. I am restoring a Model 90 si...vincer — 05:02 PM |
|
Who's Online
|
There are currently 1540 online users. [Complete List]
» 2 Member(s) | 1538 Guest(s)
|
|
|

|
 
|


![[-] [-]](https://philcoradio.com/phorum/images/bootbb/collapse.png)


