First Radio Resto - Philco 60B
Posts: 24
Threads: 2
Joined: Aug 2016
City: San Diego, CA

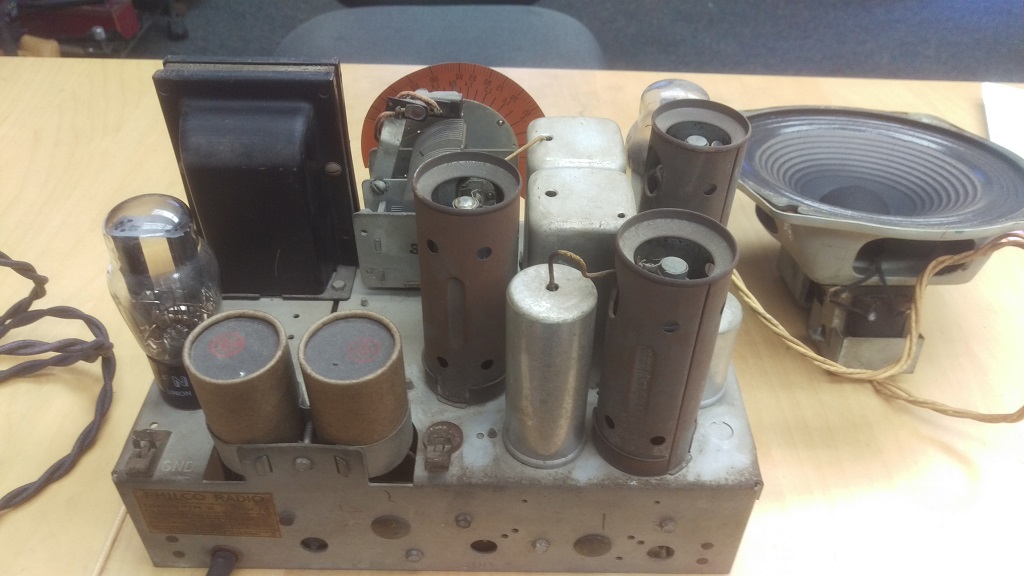
Hello - I recently stumbled into a Philco 60B (code 121, 1934?) and was instantly hooked.
I have a small bit of radio/electronics knowledge, I am a HAM operator and am fairly proficient with a soldering iron...
I plan to restore and use this radio and after researching every article I can find about restoring these radios I find that I still have many questions...
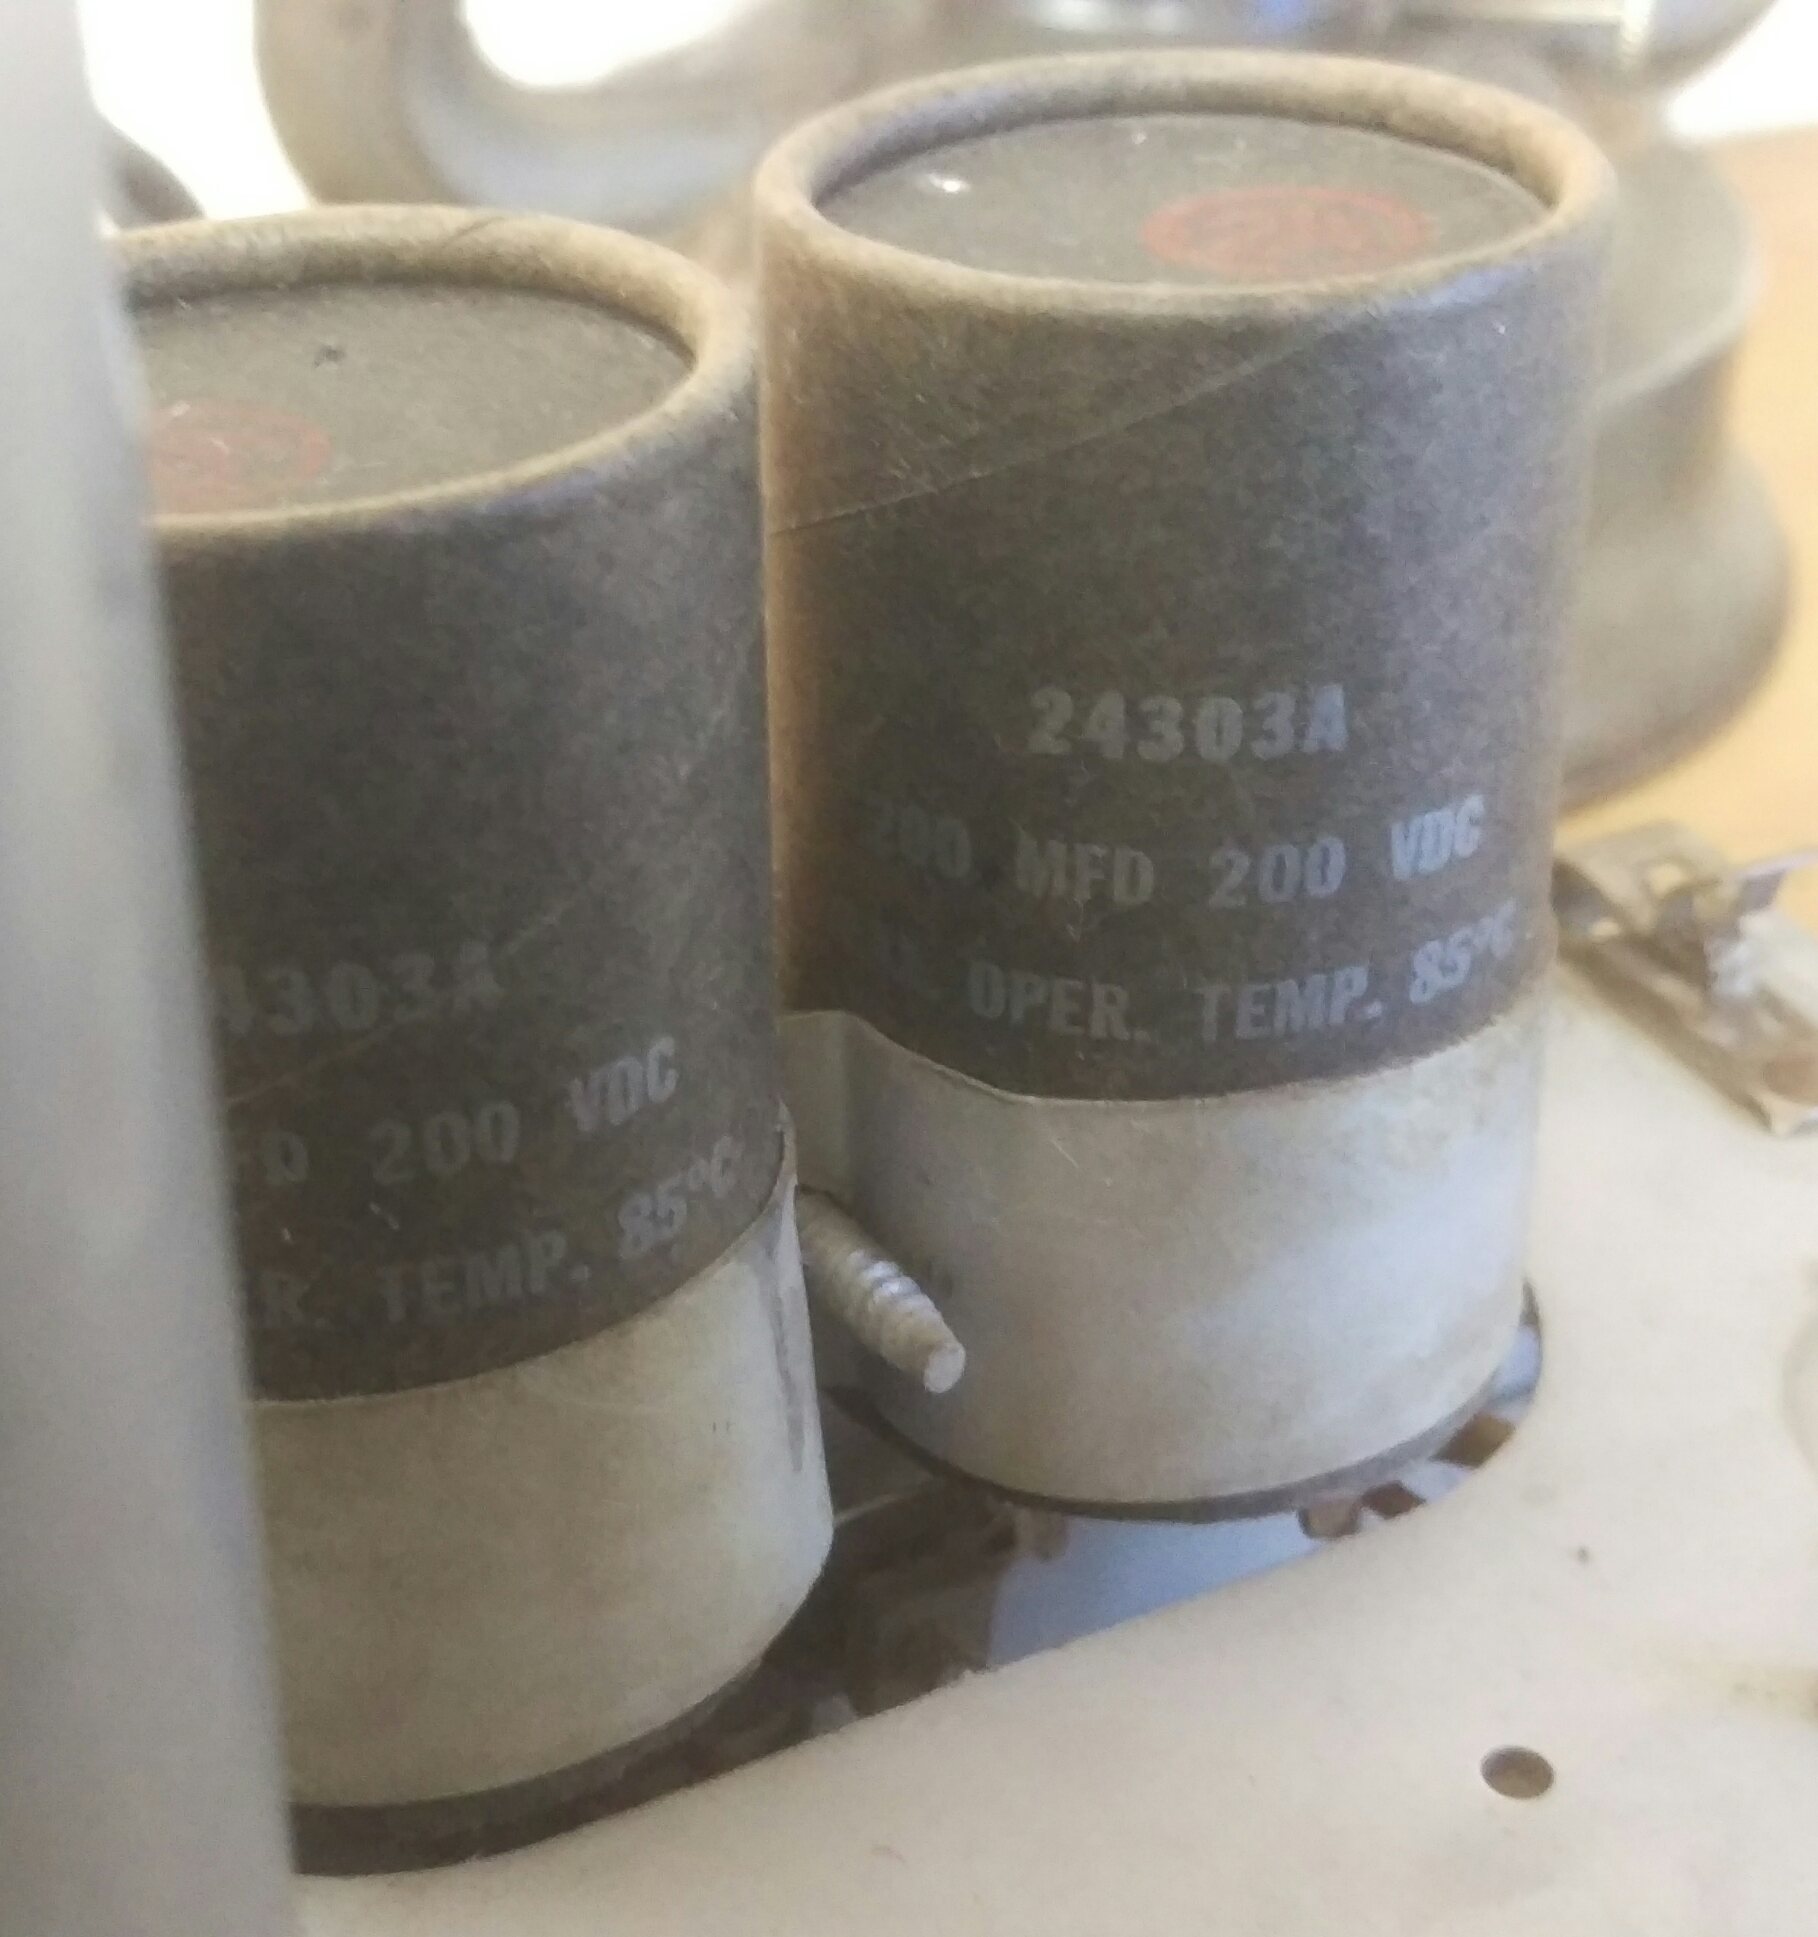
I'm off to a bad but lucky start - The radio came from an avid radio operators estate. I see that the two main power caps had been replaced and a very nice cloth power cord had recently been installed. I rolled the dice and plugged it in - powered up, tuned in a station and sounded beautiful . Pleased, I quickly unplugged it and pulled the chassis to begin the resto.
Questions -
1) Knowing that the radio is working, what should I consider doing for electronics updating? I had planned on a full re-cap, still advisable?
2) The newer power caps, can I trust them,or should they be replaced? If I replace them is there a source for the original aluminum cap bodies?
3) What is a safe product to clean the chassis and electronics? There is no rust (just on the tube covers) but the entire chassis is dirty, almost greasy looking. I have used Corosion X before (RC Hobby) is it safe to lube all moving electronics with?
4) The Chassis label on the back is really dirty, what can I clean it with without damaging?
5) I plan to remove most of the components on the top to clean. Anything I should be particular careful with?
I'm sure I will have many more questions and will spend the evening searching this great site to see what I can find.
Thanks in advance for any advice that can be offered.
Regards,
Matt
Posts: 4,377
Threads: 411
Joined: Jun 2011
City: Boston
State, Province, Country: Massachusetts
Welcome aboard Matt. You will get many valuable opinions I am sure from this group. Honestly the chassis looks pretty good to me, everyone has their own standards.
Many would change out all the caps unless thay had firm info as to who did them and when, especially if they plan on playing the set a lot. Maybe and underside picture would help.
The dial looks pretty good, how was the case?
Good luck, and hope it comes out to your spec.
Paul
Tubetalk1
Posts: 5,072
Threads: 269
Joined: Nov 2012
City: Bandon
State, Province, Country: OR
Welcome to the Phorum!

Looks like the speaker has been reconed. Have to figure out if a recap has already been done and how recently. A picture of the underside of the chassis would help.
I've cleaned chassis with isopropyl alcohol or if really greasy GoJo (without the pumice in it).
I don't try to clean the labels.
To lube bearings in the tuning cap I put a drop of oil in a screwdriver and touch it to the bearing.
There are a number of threads in the Phorum on various restorations of 60's.
Others will surely have their own thoughts....
Posts: 24
Threads: 2
Joined: Aug 2016
City: San Diego, CA
Thanks for the welcome!
I'll post a picture of the bottom tomorrow, but I see no signs of any work having been done, the bakelight caps are still sealed in tar.
The cabinet looks really good. Too good to strip and refinish, I'm going to clean it with gojo or restore a finish and buff on some wax. Hopefully that will keep some of its earned patina.
The tuning shaft is slipping on the tuner. Hopefully some cleaning will help. I understand it works by friction.
I'll work on the chassis with alcohol tomorrow. I read a tip from bottle collectors that hydrogen peroxide can clean labels without damage, I'll give it a try.
Posts: 7,283
Threads: 268
Joined: Dec 2009
City: Roslyn Pa
Hi Matt & welcome,
<1) Knowing that the radio is working, what should I consider doing for electronics updating? I had planned on a full re-cap, still advisable?
Good question. I would say if the electrolytics are more than 15-20yrs old then it's not a bad idea to error on the side of safely and swap them out. The paper caps should be replaced. If you look at leads coming though the rivets on the bakelite blocks the originals will have stranded wire, replacements will have solid wire. Also checking the resistor values is good too. Even though it's working it may work better with all specified values.
2) The newer power caps, can I trust them,or should they be replaced? If I replace them is there a source for the original aluminum cap bodies?
Most guys will take the old caps and cut them open and replace the innards with new remount them back on the chassis. Or some will disconnect the old and solder in new ones under the chassis.
3) What is a safe product to clean the chassis and electronics? There is no rust (just on the tube covers) but the entire chassis is dirty, almost greasy looking. I have used Corosion X before (RC Hobby) is it safe to lube all moving electronics with?
See Bob's comments
4) The Chassis label on the back is really dirty, what can I clean it with without damaging?
Probably not but there are guys making repro labels out there so you may be able to find a replacement.
5) I plan to remove most of the components on the top to clean. Anything I should be particular careful with?
Personally I wouldn't. Some will strip down the chassis, drill out the rivets and strip it bare to clean or polish it or whatever. The problem arises when the reassembly occurs. The wiring is layed out in a very particular fashion and if you are not really careful can get you self into trouble. Most or the time it ends up being an alignment issue or some sort of oscillating/motorboating problem.
I'm sure I will have many more questions and will spend the evening searching this great site to see what I can find.
GL de N3GTE
When my pals were reading comic books
I was down in the basement in my dad's
workshop. Perusing his Sam's Photofoacts
Vol 1-50 admiring the old set and trying to
figure out what all those squiggly meant.
Circa 1966
Now I think I've got!
Terry
Posts: 4,682
Threads: 51
Joined: Sep 2008
City: Sandwick, BC, CA
About the only parts that you can remove from the top of the chassis is the power transformer, the tuning condenser, and the filter condenser cans along with the bracket. The aluminum cans for the antenna, oscillator, and IF transformers cannot be removed easily without destroying them. Some may disagree but I have regularly washing dirty chassis with a solution of trisodium phosphate and hot water, about a tablespoon per gallon, and a toothbrush, followed by one or more rinses, though I could see gojo working well for this too. Normally people are conditioned into thinking that electricity and water don't mix, but in my case I wash them on a hot day and then leave them to dry for several days before even thinking about powering the chassis up. Oh, remove the dial first before cleaning regardless of what method you use, some Philco dials used water based ink but I'm not sure about the model 60s.
Regards
Arran
Posts: 7,283
Threads: 268
Joined: Dec 2009
City: Roslyn Pa
> Oh, remove the dial first before cleaning regardless of what method you use, some Philco dials used water based ink but I'm not sure about the model 60s.
You can clean the dial gently with odorless mineral spirits OMS. No water or soaps the printing will wipe right off.
When my pals were reading comic books
I was down in the basement in my dad's
workshop. Perusing his Sam's Photofoacts
Vol 1-50 admiring the old set and trying to
figure out what all those squiggly meant.
Circa 1966
Now I think I've got!
Terry
Posts: 24
Threads: 2
Joined: Aug 2016
City: San Diego, CA

Well I'm embarrassed that I'm stumped at the first recap step...
I want to replace the two primary e caps and I'm finding info with wildly different specs -
- Replace with current values? There are a pair of 200MF 200 VDC e caps in there now. That doesnt seem right?
- If I'm reading my schematic correctly (Radiomuseum.org) items 45 and 46 are my e caps and they are both 8 mf. That doesnt seem right either.
- Antiqueradios.com mentions that the model 60 schematic should call for 1 of 12 mf 400V and 2 of 8 mf 250V.
Is there another schematic source that I can try to validate these values?
Thanks!
Matt
Posts: 7,283
Threads: 268
Joined: Dec 2009
City: Roslyn Pa
The ones you have now are way off in value. For simplicity a pair of 22mfd@ 450v will work fine. Within reason the capacitance isn't real critical, 200mfd isn't reasonable. I would suspect that the dc voltage at the filament of the 80 tube is going to be about 300vdc or better so you'll need a cap with at least 300v rating or higher. Standard value is 450V. By using the 200mfd@200v your asking for trouble!
Just so you know there where like 5 different versions of the model 60 though it's long run.
http://www.nostalgiaair.org/pagesbymodel...013793.pdf
When my pals were reading comic books
I was down in the basement in my dad's
workshop. Perusing his Sam's Photofoacts
Vol 1-50 admiring the old set and trying to
figure out what all those squiggly meant.
Circa 1966
Now I think I've got!
Terry
(This post was last modified: 08-09-2016, 02:16 PM by Radioroslyn.)
Posts: 5,072
Threads: 269
Joined: Nov 2012
City: Bandon
State, Province, Country: OR
The Philco 60 model underwent a number of changes that are nicely documented in Ron's Evolution of the Philco Model 60. He has schematics with each of the changes as the model evolved. Its a must read and you'll need to sort out the version of 60 you have.
Posts: 1,402
Threads: 70
Joined: Oct 2007
City: Linn Creek, MO
Matt, Ron has done much research on the 60. Take a look here https://philcoradio.com/library/index.ph...-model-60/ It looks like the original filters were 8uf.
Steve
M R Radios C M Tubes
Posts: 24
Threads: 2
Joined: Aug 2016
City: San Diego, CA
(08-09-2016, 01:42 PM)Radioroslyn Wrote: The ones you have now are way off in value. For simplicity a pair of 22mfd@ 450v will work fine. Within reason the capacitance isn't real critical, 200mfd isn't reasonable. I would suspect that the dc voltage at the filament of the 80 tube is going to be about 300vdc or better so you'll need a cap with at least 300v rating or higher. Standard value is 450V. By using the 200mfd@200v your asking for trouble!
Just so you know there where like 5 different versions of the model 60 though it's long run.
http://www.nostalgiaair.org/pagesbymodel...013793.pdf
Thanks for that! I knew the values should'nt be critical, but 8 mf to 200mf did not seem reasonable!
Posts: 24
Threads: 2
Joined: Aug 2016
City: San Diego, CA
(08-09-2016, 02:26 PM)klondike98 Wrote: The Philco 60 model underwent a number of changes that are nicely documented in Ron's Evolution of the Philco Model 60. He has schematics with each of the changes as the model evolved. Its a must read and you'll need to sort out the version of 60 you have.
YES! I have been following dead links to the "Evolution Philco 60" now I know where those files are.
Question - I have the small bakelight escutcheon so July 1934. Is it a run 6, Nov '33 schematic or run 7 Aug '34 schematic?
Posts: 24
Threads: 2
Joined: Aug 2016
City: San Diego, CA
I see I have the Wave Trap so I must be run 7 Aug '34
Posts: 24
Threads: 2
Joined: Aug 2016
City: San Diego, CA

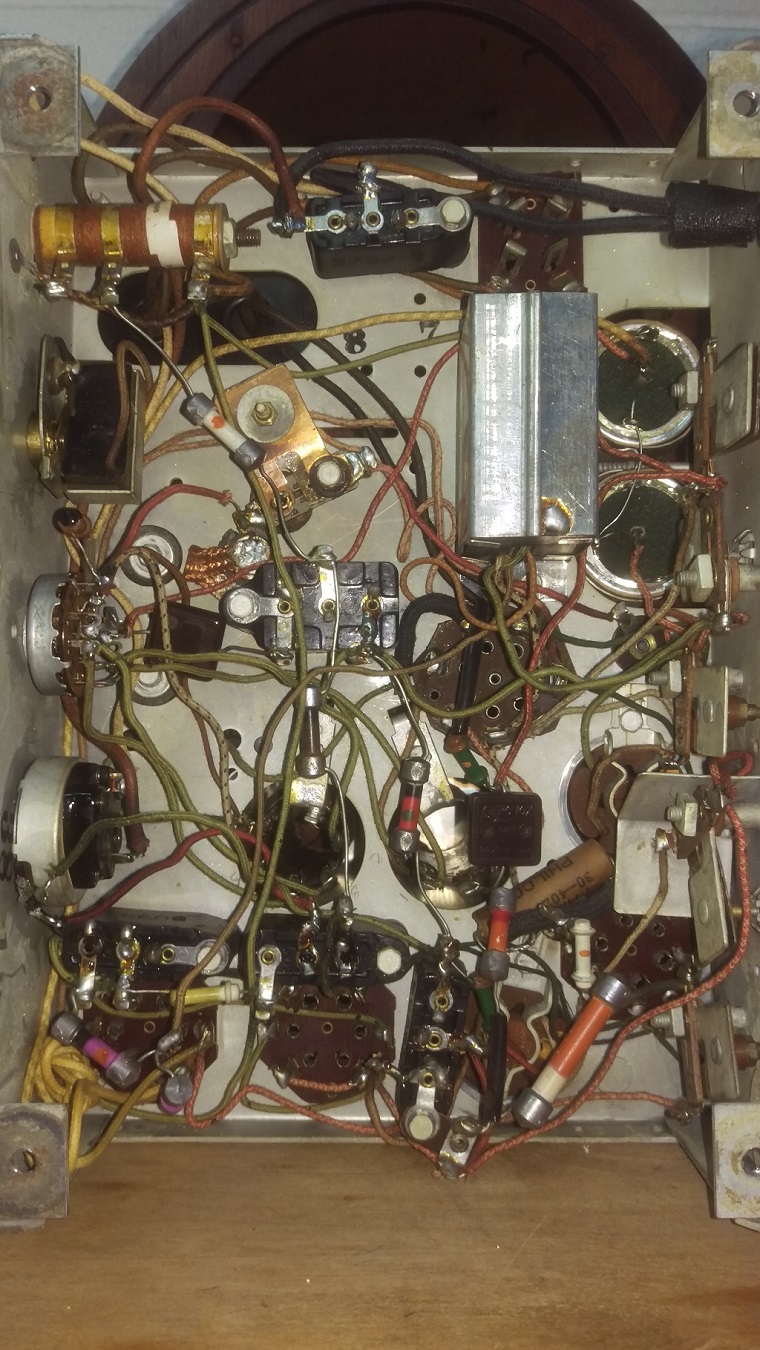
Here's the bottom picture. As far as I can tell it's original except for the newer power cord.
I did notice that IF tube (should be a 78 per schematics) has been swapped for a 77. Was that a running change or did someone put the wrong tube in?
I have sourced and ordered some Philco e-cap cans as well as new caps to stuff them with. I have heard conflicting info as to weather the e-cap cans should be insulated from the chassis (cardboard tube). I have read both, one or neither  The schematic looks like the cans are not grounded to the chassis.
(This post was last modified: 08-10-2016, 07:14 PM by Solamar.
Edit Reason: Read schematic wrong...
)
Users browsing this thread: 1 Guest(s)
|
|
Recent Posts
|
|
HiFi (Chifi) tube amp build - but my own design.
|
| What may be lacking in the PP Tube amps may be the 2nd harmonics, which some, especially RCA back in the day called &quo...MrFixr55 — 05:32 PM |
|
Jackson 715 not working
|
| Usually in an emission tester, the tube under test is measured as if it were a diode. So, some testers connect all the g...RodB — 04:17 PM |
|
Restoring Philco 37-604C
|
| Yep. F5 is green, D5 is Red.
Red is Bad.
Green is Clean.morzh — 01:30 PM |
|
Jackson 715 not working
|
| I did start to do that but I stalled out because I could not figure out how the grid and plate get voltage. In this diag...daveone23 — 11:52 AM |
|
Restoring Philco 37-604C
|
| (Insert Homer Simpson "DOPF" Here.)
When all fails, look at the can. Took the Ron Ramirez advice, red Caig D...MrFixr55 — 09:23 AM |
|
Philco 91 Speaker Replacement
|
| From your text I am not sure if you intend to use the existing speaker with a resistor instead of the field coil.
It wo...morzh — 08:44 AM |
|
Philco 91 Speaker Replacement
|
| My field coil is bad. I am still hoping to find an original, but if I can't I will go with a fitting Philco speaker, 125...dconant — 08:34 AM |
|
Philco 91 Speaker Replacement
|
| As Rod said, it is OK to use a fitting speaker, and then look for an original one.
If you buy a Hammond 125 output tr...morzh — 08:15 AM |
|
Philco 91 Speaker Replacement
|
| Yes, I often have to substitute, then keep an eye out for an original. In the meantime, the radio is working and being e...RodB — 08:02 AM |
|
Philco 91 Speaker Replacement
|
| I was wondering if I could use a more common Philco speaker and just add the resistance I need for the coil and get a ne...dconant — 07:45 AM |
|
Who's Online
|
There are currently 2058 online users. [Complete List]
» 3 Member(s) | 2055 Guest(s)
|
|
|

|
 
|


![[-] [-]](https://philcoradio.com/phorum/images/bootbb/collapse.png)


