Posts: 28
Threads: 7
Joined: Feb 2017
City: Coatesville PA
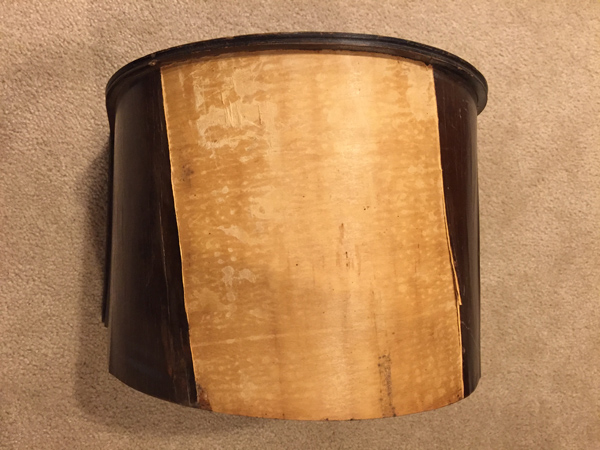
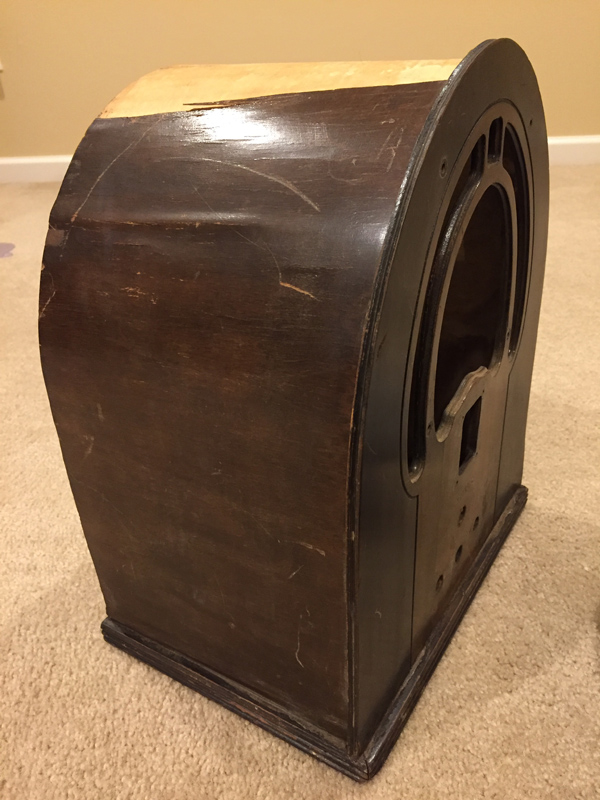
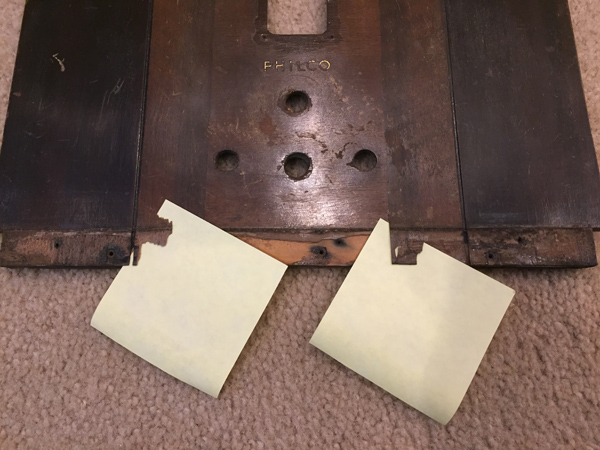
Hi Folks. I started working on my first Philco, a model 89 code 123, and as you can see the veneer on the top is totally gone and the sides are buckled and separating. What's the best way to remove the veneer completely (I'm guessing that's the best option) and where can I find a good replacement. Many of the veneers that I have seen are almost paper thin while the original looks to be about 1/32" thick. Also I'm not sure about the wood type. Walnut maybe?


Posts: 358
Threads: 4
Joined: Aug 2015
City: Monteith, Ontario CA
There are two ways that often work to remove old veneer. One is heat as from a heat gun or hair dryer. The other is moisture, ie : lay a damp cloth over the section you wish to remove and let it rest there until the veneer is loosene enough to remove. Often a combination of the two works best. Don't let moisture get into any other glue joints such as between the front panel and arch woods.
Posts: 1,411
Threads: 72
Joined: Oct 2007
City: Linn Creek, MO
Hi Dave, welcome to the Phorum!
I think your assessment is correct, the veneer needs to be removed completely. It is very difficult to veneer a curved surface. If using wood glue, the veneer needs to be clamped, something almost impossible to do with the curve. One option would be to use contact cement. The problem would be trying to get the veneer all the way into the groove in the front panel before it sticks to the wood. Another way is to use wood glue and activate it with a hot iron. The best solution would be to replace the wrap-around entirely. If you want to go that route, I can help. I will be sending a PM.
Steve
M R Radios C M Tubes
Posts: 7,300
Threads: 268
Joined: Dec 2009
City: Roslyn Pa
Hi Neighbor & welcome,
If your not in much of a hurry you could wait and see what Buzz does with his. Yours is a bit worst but his has a lot of buckling too. 1935 Philco Model 89 Restore Part 2 - YouTube I think re veneering it is the way to go as others have mentioned or sometimes these cabinets pop up on epay for a good price in decent condition. I got it's cousin around here somewhere the 19LZX (19 is an 89 w/a shadowmeter)
http://philcoradio.com/gallery/1933a.htm#d
GL
When my pals were reading comic books
I was down in the basement in my dad's
workshop. Perusing his Sam's Photofoacts
Vol 1-50 admiring the old set and trying to
figure out what all those squiggly meant.
Circa 1966
Now I think I've got!
Terry
(This post was last modified: 03-10-2017, 09:41 PM by Radioroslyn.)
Posts: 4,876
Threads: 54
Joined: Sep 2008
City: Sandwick, BC, CA
I think that the veneer over the arch is like that on a model 81, it looks like some sort of tight grained, blond, hardwood like maple, poplar, or beech. Knowing Philco that's probably what they used since they intended to slap shaded lacquer over top of it, the fact that it's also a thick veneer would also indicate this. The model 89 was a step up from a model 60, which was a step up from a model 80/81, so they used the fancy veneer on the front panel and used the cheap stuff over the arch, whereas the 80/81s used cheap veneer on everything.
Regards
Arran
Posts: 1,411
Threads: 72
Joined: Oct 2007
City: Linn Creek, MO
Arran is correct, Philco used a cheep veneer on the wrap-around, toned dark to look like Walnut. It fooled a lot of people LOL.
This is a cabinet that I did a restoration on a few years ago that had been striped and stained. It had what appeared to be rotary cut Fir.
[img]<a data-flickr-embed=[/img][Image: https://c1.staticflickr.com/1/737/325853...94d9_z.jpg]" />
I use Walnut veneer on my reproduction cabinets.
Steve
M R Radios C M Tubes
Posts: 4,876
Threads: 54
Joined: Sep 2008
City: Sandwick, BC, CA
Steve;
It would not surprise me if Philco resorted to doing what Ford supposedly did with the model Ts, in re-using material from packing crates in their cabinets, though probably not for the curved parts. It would be nice if that actually was rotary cut Douglas fir, fir turns from a sort of light orange coulor to a burgundy coulor with age if it isn't covered up with paint or what not. Tulip poplar was a popular choice in cheap cabinets, and so was ash, maple, and probably birch and beach too, I know that they liked using poplar for moldings since it has few defects and machines well.
Regards
Arran
Posts: 28
Threads: 7
Joined: Feb 2017
City: Coatesville PA
Well, after weighing my options and getting input from the forum I decided to order a new arch from Steve. I really wanted to keep as much of the old cabinet as possible but I don't have the tools (or the skills) to rebuild the arch properly. I was able to remove the front panel but the veneer under the trim is a little beat up. I think the trim will cover most of this but I have some lifted veneer that I'm thinking needs to be glued down before I remove the lacquer. Any suggestions on what glue and method is best for addressing these two spots?

***********
Dave Thomas
Coatesville, PA
Posts: 1,411
Threads: 72
Joined: Oct 2007
City: Linn Creek, MO
Dave, try putting a few drops of wood glue on a business card and slip it under the loose veneer and work it around a little. Use C-clamps and wood blocks on the front and back to clamp. Laminated counter top material makes good clamping blocks. The laminate will not become stuck to your veneer or you can use wax paper under your blocks.
Steve
M R Radios C M Tubes
Posts: 4,876
Threads: 54
Joined: Sep 2008
City: Sandwick, BC, CA
(03-14-2017, 01:27 PM)Steve Davis Wrote: Dave, try putting a few drops of wood glue on a business card and slip it under the loose veneer and work it around a little. Use C-clamps and wood blocks on the front and back to clamp. Laminated counter top material makes good clamping blocks. The laminate will not become stuck to your veneer or you can use wax paper under your blocks.
Steve
Steve;
One trick I figured out years ago is to wrap the blocks in either saran wrap or a plastic bag, glue doesn't stick to plastic bags nor saran wrap. Glue residue comes off with warm water and a brush. I was going to suggest a hypodermic needle and syringe to inject the glue, but not everybody knows where to get one, and it probably isn't necessary since the section that needs to be glued isn't that deep.
Regards
Arran
Posts: 28
Threads: 7
Joined: Feb 2017
City: Coatesville PA
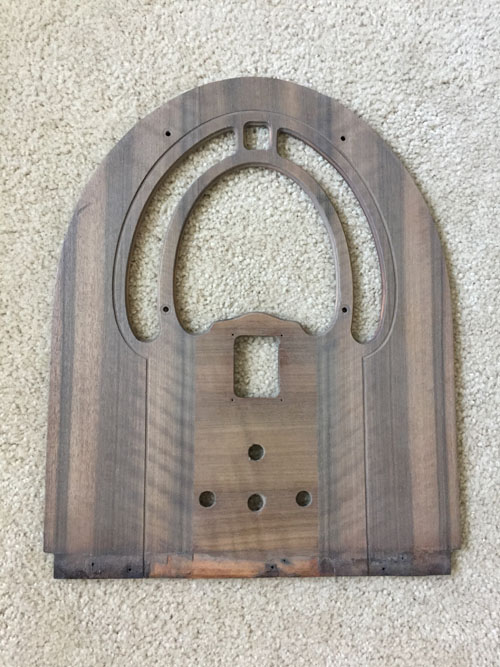
Well I'm finally ready to finish the cabinet for my 89 so I started with the front panel. I used lacquer thinner and steel wool to remove the old toner and although it worked well it seems a little darker than I expected and definitely darker than the new arch that Steve made for me. I'm wondering if the thinner turned the old lacquer into a sort of stain that darkened the veneer. Should I just leave it alone and continue finishing or sand it a bit. I'm worried about taking off too much of the old veneer. Any suggestions?

***********
Dave Thomas
Coatesville, PA
Posts: 1,411
Threads: 72
Joined: Oct 2007
City: Linn Creek, MO
The veneer on your front panel has darkened with age. Using toner on the new wraparound, you should be able to get a good match.
Steve
M R Radios C M Tubes
Posts: 28
Threads: 7
Joined: Feb 2017
City: Coatesville PA
Got a little surprise today when I tried to dry fit the arch. The slot in the original front panel is 1/8" but the new arch is about 5/32". Luckily I have the small Dremel router attachment and I was able to widen it (slowly & carefully) with a 1/8" bit. Ready now for clear coat and grain filler. Steve, you mentioned applying clear lacquer first then the grain filler. Will the filler adhere well to the clear coat. That was my only concern.
***********
Dave Thomas
Coatesville, PA
Posts: 2,118
Threads: 112
Joined: Jun 2010
City: Medford OR (OR what?)
If you are using Crystallac, yes. If you are using Por-o-pac, probably not.
"I just might turn into smoke, but I feel fine"
http://www.russoldradios.com/
Posts: 28
Threads: 7
Joined: Feb 2017
City: Coatesville PA
Maybe I'm confusing clear lacquer with some sort of sealer. What type or brand would work on the bare wood before applying the Behlen Por-o-Pac?
***********
Dave Thomas
Coatesville, PA
Users browsing this thread: 1 Guest(s)
|
|
Recent Posts
|
|
Philco model 40-100
|
| You may be able to make the part out of wood. The particular vendor has a habit of disassembling radios and selling the...MrFixr55 — 10:09 PM |
|
Philco 46-480 Electronic Restoration
|
| Used to get to Bentonville when I worked for a Walmart vendor....nice and sleepy back then. PaulPaul Philco322 — 09:49 PM |
|
Philco Model 249 made in England
|
| Did Garrard produce stand-alone turntables? The reason I ask is, when I was a kid my grandfather gave me a KLH Model 20 ...jrblasde — 09:37 PM |
|
Philco Model 249 made in England
|
| Neat looking set, definitely Euro- style. I am guessing that this is solidstate due to the vent holes (or lack thereof,...MrFixr55 — 09:32 PM |
|
Philco 46-480 Electronic Restoration
|
| Haha, thank you sir! I’ve been eyeballing a 47-1230 console for sale over north of Bentonville, Arkansas for a while. Pr...jrblasde — 09:18 PM |
|
Philco 46-480 Electronic Restoration
|
| @ Joseph, get off the porch and run with the dogs. You fixed one, grab another. @ Morzh, I think that we are the same ...MrFixr55 — 08:59 PM |
|
Philco Model 249 made in England
|
| Wow! Now that is something! I’ve never seen a Philco like that, but it’s pretty mid-century.jrblasde — 06:40 PM |
|
Philco 46-480 Electronic Restoration
|
| I've run the radio for a couple of hours today, and all is well. It's a remarkable sounding radio! I'll go ahead and upl...jrblasde — 06:05 PM |
|
Philco Model 249 made in England
|
| Gary - Thanks for responding! I hadn't actually taken possession of it at the time of my post but since you said it was...fklown — 03:32 PM |
|
Philco model 40-100
|
| Marion;
Replacing volume controls was something some service shops did in years gone by to make a little extra profit...Arran — 03:24 PM |
|
Who's Online
|
There are currently 478 online users. [Complete List]
» 2 Member(s) | 476 Guest(s)
|
|
|

|
 
|


![[-] [-]](https://philcoradio.com/phorum/images/bootbb/collapse.png)


