Posts: 1,620
Threads: 53
Joined: Nov 2017
City: Menlo Park
State, Province, Country: CA
Hi Folks,
One thing needed for our 16X restoration is speaker cloth. I have found a couple of pictures on line, but they either don't provide enough detail, or look so good that it isn't possible to be sure the material is original. It is the early 5 band model.
Any assistance would be very welcome.
Another thing I'd like to address is the paper label that should be on the inside of the cabinet with model number and chassis details of valves/tubes used. This was missing from our radio - which made the initial ID much harder, and also, knowing which valves went in which sockets, as they had been switched around! Are reproductions available, or copies of the drawings that I could print? This would be a nice feature to add.
Thanks,
Ed
I don't hold with furniture that talks.
Posts: 1,519
Threads: 69
Joined: Nov 2012
City: Kansas city, MO.
Ed you might want to look here to see what might work for you.
http://richmonddesignsinc.com/grille_cloth_product_page
Posts: 1,620
Threads: 53
Joined: Nov 2017
City: Menlo Park
State, Province, Country: CA
Thank you ! This looks a lot more promising than some other sources I had turned up.
Ed
I don't hold with furniture that talks.
Posts: 13,776
Threads: 580
Joined: Sep 2005
City: Ferdinand
State, Province, Country: Indiana
Ed
Your 16X looks like this, correct?
[Image: http://philcoradio.com/gallery2/images/1...age_00.jpg]
This radio has its original cloth.
That pattern was never faithfully reproduced. Back when Radio Grille Cloth Headquarters was in business, John tried to replicate it. It was not an exact copy, so he sold it as generic console cloth. It was a pretty good replacement at the time.
Radio Grille Cloth Headquarters is long gone now, so I would suggest the "Whiskey Rayon" cloth from Kenny Richmond (Richmond Designs) or GRC02 from Radio Daze.
--
Ron Ramirez
Ferdinand IN
Posts: 1,620
Threads: 53
Joined: Nov 2017
City: Menlo Park
State, Province, Country: CA
Thank you Ron,
What a brilliant Phorum 
Yes that is exactly our radio (aside from grillecloth obviously). Thanks for the recommendations.
I have also to reproduce the perforated back over the speaker compartment, but did find helpful pictures for that. It seems the backs were lined on the inside with something like furniture underlining. Is that correct?
Cheers, and thanks again,
Ed
I don't hold with furniture that talks.
Posts: 1,620
Threads: 53
Joined: Nov 2017
City: Menlo Park
State, Province, Country: CA
I have another question about the cabinet. There is a recess at the rear of the soundboard matching the speaker. It originally had some sort of gasket material to seal between the speaker and the soundboard, and also presumably to prevent vibrations.
What material was used? There is nothing left, save for a few traces which suggest it might have been thick felt or similar.
As usual, any help is gratefully received.
Cheers
Ed
I don't hold with furniture that talks.
Posts: 481
Threads: 18
Joined: Jan 2013
City: Mesa, AZ
I know that my 38-1 has a thick piece of grayish/brown felt going around the perimeter, measuring nearly 1/2" thick, and comes together at the bottom. I'm not sure if this is original, but certainly seems so, as the gasket around the dial face is in perfect condition, also. 
Posts: 18,427
Threads: 622
Joined: Oct 2011
City: Jackson
State, Province, Country: NJ
In all the Philcos I dealt with, that used a gasket between the speaker and the board, I saw felt being used.
People who do not drink, do not smoke, do not eat red meat will one day feel really stupid lying there and dying from nothing.
Posts: 1,620
Threads: 53
Joined: Nov 2017
City: Menlo Park
State, Province, Country: CA
Thanks - That seems right. The remaining traces look like felt. Thick strips with adhesive are available from plenty of sources.
I don't hold with furniture that talks.
Posts: 751
Threads: 91
Joined: Nov 2015
City: Jonesboro
State, Province, Country: AR
Ed,
As to the labels for the radio, check our "Downloadable Files" section of the Phorum. While I didn't see anything for the 16X, I did see a couple posts that listed the model 16. You might be able to use those, or if you have image editing capability, can edit then print them up.
Hope this is helpful.
http://philcoradio.com/phorum/forumdisplay.php?fid=25
Blessings,
Jeff W.
Jonesboro, Arkansas
http://jeffsradios.weebly.com
God loves you as you are, not as you should be, because none of us are as we should be. - Brennan Manning
Posts: 1,620
Threads: 53
Joined: Nov 2017
City: Menlo Park
State, Province, Country: CA
Thanks Jeff!
I have an alternative for this as well. I found a just readable image on line, and in my service info have the label details. With this, I have started to redraw the chassis layout as accurately as possible on the computer. I will make this available once I am happy with it. If it gets to the radio I will ammend my label to record that it is a reproduction, and the date the set was restored.
Cheers,
Ed
I don't hold with furniture that talks.
Posts: 1,620
Threads: 53
Joined: Nov 2017
City: Menlo Park
State, Province, Country: CA
OK. last weekend, I found the speaker felt gasket - a basic "Weather seal" product from the hardware store down the street, glued in place, and I replaced the sound board. Things are looking good. Close inspection revealed a couple of cabinet areas in need of glue, and that was also attended.
I found a suitable piece of hardboard, and this week's fun will be making a new back for the speaker compartment. I'll probably have to invest in a new hole saw - they were serious about those perforations!
I don't hold with furniture that talks.
Posts: 1,620
Threads: 53
Joined: Nov 2017
City: Menlo Park
State, Province, Country: CA
A little work today... I cut a piece of board to the right size, and bought the correct size hole saw. Then I tried to make a few practice holes on the scrap material. Sometimes this is really worthwhile. Now I know suitable drill speeds and which direction to cut. Next, to mark out the panel in the appropriate pattern and start making holes. ~100 of them!
I don't hold with furniture that talks.
Posts: 1,620
Threads: 53
Joined: Nov 2017
City: Menlo Park
State, Province, Country: CA
More work today (eventually) on the back. Some of my available time was absorbed in repairing a chair for Mrs H, making her happy.
I am now thinking of rebranding this part of the radio "The Philco Effort Absorbing Screen" as it continues to be slow going. Working with a hole saw depletes my drill battery rather quickly, and it is slow going with the hardboard. Slower still, as it is often hard to remove the disc from the centre of the tool. I have now figured out a method to stop that from happening. Not completed today, but I am at least over halfway with the drilling. I might display the radio facing the wall for a while to admire the time-consuming handiwork on this, and the chassis!
Cheers
Ed
I don't hold with furniture that talks.
Posts: 1,620
Threads: 53
Joined: Nov 2017
City: Menlo Park
State, Province, Country: CA
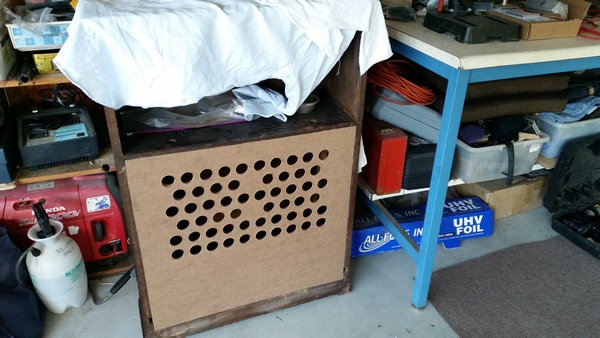
Here is the back, part way completed, and resting in the cabinet for reference. The design is based on a picture found on line, and scaled accordingly. Eventually I'll paint it black (matches what I saw in the picture) and add cloth to the inside surface.
I don't hold with furniture that talks.
Users browsing this thread: 1 Guest(s)
|
|
Recent Posts
|
|
54C Complete Teardown/Rebuild
|
| Hello Roy,
here is this one
sincerely Richardradiorich — 12:45 AM |
|
54C Complete Teardown/Rebuild
|
| Richard,
Had grabbed it already but thank you just the same. I find myself wanting to find some way to block out the...glyphmon — 12:03 AM |
|
54C Complete Teardown/Rebuild
|
| Hello roy,
here is a link to the schematic .
Sincerely Richardradiorich — 11:54 PM |
|
54C Complete Teardown/Rebuild
|
| Richard,
The Silvertone 2014 also is a transformerless set, so I am incorporating a 1:1 600 ohm audio isolation transfo...glyphmon — 11:37 PM |
|
Preliminary work on wife's Silvertone 2014
|
| Did an alignment today which was interesting. IF alignment went great, almost all was already spot-on. Adjusting on th...glyphmon — 11:35 PM |
|
54C Complete Teardown/Rebuild
|
| The main problem with adding a Bluetooth input is that this set lacks a traditional power transformer to isolate it from...radiorich — 11:19 PM |
|
54C Cabinet Refinish
|
|
I started stripping this cabinet before it got super chilly out because I knew I wasn't going to be able to work on ...glyphmon — 11:18 PM |
|
54C Complete Teardown/Rebuild
|
| While I'm waiting to wrap up the final steps on my wife's Silvertone 2014, I started disassembly on the next project. O...glyphmon — 11:07 PM |
|
Preliminary work on wife's Silvertone 2014
|
| Hello roy,
that great news glad it worked out for you !!
Sincerely Richardradiorich — 10:50 PM |
|
Preliminary work on wife's Silvertone 2014
|
| Safety caps arrived today. Soldered one in and had a successful first power-up. No magic smoke escaped and it tunes in...glyphmon — 09:53 PM |
|
Who's Online
|
There are currently 1952 online users. [Complete List]
» 1 Member(s) | 1951 Guest(s)
|
|
|

|
 
|








