I'm trying to figure out what's going on with the choke, part 120 (32-7491). I checked the resistance and it reads ~11K ohms instead of 400 ohms. That's not a good sign.
If anything I would have expected it to maybe be open (broken wire) or less than 400 ohms (some sort of short). But that not the case.
Any ideas? I'd kind of like to salvage it, but don't really want to wind wire for the next week.
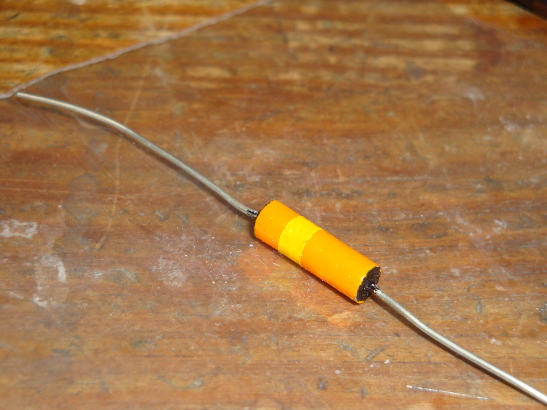
Also I'm thinking of restuffing capacitors and making appropriate looking resistors by placing "modern" ones in polystyrene tubes. It's relatively easy with the exception of one detail. The leads on modern ones are a lot thinner. For my "prototype" I soldered thicker leads to the resistor. It works but I worry about accidentally melting those joints and creating cold solder joints when installing them. I know, be careful and use a heat sink. Any thoughts? Is the lead thing pathological?
Here's my "prototype". The paint job's a bit rough...
Can't think of anything witty.
Greg O.
Whitehall, PA
The thought of wrapping resistance with potentially flammable material doesn't set well with me.
In normal operation, capacitors generally do not get warm, . . . but we know that current passing through a resistance does create a certain amount heat, as a natural occurrence. So the next question becomes , "How much more heat could the polystyrene take before creating an unacceptable hazard over, say, a naked power resistor?
Just a thought.
(This post was last modified: 02-08-2020, 09:40 AM by Jake Blake.)
Greg, On the choke if it isn't a simple fix I would put a want ad for a parts chassis here and on the barking dog. It's not uncommon to find a bad rf coil or two in the deck. Kutztown is coming up in May and to save shipping and the sell is coming you could pick it up there. The last couple of yrs there have been a '116 chassis for a decent price. On the resistors I want someone to know that it's been serviced so I would not bother recreate the old style ones.
TP, I like the color coordinated shrink tubing! I don't know why but some folks use white or bright orange and it just kinda rubs me the wrong way. Black goes w/everything and matching is even better!
When my pals were reading comic books
I was down in the basement in my dad's
workshop. Perusing his Sam's Photofoacts
Vol 1-50 admiring the old set and trying to
figure out what all those squiggly meant.
Circa 1966
Now I think I've got it!
I think how it works is that you loosen the nut on the vc and slide it back to disengage the shaft. Undo the nut at the front of the chassis to remove the shaft and bushing. It's been 100yrs ago since I've had one apart.
When my pals were reading comic books
I was down in the basement in my dad's
workshop. Perusing his Sam's Photofoacts
Vol 1-50 admiring the old set and trying to
figure out what all those squiggly meant.
Circa 1966
Now I think I've got it!
the shaft is actually held in place with a slide in clip on the back side of the front of the chassis. Remove it and the shaft will slide out of the VC and all the way out of the chassis. There is a small clip on the end of the shaft that goes into the VC. Don't lose it. It's there to take up some loosenes that would otherwise be in the linkage.
A couple of pics of my 38-116 that is still on the bench (37-116 is the same or similar):
(This post was last modified: 03-02-2020, 07:55 PM by rfeenstra.)
Thanks. It's similar to your 38-116 but there's something that looks like a C-clip holding it in place. I had it in my head that the shaft was somehow locked on to the volume control shaft and didn't think to look elsewhere. I'll take it apart tomorrow.
I noticed that you did quite a bit of rewiring. My wires don't seem to be too brittle, but I think I should avoid excessive bending.
Can't think of anything witty.
Greg O.
Whitehall, PA
Yes I did replace all the wire, and the resistors (you can see that I did not try to mold the resistors to make them look original), and all of the tubular and electorlytic capacitors (those I re-stuffed).
I removed the RF chassis and have checked the antenna transformer coils.
The BC band transformer has a bad primary. There's no continuity between either end and the center tap. I suspect the problem is at the center tap.
How is the primary wound? I'd kind of like to know before I start unwinding wire.
I scraped the wax off of the primary with my finger nail. I expected to see some sort of discontinuity in the middle where two haves of the coil join. Maybe it's small and I missed it. I'll clear off some wax at that end with the heat gun to see what I can see.
It wasn't fun getting the coil out and it won't be fun replacing the capacitor sandwiched between the two band switch wafers either.
Can't think of anything witty.
Greg O.
Whitehall, PA
I didn't have a problem with the RF coil, so I can't help you there. Just the oscillator coil for the Police band - the typical Philco green wire syndrome. Make sure you check that coil as it is a very common problem on these.
(This post was last modified: 03-21-2020, 07:14 PM by rfeenstra.)
Fixed the primary antenna coil. It turns out that both ends were "broken".
At one end the wire had somehow broken off of the terminal. I added a little piece of wire and reconnected it.
At the other end it was a bit trickier. It looks like the secondary is wound on a long coil form and the primary on a shorter form slipped over top of the long one. Wire from the end in question looks like it must go through a hole in the and up between the two forms to the terminal.
I took a minimally invasive approach. I displaced the wire a bit. Soldered a piece of wire to the end. Took the wire through a hole up to the terminal. I didn't bother to snip the original bit that went to the terminal. Then I refreshed the wax a bit.
I didn't want to rewind the coil if at all possible.
On to the next problem, whatever that may be.
Can't think of anything witty.
Greg O.
Whitehall, PA








 Do check the oscillator coils.


