Another noob with another Philco!
Posts: 19
Threads: 3
Joined: Dec 2018
City: Duluth
State, Province, Country: GA


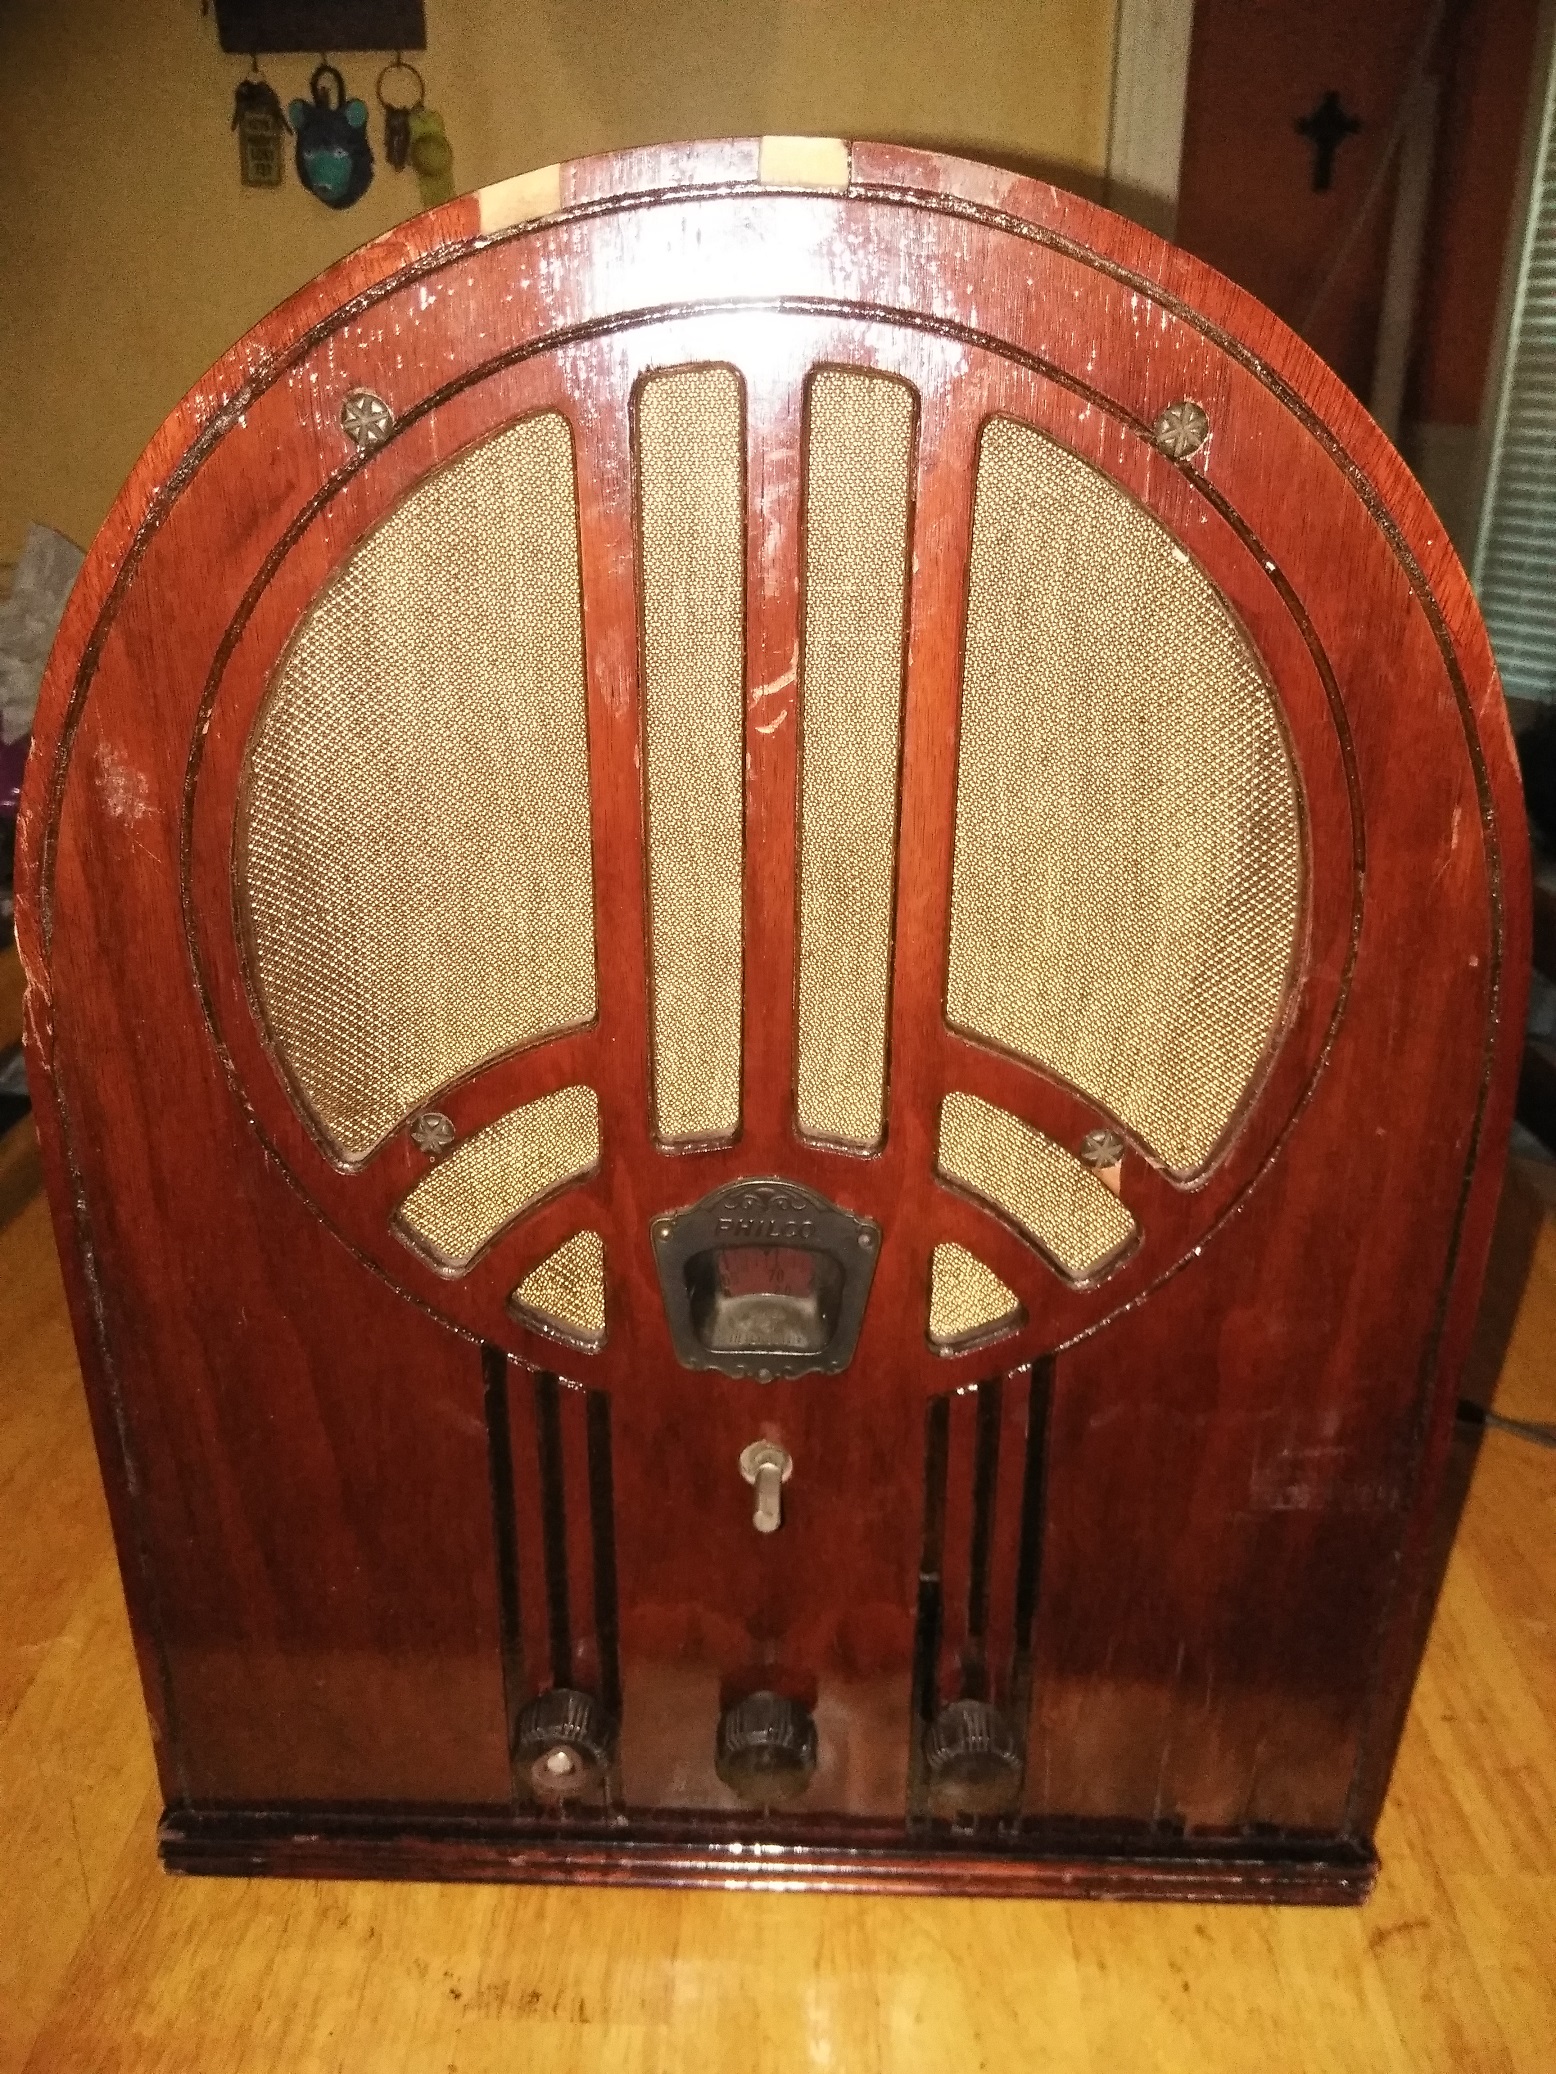
Hi everyone! My very first post here after lurking in the shadows for a week while I was hungrily waiting to get my Model 60 2nd. Edition delivered. Took it out of the box today and I must admit, I was somewhat disappointed. Don't get me wrong, it's still a neat radio and a project for restoration. But as I have discovered in times past, eBay photos can be somewhat unrevealing if the light level isn't adequate enough. Man, I'm gonna have to remember that trick one day for my rougher listings!
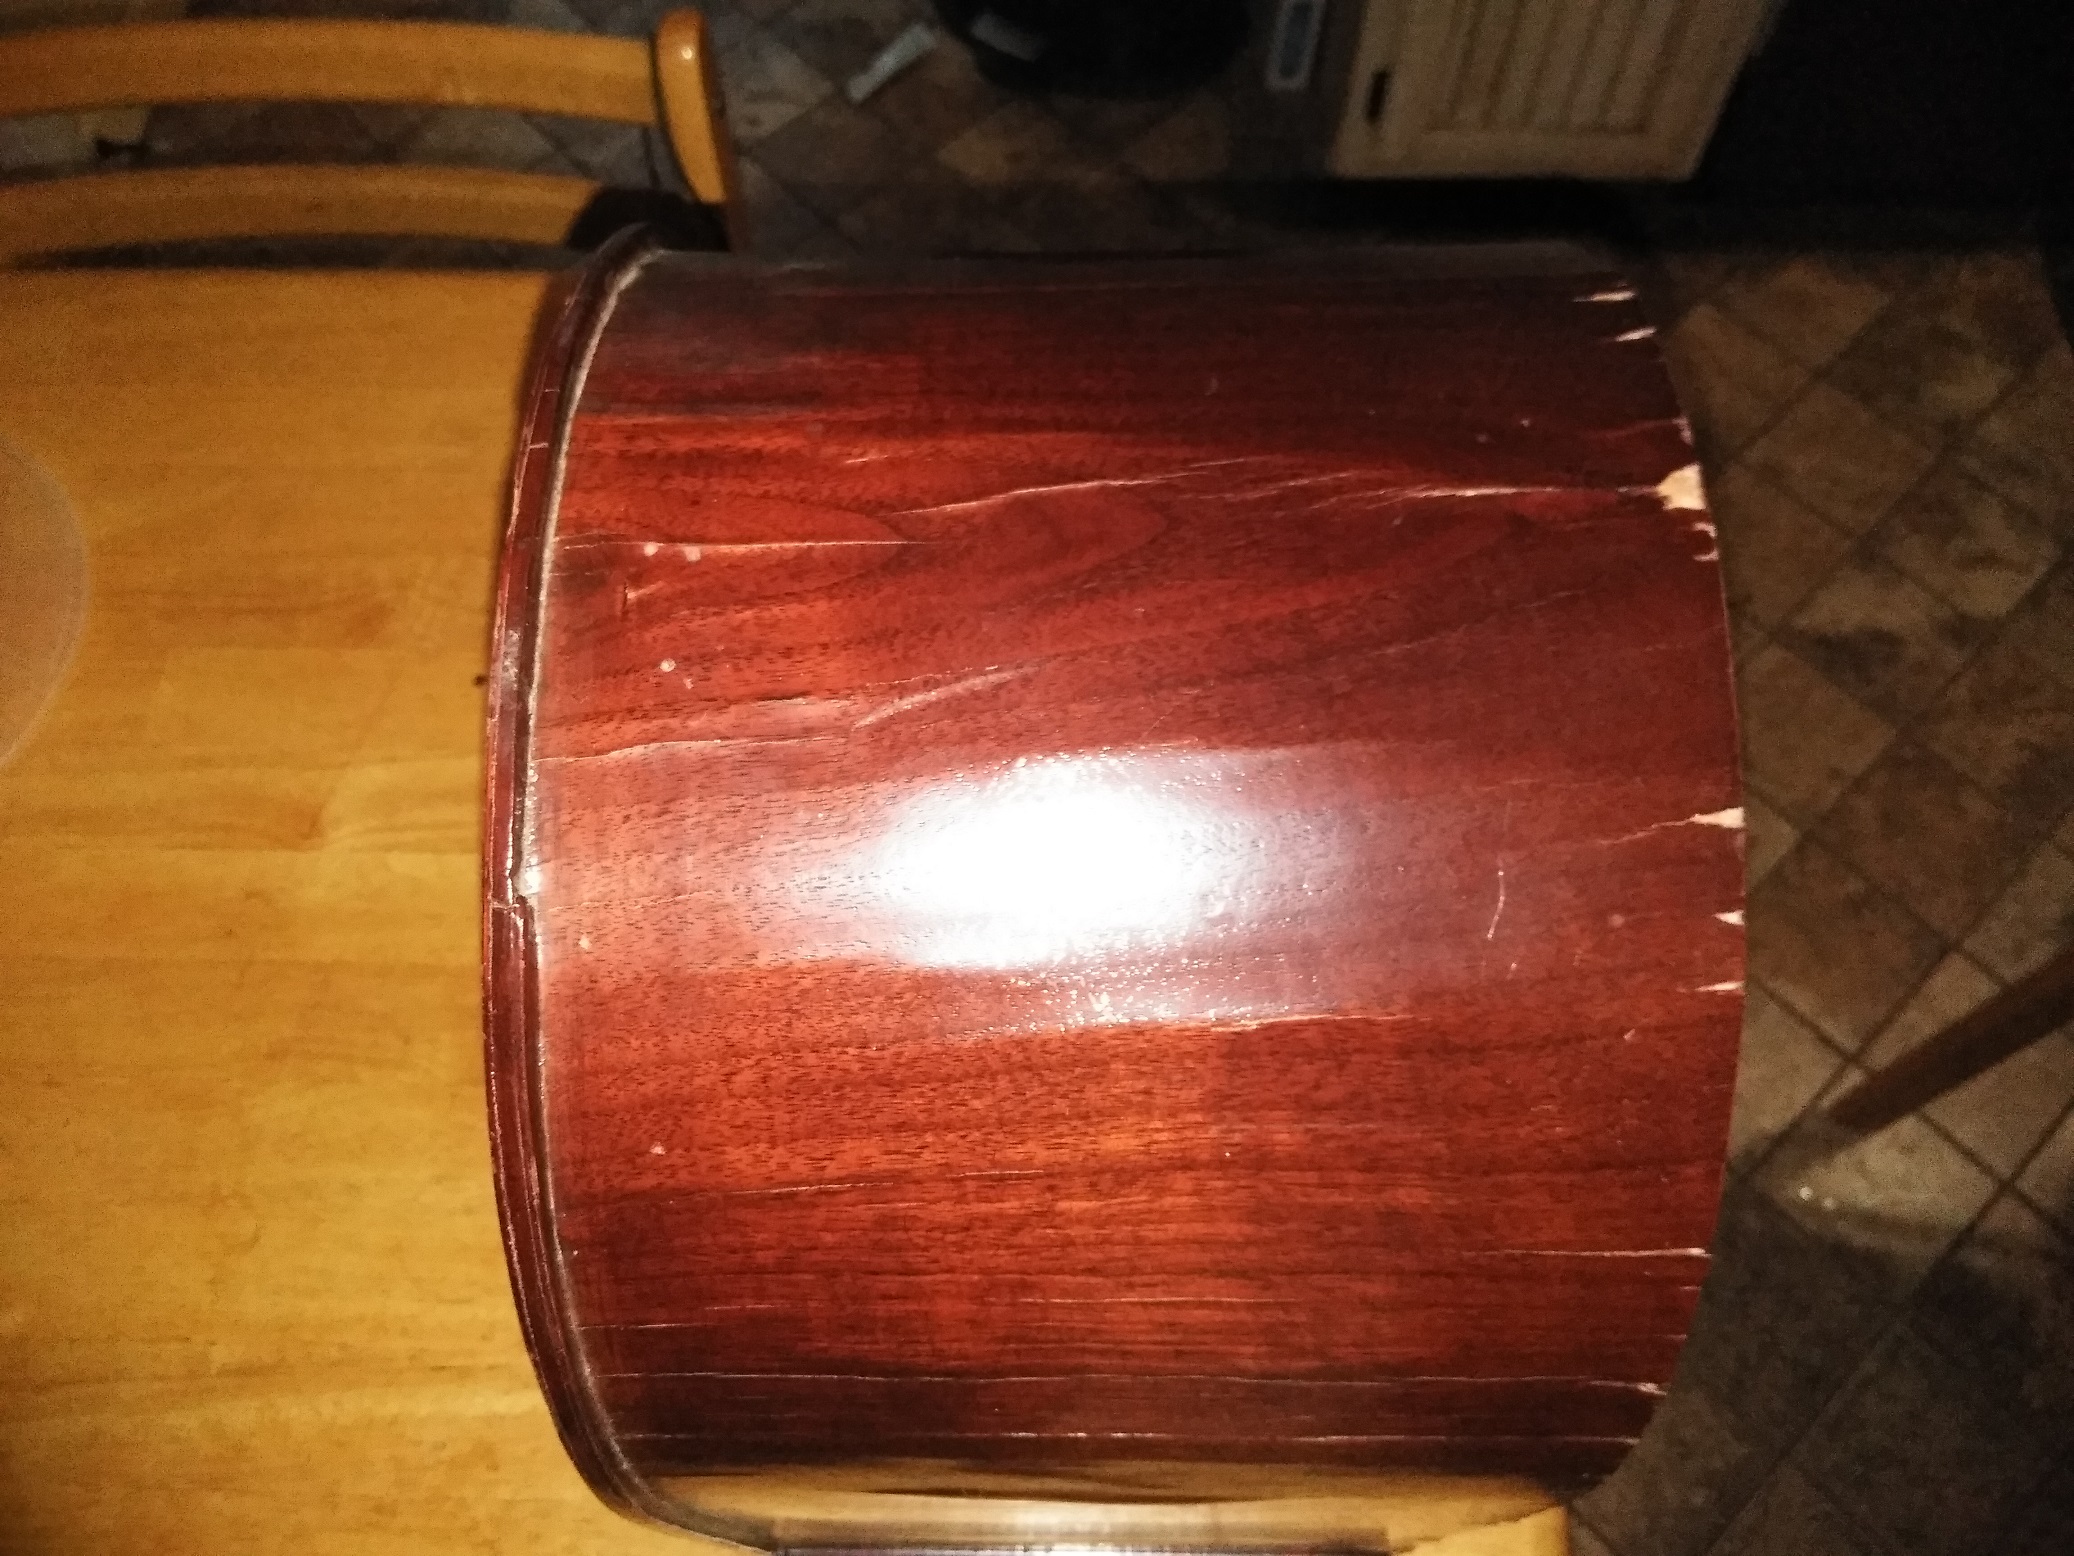
Anyway, taking it out of the box a little nervously, as it wasn't really packed as well as I would have expected, I was relieved to note that it seemed to make the trip from northern Indiana to the ATL without further damage. BUT, the laminate on the top and the sides of the cathedral appears to be almost a total loss. There is a lot of separation and buckling going on, with some small missing pieces. I've reviewed an excellent post here on repairs of smaller areas, but after looking at the unit, I just don't think that will do. Heartbreaking, but fixable.
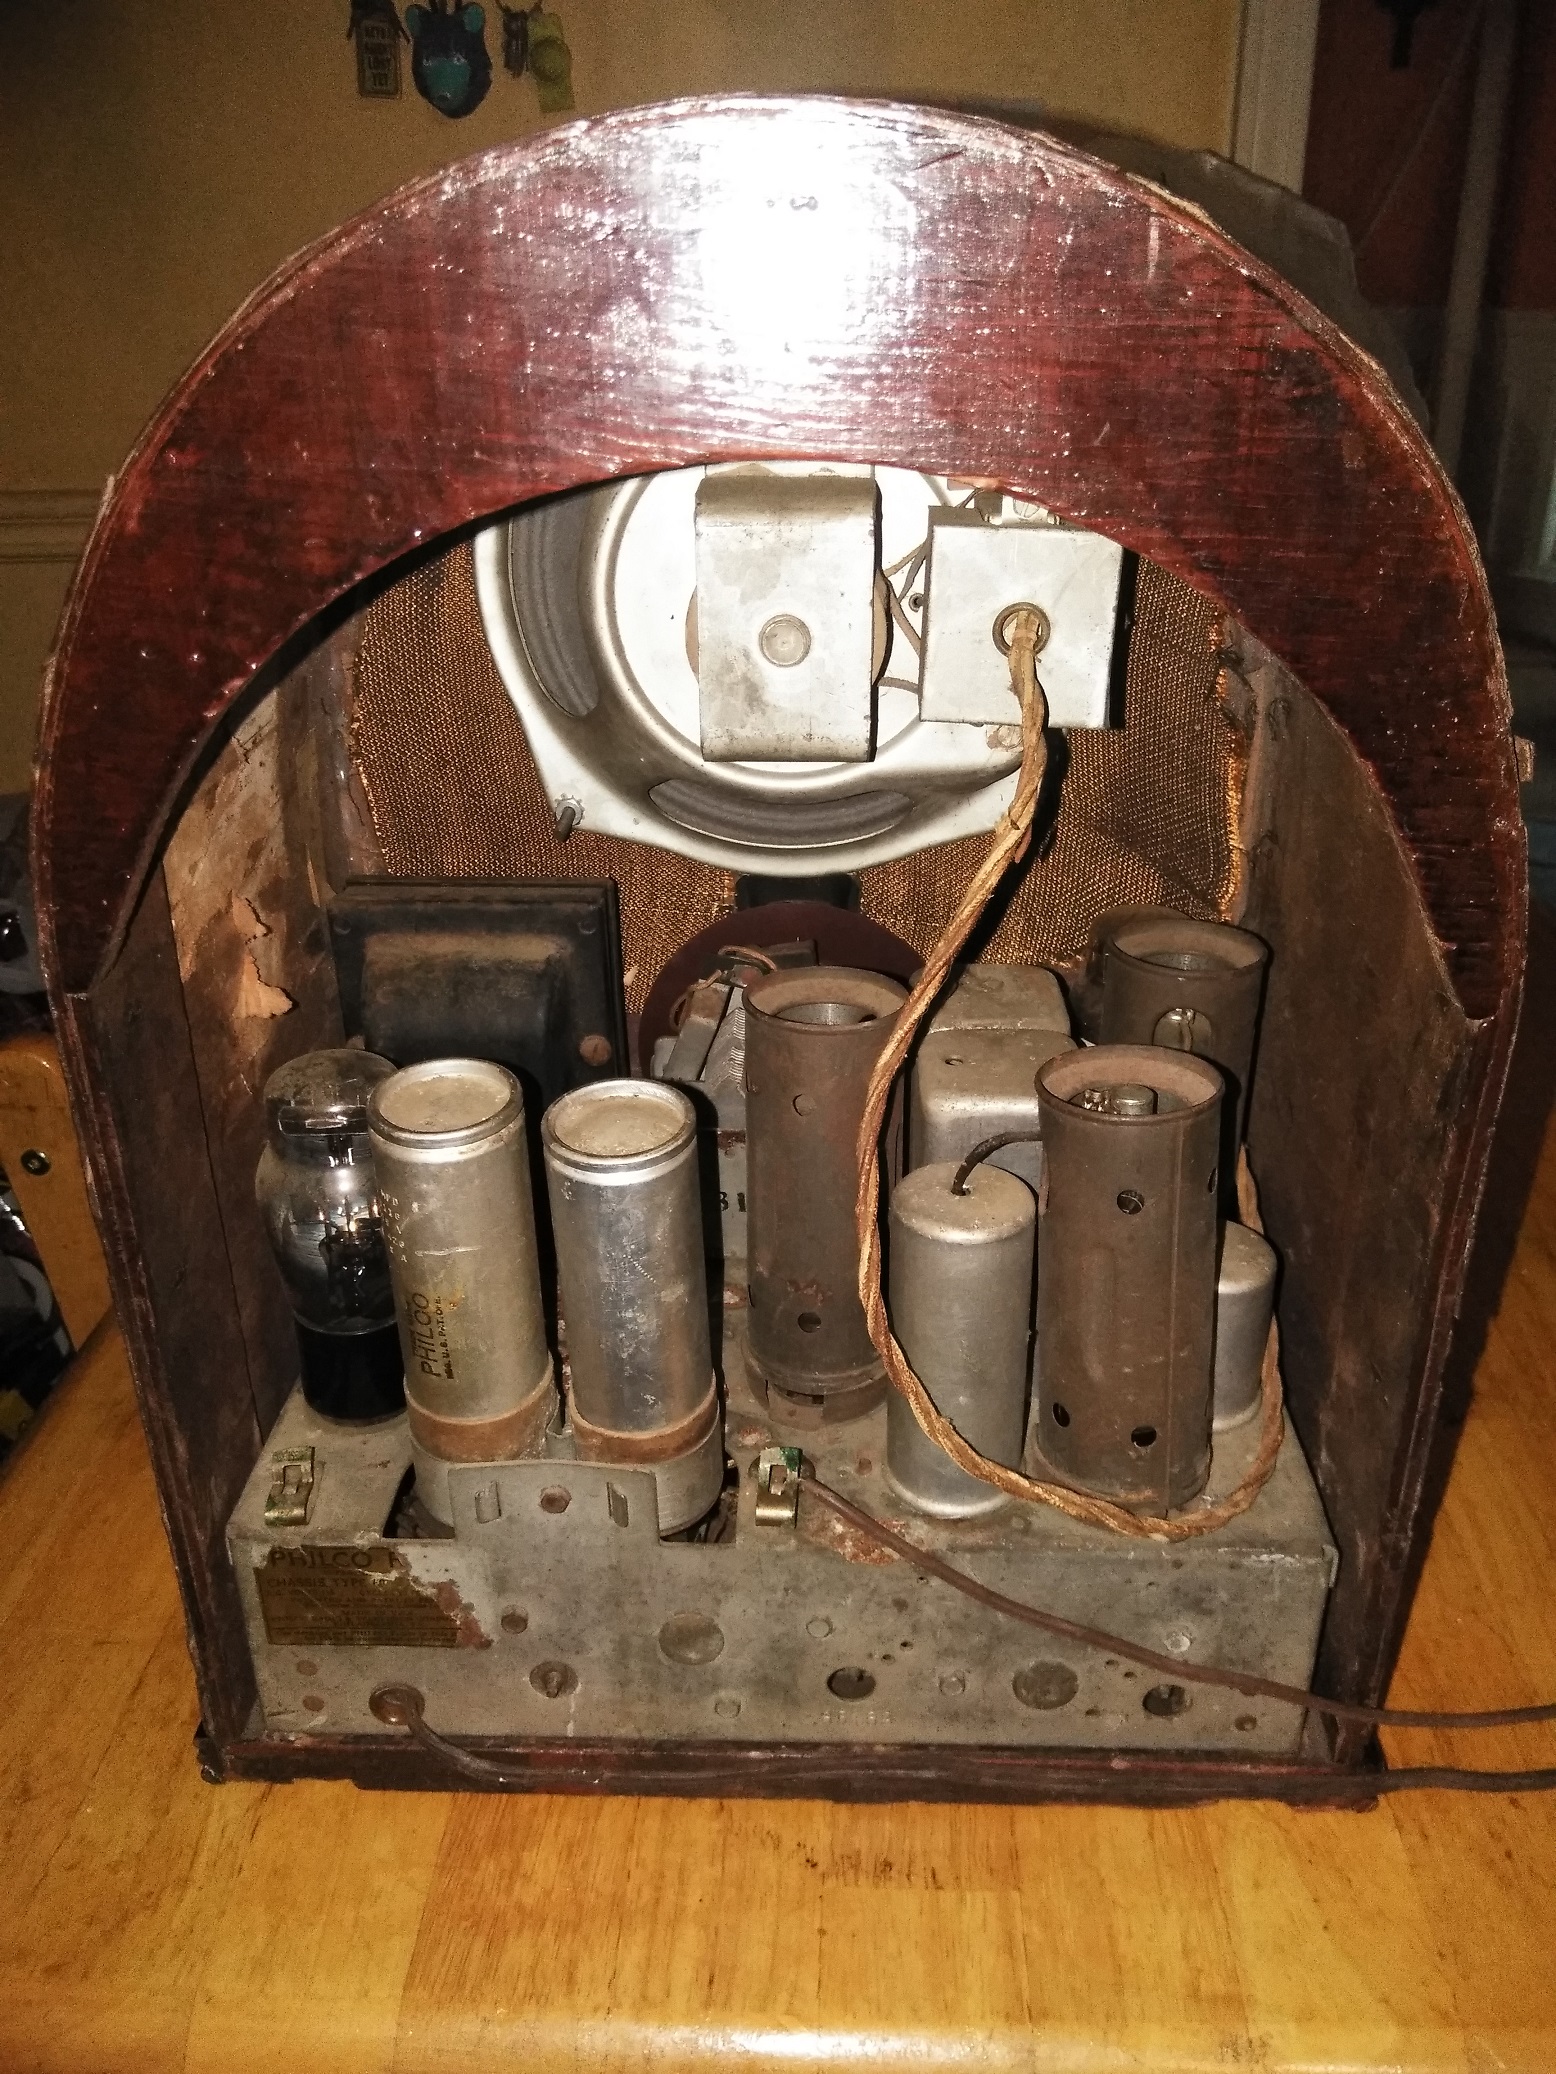
It also appears that this radio was the subject of some restoration in the past, but how long ago, I just don't know. I'm guessing around the 60s or 70s, since the power cord has been replaced with non cloth insulated, but has one of the dumb plugs that is almost square shaped that were so popular in the hardware stores back in the day. You know, the ones that you fed the two conductors into and then pressed a snap in button that caused the inner teeth to perforate the insulation jacket to get current from the blades? I just am having a hard time imagining someone resorting to that. Also, the toner doesn't look quite right as to its shade and the exterior is WAY too glossy, even over the damaged laminate. I guess it spent some time in a northern garage around lake Michigan after its previous work. The decal on the front is also gone, and most of the interior factory decals look as if someone attempted to peel them out. WHY?
The dial is darkened to a point where it will have to be replaced, and the tuning knob shaft assembly appears to be slightly loose from the chassis. Which might explain at least partially why the dial doesn't turn as well as it should when the shaft is turned. The knobs do not appear to be the originals either, and one is missing and another is defective They aren't full rosette and they aren't hex. I think that I would call them partial rosette if anything. According to http://www.tuberadioland.com/philco60B_2nd_main.html, these type knobs were never mentioned but the other two were. Oh, I think that the speaker grill cloth is not the right one, either.
According to the lister, the radio will turn on but get nothing but static and cannot be tuned. What a surprise, but I knew that from the listing, so it's okay.
The inside chassis at first glance appears to be fairly corrosion free unlike many of these neglected ones look, so that may be a plus. One of my first steps will be replacement of the cord, as its insulation is degraded with a couple of small sections to the rubber jacket missing and to put a proper one on it. I see a long wire going to a clip in the top center of the chassis, which I assume means that it was used as a ground. How do these radios do with three prong polarized plugs that are out there? I'm a home inspector in my day job, in spite of my screen name, and I'm somewhat reluctant to replace it with anything less unless it's just undo-able. I'm also gonna start looking for someone with a tube tester that I can get readings on the tubes from in the next few days. After that, I'll get around to the caps, before ever turning it on for testing.
Any sage advice on these first steps? I also know a really good furniture guy who's going to help with getting a laminate sheet and the right toner for this baby. But the cabinet is just gonna have to wait on getting the electronics operational at this stage.
Thanks for reading this very LONG post. I'll be posting updates as I go along. 
You can call me Jerry if you don't want to use my handle. I get it. Makes some folks nervous.
I have a finely tuned horse puckey detector. Don't blame me if it goes off. 
Posts: 5,216
Threads: 275
Joined: Nov 2012
City: Wilsonville
State, Province, Country: OR
Welcome to the Phorum!

Be sure to read the following post about the Evolution of the Model 60.
http://philcoradio.com/phorum/showthread.php?tid=15007
Posts: 1,269
Threads: 32
Joined: Jan 2014
City: Wellborn Florida

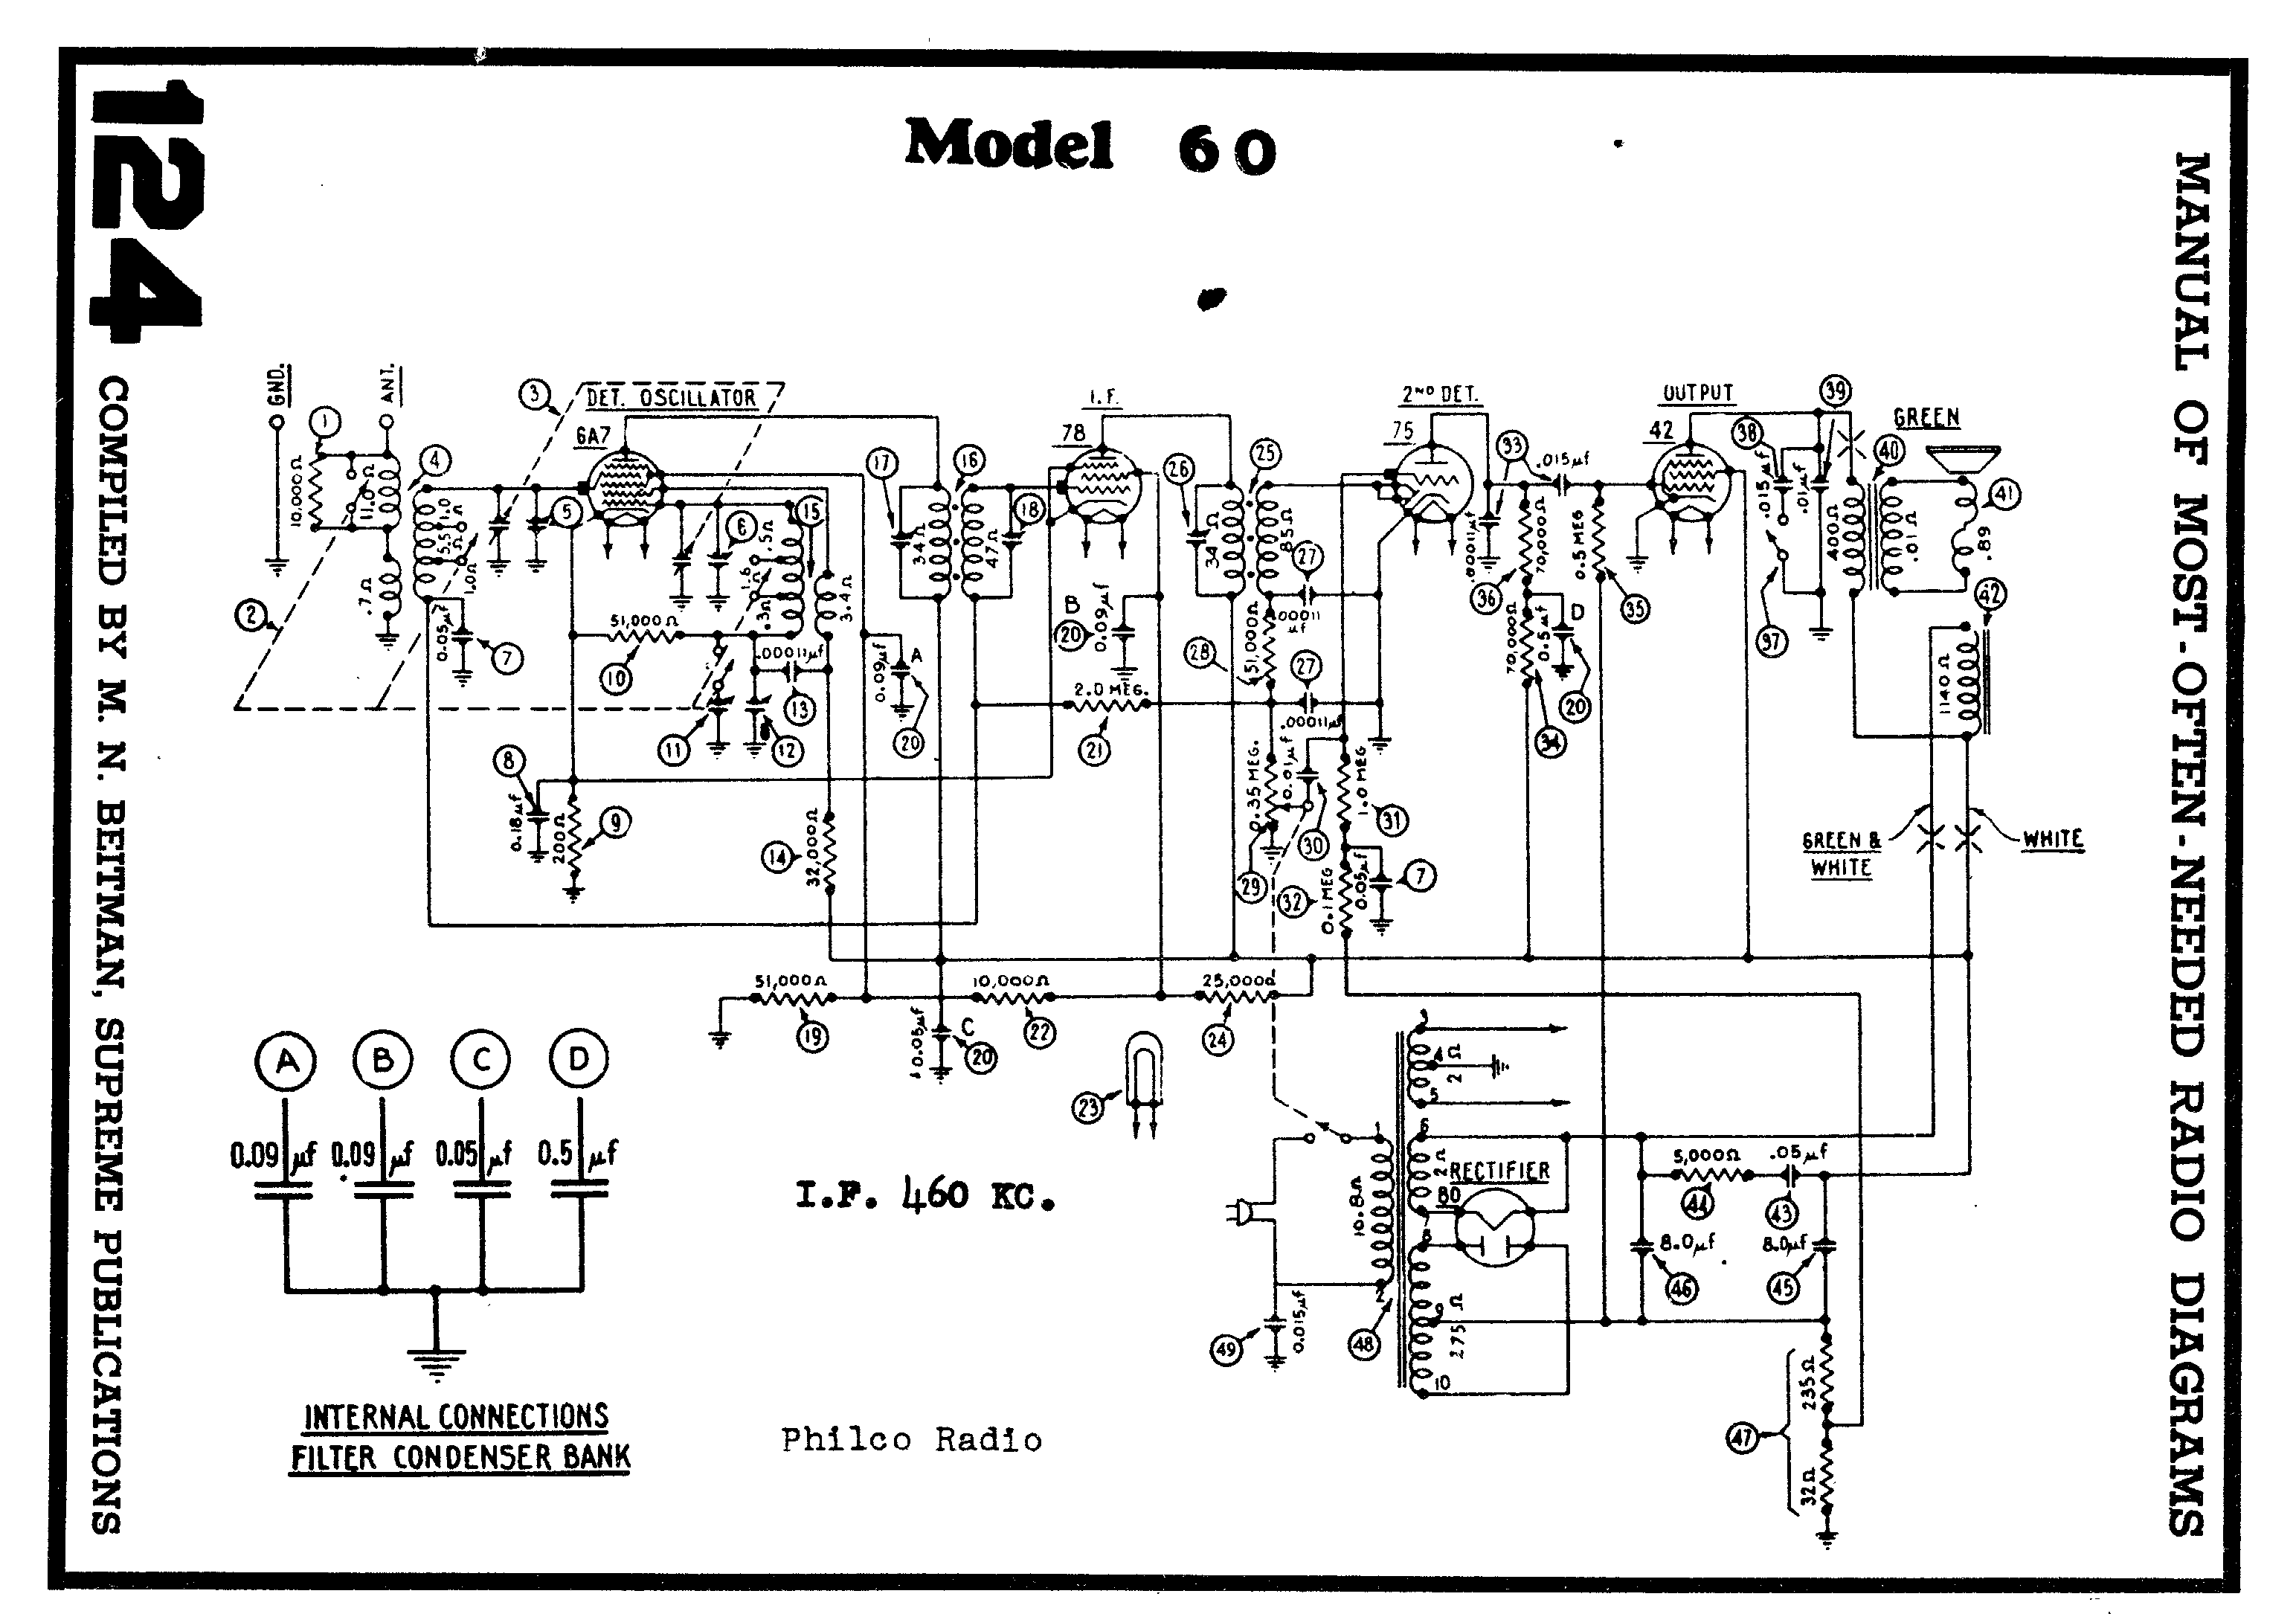
Not sure which edition but this is all the info from Beitmans
Posts: 5,216
Threads: 275
Joined: Nov 2012
City: Wilsonville
State, Province, Country: OR
David, the best schematics for the Model 60 in its many versions are found in the Phorum thread I mentioned:
http://philcoradio.com/phorum/showthread.php?tid=15007
There were many revisions and Ron has documented them in painstaking detail.
Posts: 21
Threads: 3
Joined: Dec 2018
City: Davis
State, Province, Country: CA
Looks like a good project. Messy veneer, but without crazy curves, just one big bend to deal with. The electronics seem like a solid foundation for restoration as well. Good luck!
Posts: 16,577
Threads: 574
Joined: Oct 2011
City: Jackson
State, Province, Country: NJ
I hope this shiny glittery stuff is not poly, then you will have to deal with it on the front panel.
People who do not drink, do not smoke, do not eat red meat will one day feel really stupid lying there and dying from nothing.
Posts: 19
Threads: 3
Joined: Dec 2018
City: Duluth
State, Province, Country: GA
You took the words right out of my mouth. Unfortunately, I think that's exactly what it is.
You can call me Jerry if you don't want to use my handle. I get it. Makes some folks nervous.
I have a finely tuned horse puckey detector. Don't blame me if it goes off. 
Posts: 7,305
Threads: 270
Joined: Dec 2009
City: Roslyn Pa
Hi Jerry and welcome,
As mentioned the chassis looks pretty good but on the other hand the cabinet is a mess. Looking at the wrinkling of the veneer on the outside (surround) I'm thinking that the wood under it is no good either. I would disassemble the cabinet removing the surround from the baseboard and front panel. Remove the arch from the surround. Depending on your skill set fabricate a new surround or give Steve Davis a note and he could probably build a new one for you. He does excellent work and prices are reasonable. The finish that is currently on it maybe polyurethane which add a little more difficulty to remove. The rest is probably salvageable but it more that likely it would be more time/cost effective to find another cabinet while servicing the chassis.
Best of luck w/your new project!
When my pals were reading comic books
I was down in the basement in my dad's
workshop. Perusing his Sam's Photofoacts
Vol 1-50 admiring the old set and trying to
figure out what all those squiggly meant.
Circa 1966
Now I think I've got!
Terry
Posts: 7,305
Threads: 270
Joined: Dec 2009
City: Roslyn Pa
I suppose I should answer your questions.
> The decal on the front is also gone, and most of the interior factory decals look as if someone attempted to peel them out. WHY?
Never had a decal on the front, just the Philco logo on the dial escutcheon. The labels on the chassis probably just fell off from glue failure over the 80 some years. If you poke around the Phorum you may find printable labels for the inside of the cabinet.
>The dial is darkened to a point where it will have to be replaced
I'd leave it still looks good. You can clean it but use only mineral spirits NO water or soaps lest the print will disappear.
> The knobs do not appear to be the originals either
Yes the knobs are from a 1939 or so Philco set. Should have the rosette knobs and the tuning is a little larger than the others. The hex knobs wern't used on the 60 for another year or so. http://philcoradio.com/gallery2/1934a/#Model_60B
> I think that the speaker grill cloth is not the right one, either.
Well it's not too bad looking and not sure that the original pattern is available.
<How do these radios do with three prong polarized plugs that are out there?
Personally I wouldn't use one. There is a LOT of rf noise on the ac lines these days and using the ground the home ground wiring promotes pickup of these noises. Better to use a separate ground like a connection to a cold water pipe or hot water baseboard fin.
I think I've touched on most of your question.
When my pals were reading comic books
I was down in the basement in my dad's
workshop. Perusing his Sam's Photofoacts
Vol 1-50 admiring the old set and trying to
figure out what all those squiggly meant.
Circa 1966
Now I think I've got!
Terry
(This post was last modified: 12-12-2018, 11:24 PM by Radioroslyn.)
Posts: 19
Threads: 3
Joined: Dec 2018
City: Duluth
State, Province, Country: GA
Thanks my friend. I'm really not having much luck finding anyone with a tube tester in the area. Maybe someone will come across this post and recommend a person that has one that can test the tubes for me in the Atlanta area. Just now getting around to that part of the process. Too much else going on during this holiday. I've got two little ones still and am a single dad. Plus, this d**ned Lyme disease has reared it's ugly head over the season. That's part of the reason why I got the radio, for my bad days to keep me busy. But this time it was just too much coupled with all of the other stuff. But I'm back on it now!
You can call me Jerry if you don't want to use my handle. I get it. Makes some folks nervous.
I have a finely tuned horse puckey detector. Don't blame me if it goes off. 
(This post was last modified: 01-05-2019, 04:30 AM by atlghosthunter.
Edit Reason: more comments
)
Posts: 7,305
Threads: 270
Joined: Dec 2009
City: Roslyn Pa
Hi Jerry,
>Thanks my friend.
Your very welcome!
>I'm really not having much luck finding anyone with a tube tester in the area.
If you like living on the wild side of things you can do a very basic test which will tell you if the tubes any chance of working. To do this REMOVE #80 tube. It's the one on the left side (rear view) by the power transformer and filter caps. Just pull it straight up. Inspect the ac cord for damage and replace if needed. Plug it in and turn it on. Dial lamp should light and so should all of the remaining tubes.
If this method seems a bit radical you can remove each tube one by one. Looking at the bottom you'll note that there are six pins, two fat ones and four slim ones. Use your ohm meter to measure the resistance across the two fat pins. Should show a low resistance a couple of ohms. If not the tube's heater is bad and will render it useless. The 80 has four pins but do like wise measure the two fat pins.
This test doesn't tell what condition the tube is in but whether it will work at all. Generally tubes aren't the major problem as even if there are not 100% the set well work ok. Then you get down to abt 30-40% then you can have some issues.
<Plus, this d**ned Lyme disease has reared it's ugly head over the season.
Know what you mean I was diagnosed with Lyme back in the '90s it sucks!! Picked it up at an Easter egg hunt with the kids in '89. Youngest son got it too at that time but we found it out pretty quick and got on meds. He's 31 now and doesn't have any signs of it. I had it for a while before it started with any symptoms. Still have issues from it. Can really run your battery down and w/aches and pains.
< That's part of the reason why I got the radio, for my bad days to keep me busy.
I've been doing radio stuff since I was a kid back in the '60s. It keeps you mind active thinking of troubleshooting and such. I enjoy figuring things out.
When my pals were reading comic books
I was down in the basement in my dad's
workshop. Perusing his Sam's Photofoacts
Vol 1-50 admiring the old set and trying to
figure out what all those squiggly meant.
Circa 1966
Now I think I've got!
Terry
Posts: 120
Threads: 15
Joined: Aug 2017
City: Fort Worth
State, Province, Country: TX
(01-05-2019, 04:27 AM)atlghosthunter Wrote: Thanks my friend. I'm really not having much luck finding anyone with a tube tester in the area. Maybe someone will come across this post and recommend a person that has one that can test the tubes for me in the Atlanta area. Just now getting around to that part of the process.
Jerry,
Sorry to hear about the Lyme disease when you already have your hands full with two little ones. If you want the tubes tested, I'd be happy to test them for you on my emissions tester, Jackson 648S. You'd have to mail them to me. I can test and return them. If you can't find anyone locally and want to send them, pm me so we can work out details.
Larry
Posts: 19
Threads: 3
Joined: Dec 2018
City: Duluth
State, Province, Country: GA
Sorry that it has taken me so long. I've pushed it to the side again. I'm still leaning to a 3 prong. Just that nagging safety aspect part of my personality. Couldn't one simply put an RFI/EMI filter on the cord and reduce or even eliminate much of the noise?
You can call me Jerry if you don't want to use my handle. I get it. Makes some folks nervous.
I have a finely tuned horse puckey detector. Don't blame me if it goes off. 
(This post was last modified: 07-16-2019, 10:11 PM by atlghosthunter.)
Posts: 19
Threads: 3
Joined: Dec 2018
City: Duluth
State, Province, Country: GA
I may just do that Larry, thanks for the offer. It may be a bit.
You can call me Jerry if you don't want to use my handle. I get it. Makes some folks nervous.
I have a finely tuned horse puckey detector. Don't blame me if it goes off. 
Posts: 88
Threads: 17
Joined: May 2018
City: Hayden, ID
Hi Larry, I have a Jackson 648s Tester too, I had an updates tube chart, but can't seem to find it after the move, do you have a copy of it? Thanks
Philco 41-295X 4 band radio.
I'm 67 years old, in north Idaho.
Users browsing this thread: 1 Guest(s)
|
|
Recent Posts
|
|
Philco 42-345 Restoration/Repair
|
| Hi OSanders,
Look carefully at the band switch. Turn it slowly and "wiggle" it around the desired band. ...MrFixr55 — 12:33 AM |
|
5U4 vs 5Z4 tubes
|
| I think that RCA and GE introduced metal tubes in the USA in 1936. I don't know if they were being made by RCA, GE or b...MrFixr55 — 11:20 PM |
|
Philco 42-345 Restoration/Repair
|
| Vlad95,
Thank you for the stringing guides and wow there are so manyosanders0311 — 06:01 PM |
|
5U4 vs 5Z4 tubes
|
| A pre war Hallicrafters, and an early one too, very nice! 1936 is pretty early for metal tubes too, which would explain ...Arran — 05:58 PM |
|
Philco 42-345 Restoration/Repair
|
| Thanks Rod,
"When you hear the background hiss and no station it usually indicates that the oscillator quit" ...osanders0311 — 05:52 PM |
|
Philco 42-345 Restoration/Repair
|
| RodB
:beerchug:Vlad95 — 10:22 AM |
|
Philco 42-345 Restoration/Repair
|
| Vlad, you nailed it. Swiss and German roots.RodB — 09:54 AM |
|
5U4 vs 5Z4 tubes
|
| Well this is a Hallicrafters SX/9 circa 1936.
No real issues so far although I dodged a real bullet with a cap that was...bridkarl — 07:59 AM |
|
5U4 vs 5Z4 tubes
|
| The pinout is the same but the 5U4 has a 3 amp filament, verses 2 amps or less on the 5Z4. I think that the pinout of a ...Arran — 12:04 AM |
|
Philco 42-345 Restoration/Repair
|
| By the way.
osanders0311
Take a look here: Dial cord stringing Guides
May be here you can fount correct string settin...Vlad95 — 11:15 PM |
|
Who's Online
|
There are currently 1179 online users. [Complete List]
» 1 Member(s) | 1178 Guest(s)
|
|
|

|
 
|


![[-] [-]](https://philcoradio.com/phorum/images/bootbb/collapse.png)


