Posts: 761
Threads: 56
Joined: Jul 2013
City: Kentucky
Ok, there is interest in a simple lesson on refinishing a radio. I'm going to show you the way I do it. Everyone has different methods, and they all work, to a degree. So, let's begin.....
These are the supplies that I will use...
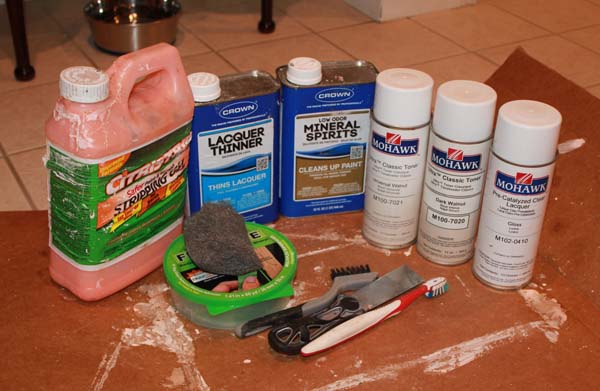
Notice I am using Citristrip. This is not the best stripper. We live in a condo, and I try to protect my neighbors from stinking smells as much as possible. Citristrip has no odors, and it's water based. It cleans up easy. I can use it indoors, which I consider a bonus. If a radio has been painted, or is difficult to strip, I go with better stuff... but if you live in a condo or an apartment, Citristrip will handle most lacquer based finishes just fine.
So, we have..
Stripper - (your choice)
Lacquer Thinner
Mineral Spirits
Mohawk Ultra Classic Toner - Walnut, Dark Walnut and Pre Cat Clear Gloss
Various Brushes and a scraper.
Frog Tape - (painters tape)
Steel Wool - #0000
Cardboard
Not pictured are rubber gloves, paint brushes and a can of brown/black mix paint and paper towels.
I think that's it... if I forgot anything, I'll mention it later.. Shall we begin?
The artist formerly known as Puhpow! 8)
(This post was last modified: 09-13-2013, 04:29 PM by Jamie.)
Posts: 761
Threads: 56
Joined: Jul 2013
City: Kentucky
Ahh... I forgot one thing already...
The victim ...
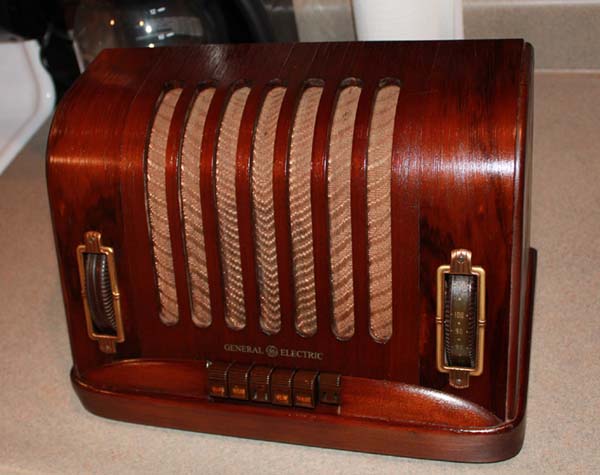
This little radio may appear to have a beautiful finish, but trust me... it doesn't. Don't be fooled by a photograph. I was going to sell it as is..because I have this thing about saving original finishes no matter what... but I tried to save this one, and I failed. Restore a finish almost worked, but this finish is too thick. I don't know what was used on this radio, but I don't like it. Spraying a bad finish with clear lacquer isn't fair to anyone. You are cheating the radio and any buyer of that radio. This radio needs to be refinished, so let's do it..
The artist formerly known as Puhpow! 8)
(This post was last modified: 09-13-2013, 04:21 PM by Jamie.)
Posts: 761
Threads: 56
Joined: Jul 2013
City: Kentucky
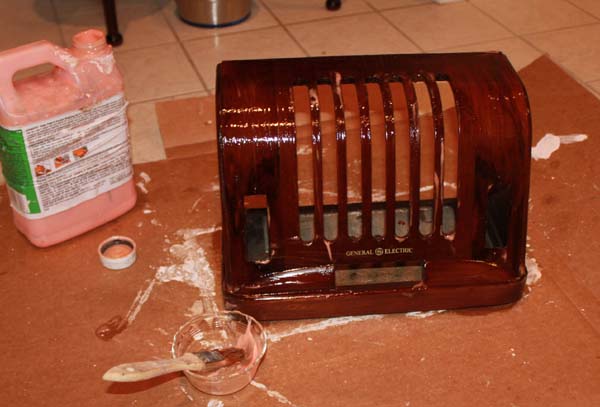
Here I have applied the stripper. I usually let it sit for about twenty minutes. You can let it sit for 24 hours if you want, but with diminishing returns. It becomes harder to remove once it dries. I'll go at it with the scraper in a few minutes, then dunk the steel wool in more stripper and use that to finish it up. Lacquer thinner will remove any real stubborn spots, but I try not to use it because it smells. Once it's all clean looking, I'll get rid of any stripper residue with mineral spirits. Hehe stripper residue.. we don't want any of that, do we??
Now, for those of you who've never done this... don't be intimidated. It's very easy and you'll be surprised with your results.
The artist formerly known as Puhpow! 8)
Posts: 761
Threads: 56
Joined: Jul 2013
City: Kentucky
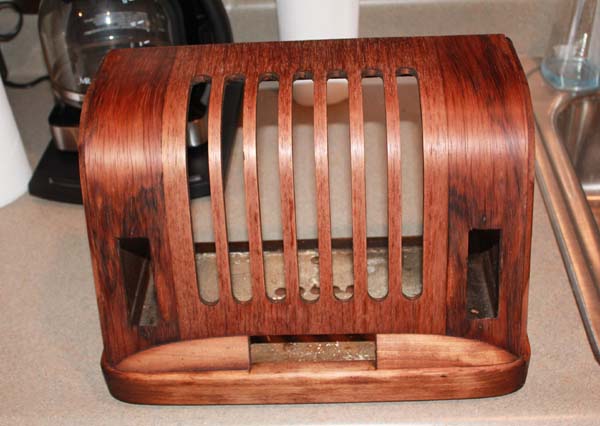
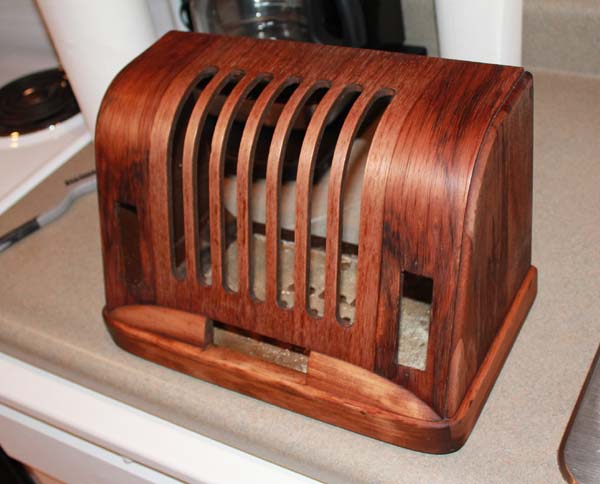
Here is our little radio all stripped. Yes, it only took about 30 minutes. No sense in wasting time. One thing to mention - I did use the stripper indoors, but I took it outside to wash it with mineral spirits and lacquer thinner. Never use those things indoors, the odors are flammable and they could kill you. As you remove stripper and finish, follow the grain with your scraper or steel wool. Otherwise, you will leave marks in the wood.
Now, at this point we have some options. This is where I would repair any damage to veneer or wood, use grain filler, etc. This radio cabinet is pretty nice, so I'm going to skip all of that. It never had a piano finish when new, so I'm not going to do it now. No grain filler. But some guys do it no matter what.. I respect that too. From this point on, do NOT touch the radio with your bare hands. Oil in your skin can cause fisheyes in the final finishing process.
Ok, I want you to notice something. Look at the colors of the wood. See the differences? Scroll up...Look at the original photo of this radio, then come back down here. Notice the center panel and bottom of the radio are a different color than the ends? This is important. Those colors were buried under years of lacquer, shellac, whatever was on this radio. The main reason this radio is being refinished is because I want to emphasize these colors.....
..and this is why we will use Medium Walnut and Dark Walnut Toner in the next steps....
The artist formerly known as Puhpow! 8)
(This post was last modified: 09-13-2013, 04:23 PM by Jamie.)
Posts: 761
Threads: 56
Joined: Jul 2013
City: Kentucky
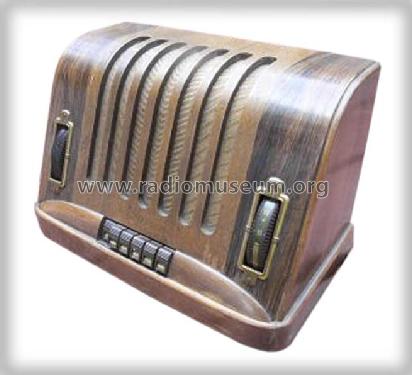
To further emphasize the final finish we are after, here is a photo of the radio when it was new. I got this from the Radio Museum. Any time you are going to refinish a radio, go there and see if they have a photo of it. It's a great reference and will help you choose the correct colors of toner, stain, whatever.... Heck, you can paint it pink if you want, it's your radio. I prefer to stay as original as possible. But it's up to you! That's the best thing about restoring radios. It's your radio!
..now, back on topic.. toner ..
I use Mohawk toners only. You will see they make two different products -
Ultra Classic Toner, which is what we will be using.
Tone Finish Toner.... which won't be needed on this radio.
Ultra Classic is pure toner. It is like a tint. It is almost clear, but adds a touch of color to the wood. The grain is easily visible. Good stuff! Exactly the same product used back in the 30's and 40's.
Tone Finish Toner is for hiding mistakes or repairs. It also colors the wood, but it isn't quite as clear. It's perfect for hiding veneer repairs, or cracks that have been filled with wood filler. If this radio needed veneer repairs, I would spray Tone Finish toner on those spots in an attempt to hide them a little. The stuff is murky looking, so you have to use it sparingly. Just be sure to order the right stuff for the job, okay?
Once more, do not be intimidated... Toner is just like spray paint. If you can spray paint, you can easily spray toner.
..continued...
The artist formerly known as Puhpow! 8)
(This post was last modified: 09-13-2013, 04:11 PM by Jamie.)
Posts: 761
Threads: 56
Joined: Jul 2013
City: Kentucky
Here we go.. before I sprayed, I went over the cabinet with a tack cloth. This will pick up any stray hairs, steel wool pricklies, or dirt... very important step!
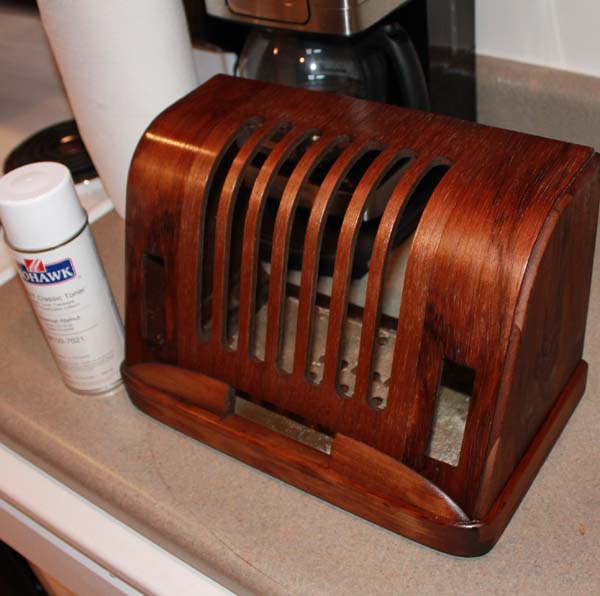
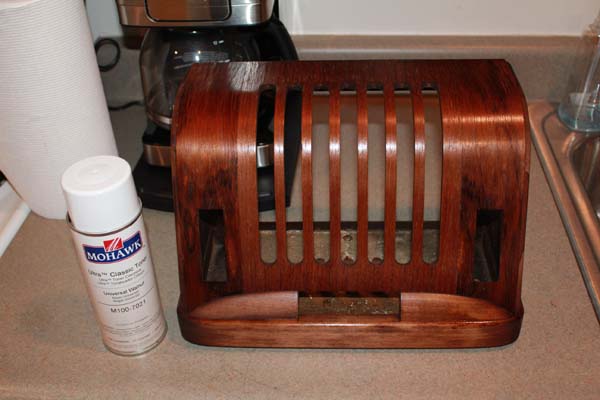
First coat of toner. I sprayed one coat of Universal Walnut covering the entire cabinet. My main concern here is the center panel, bottom edge, and sides. That's what I am coloring now. The entire cabinet was sprayed to ensure uniformity of final color, but I am only worried about that center panel, sides and the bottom edge of lighter colored wood at this point.... The idea is to be smooth and even. When you think you need one more coat, stop. The biggest mistake made by a beginner is too much toner. Remember, toner is only to tint your wood, not protect it. The final clear will protect it....
Now, since we have two colors of wood, we move on the second color... dark walnut...
The artist formerly known as Puhpow! 8)
(This post was last modified: 09-13-2013, 05:04 PM by Jamie.)
Posts: 761
Threads: 56
Joined: Jul 2013
City: Kentucky
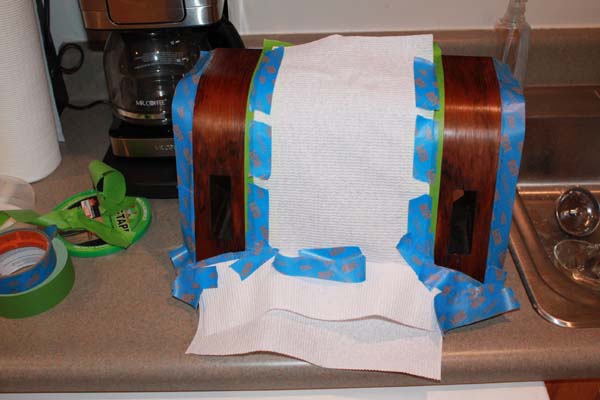
All taped up and ready to go...
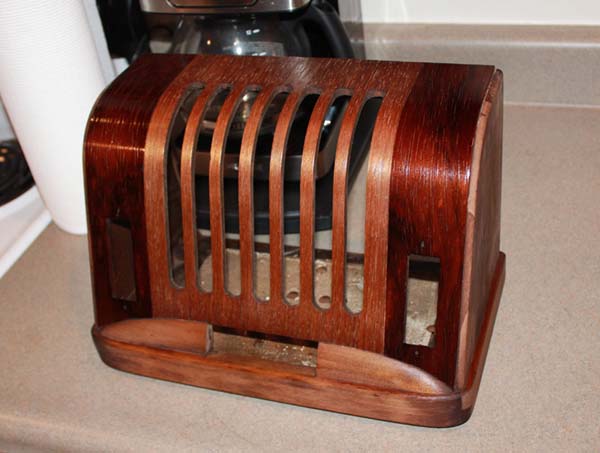
Dark Walnut toner applied...
It's getting too dark outside to do anything else. Clear coating will have to wait until tomorrow....
The artist formerly known as Puhpow! 8)
Posts: 761
Threads: 56
Joined: Jul 2013
City: Kentucky
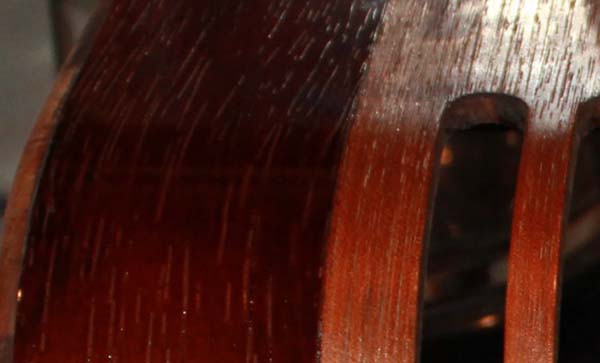
Ok change of plans. I took a good look at the cabinet today and I wasn't happy. The wood on this cabinet dried out at one time, and the grain is really expanded and deeper than I thought. The picture is a close up of the wood, so I hope you can see what I see. If I were to spray clear on this, it would look like an old radio that got refinished. That's not my goal. My goal is to bring it back to as close to what it was in 1939 as I can.
If I were going to keep this radio, I would probably just clear it and forget about it. I'm not keeping it, and I want it to be really nice for it's new owner, so we are going to fill that grain....
Normally, I would grain fill before I sprayed any toner, but it's too late now. Lacquer is very forgiving and it really doesn't make a difference, so let's get started..
The artist formerly known as Puhpow! 8)
Posts: 761
Threads: 56
Joined: Jul 2013
City: Kentucky
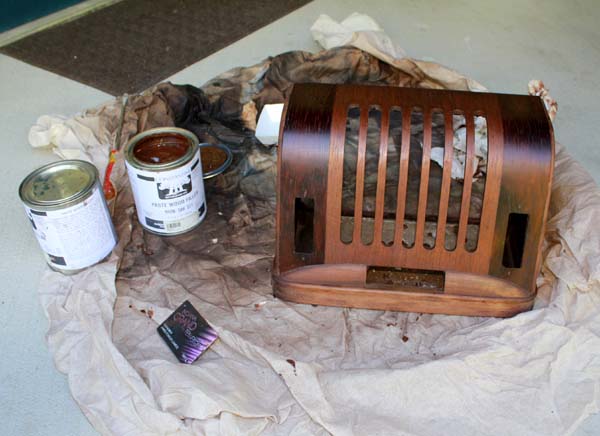
I'm going to use Constantine's grain filler. I've never used this brand before, but I've heard good things about it. All you need to grain fill is some paper towels, a plastic scraper (I use a credit card) and some mineral spirits and grain filler.
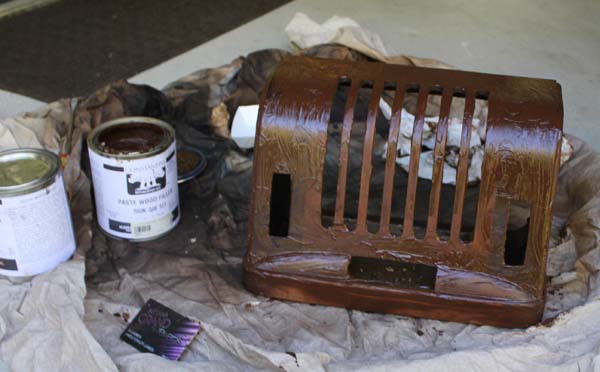
Here is the cabinet covered with grain filler. You want the filler to be the consistency of pancake batter. It's got to be thin enough to get down into the grain, but thick enough not to be runny. Constantines is pretty thin in the can, so I didn't cut it..... Pore-O-Pac (a different brand) requires thinning with mineral spirits. You can use a paint brush to apply it, but I just use my fingers (wearing rubber gloves of course). Just smear it on and try to work it into the grain. Once you've got it covered, remove the excess with your scraper, being careful not to scrape any out of the grain.
The artist formerly known as Puhpow! 8)
(This post was last modified: 09-14-2013, 05:41 PM by Jamie.)
Posts: 761
Threads: 56
Joined: Jul 2013
City: Kentucky
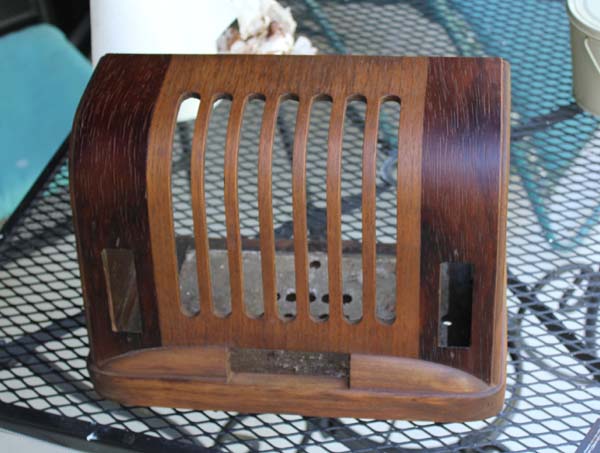
After you scrape off the excess (put it back in the can, it won't hurt it).. allow a few minutes until the filler starts to dry out. When it gets to looking a little gray, take a burlap cloth or rough paper towel and rub off the rest of it. The idea being to get it all off, but leave the grain full of filler. I rub it in a circular motion, or against the grain, depending on the wood.
The photo shows the cabinet after grain filling, scraping and rubbing... . Some times they require multiple coats of filler. I actually did this one three times... Now, it needs to dry overnight...
The artist formerly known as Puhpow! 8)
(This post was last modified: 09-15-2013, 11:06 AM by Jamie.)
Posts: 761
Threads: 56
Joined: Jul 2013
City: Kentucky
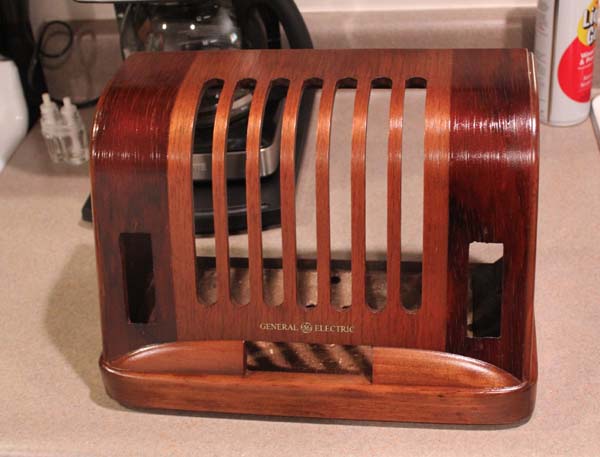
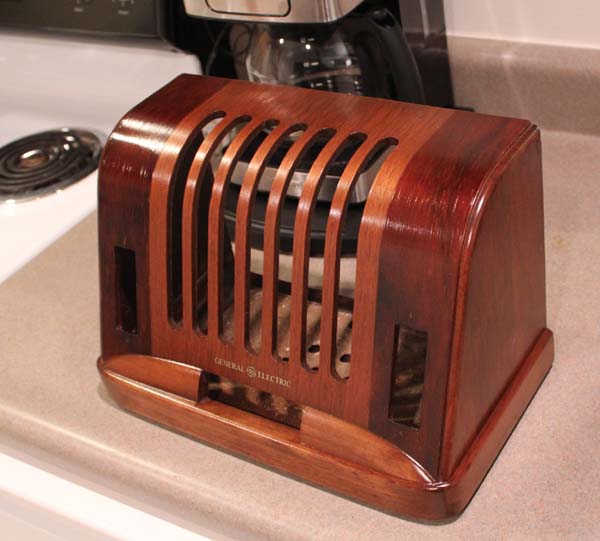
I added the decal and sprayed the clear coat this morning. I used Mohawk Pre-Catalyzed Clear Gloss. Some guys like semi-gloss. Either one is fine. I like the Pre-Cat clears because it's humid where i live and the pre-cat seems less likely to blush.
This little radio is finished. Scroll up and look at the original photo from when we began. Then look at the photo from the Radio Museum. I think this radio cabinet came out well. At the least, it's a big improvement from when we started.
From here, you can hand polish out the finish if you want. You need some very fine sandpaper, and some polishing compound. I think that's a topic for a different thread though. I'm calling this one done. I've got some new grill cloth on order, and when the radio is assembled, I'll add one more photo to this thread. Most of the time, I'll use acrylic brown/black paint to paint the cut outs for the speaker, but this radio looks fine without it.. so no need for that.
I hope this thread helps someone new. As you can see, it's easy to do if you have the right materials. Thanks for looking. And thanks to Eddie Brimer for teaching me how to do this.
The artist formerly known as Puhpow! 8)
(This post was last modified: 09-15-2013, 11:12 AM by Jamie.)
Posts: 403
Threads: 40
Joined: Feb 2011
City: McPherson, KS
Posts: 5,205
Threads: 276
Joined: Nov 2012
City: Wilsonville
State, Province, Country: OR
Thanks for the step-by-step how-to! Very nice  
Posts: 761
Threads: 56
Joined: Jul 2013
City: Kentucky
You're welcome. I hope it helps someone.
The artist formerly known as Puhpow! 8)
Posts: 139
Threads: 8
Joined: Aug 2013
City: Central PA
Very nice tutorial - thank you! One question, though. It appears your sequence was: toner, grain filler, then lacquer. Did you do anything between filling the grain and applying lacquer? I would think you would want another application of toner to even the color of the wood and the grain filler... Or is this not necessary?
Users browsing this thread: 1 Guest(s)
|
|
Recent Posts
|
|
HiFi (Chifi) tube amp build - but my own design.
|
| Well, maybe - maybe not :lol: It's been an interesting project so far! Something so simple, yet so cranky. The 1st one ...TV MAN — 05:12 PM |
|
1949 Motorola 5A9M
|
| Haven't thought of Burgess batteres in a while
https://www.radionostalgia.ca/lib/Images/battery/us/burgess1D.jpgi
...Vlad95 — 03:50 PM |
|
Philco Model 16 wiring question
|
| Measure the voltages first, just in case.morzh — 02:19 PM |
|
1949 Motorola 5A9M
|
| Haven't thought of Burgess batteries in a while Mr. Fixer. Boston Edison always used Burgess in their Bright Star yellow...Paul Philco322 — 02:17 PM |
|
1949 Motorola 5A9M
|
| Thanks Sam. I'll let you know. I can probably scare some up from the local radio club.klondike98 — 02:07 PM |
|
Philco 89 Code 123 Osc Coil
|
| Hello,
I thought I would post my findings on my bad oscillator tickler coil. There were 27 turns on the outer coil b...dconant — 12:38 PM |
|
Philco Model 16 wiring question
|
| Thanks Morzh. So it appears I did wire it incorrectly and I have to switch the wires between pins 2 and 4.bobclausen — 09:24 AM |
|
Philco 46-1209 strange behavior
|
| No, it's not a problem, just during certain condition it could show up.
Yes, an internal tube short could do that too.
...morzh — 09:13 AM |
|
HiFi (Chifi) tube amp build - but my own design.
|
| You sound guys are never satisfied. :crazy: :clap:RodB — 09:10 AM |
|
HiFi (Chifi) tube amp build - but my own design.
|
| I got some new ceramic octal tube sockets installed and also tried some different coupling caps.
The results:
The go...TV MAN — 08:42 AM |
|
Who's Online
|
There are currently 1279 online users. [Complete List]
» 2 Member(s) | 1277 Guest(s)
|
|
|

|
 
|


![[-] [-]](https://philcoradio.com/phorum/images/bootbb/collapse.png)


