Posts: 761
Threads: 56
Joined: Jul 2013
City: Kentucky
Not necessary. You can add grain filler whenever you want, as long as it's before your final coat of clear. Now, normally I do the grain filler right after I strip the radio, but this was a last minute change of plans. I was using Walnut Constantines grain filler too.. so it's colored. Even so, you can also add more toner whenever you want. I could spray more toner on it right now, then add more clear if I wanted to. Lacquer is pretty forgiving as long as you stay with the same brand.
The artist formerly known as Puhpow! 8)
Posts: 139
Threads: 8
Joined: Aug 2013
City: Central PA
Thanks for the details! I'm working on a Radiola 17 and have the cabinet stripped down. It was a mess and has taken some abuse - the finish was gouged through in multiple places leaving damage to the underlying wood (there was also damage to knobs, brass plates, and the volume pot was broken into multiple pieces).
Anyhow, I am trying to decide whether to use wood filler (Elmer's 6-oz Latex Knockdown Wood Texture Repair from Lowes) in a few places - Walnut filler is bit lighter than the mahogany wood itself, or just see how much some Constantine's Mahogany grain filler might hide some trouble spots. Many of the spots are not deep at all, but there are 3 or 4 good gouges that are 1/16 to 1/8" deep.
Posts: 761
Threads: 56
Joined: Jul 2013
City: Kentucky
I would not use grain filler to repair any damage. It's too soft and would be easily dislodged. As for other wood fillers, be very careful. Many are advertised as "stainable" but they do not take a stain and toner will not cover them. I really like Timbermate. It comes in any color you want and it is almost invisible once toned. They sell it at woodcraft stores.
The artist formerly known as Puhpow! 8)
Posts: 761
Threads: 56
Joined: Jul 2013
City: Kentucky

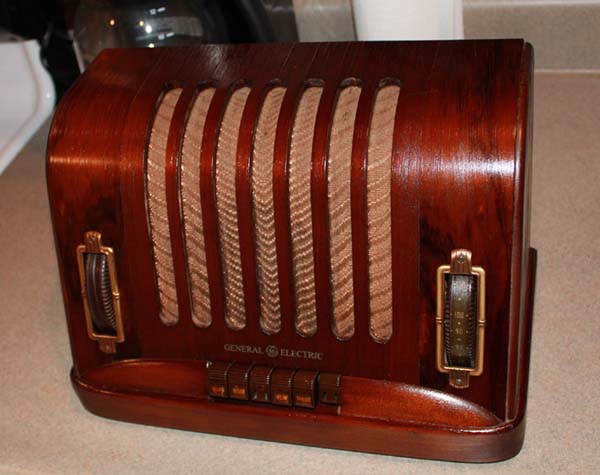
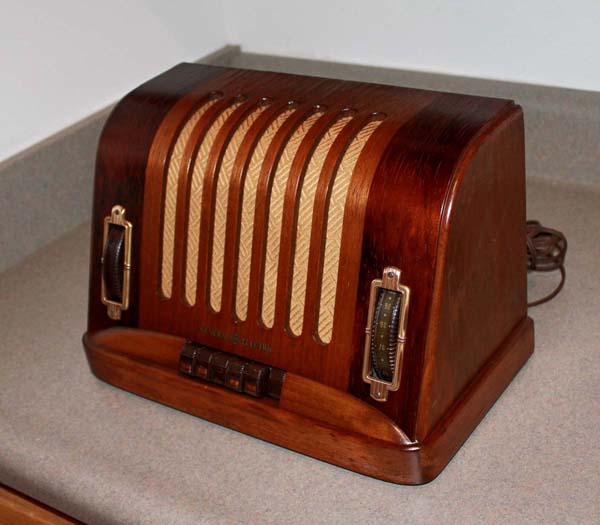
We started with this....and

Here it is... all finished. Grill cloth came today.. I think it looks a lot better now.
The artist formerly known as Puhpow! 8)
(This post was last modified: 09-18-2013, 05:44 PM by Jamie.)
Posts: 479
Threads: 73
Joined: Mar 2012
City: Riverside, CA
Wow, looks great! Excellent work!!!
- Geoff
Posts: 139
Threads: 8
Joined: Aug 2013
City: Central PA
What a little beauty! I like the increased definition in the wood.
Posts: 1,475
Threads: 69
Joined: Nov 2012
City: Kansas city, MO.
Great job! Another learning thread that gives me confidence to try cabinet restoration.
Posts: 298
Threads: 22
Joined: May 2012
City: Chattanooga
State, Province, Country: TN
+1 on being picky with the grain filler.
I tried some cheap stuff from Lowe's and ended up with a big white spot on the top of my cabinet that was a bear to remove.
I'll be trying everything out on scrap wood first for now on.
It's not how bad you mess up, it's how well you can recover.
Posts: 139
Threads: 8
Joined: Aug 2013
City: Central PA
I was just thinking of using the strategy myself - test fillers, toner, and lacquer combinations on scraps first.
Posts: 61
Threads: 2
Joined: Aug 2013
City: Renton, Wa
Thanks--a lot of very interesting education on refinishing techniques--nice work !
Posts: 395
Threads: 33
Joined: Jul 2013
City: Horsham, PA
PuhPow, excellent job. When I saw the first picture of the radio, I thought "what's wrong with that?" But compared to the finished radio, it was obviously inferior. You did this at the perfect time. I am about to begin work on my first radio that will need a new finish.
Thanks for the step-by-step. Very helpful.
Jon
Posts: 761
Threads: 56
Joined: Jul 2013
City: Kentucky
You're welcome. I'm glad this thread helps encourage you to try it.. It isn't hard to do.
The artist formerly known as Puhpow! 8)
Posts: 23
Threads: 4
Joined: Aug 2013
City: Chicago IL
Thanks Very PuhPow. I've been really intimidated by the refinishing, you took an edge of my hesitation. 
Posts: 139
Threads: 8
Joined: Aug 2013
City: Central PA
Hi PuhPow,
I have a few questions for you about refinishing. I've been working on a very beat up Radiola (mahogany cabinet) that I found a few weeks ago. I thought it would be fun to strip it and start over again for the learning experience. I figured using an inexpensive and common radio was a good way to start.
I began by working on just the lid - I figured learning in a small area would be easier. I used TimberMate wood filler, sanded it smooth and then smeared it with Constantine's grain filler and scraped with a card after a few minutes. I guess I need to be more thorough about scraping, it took me quite a long time to smooth out the little ridges and left over spots. At one point I switched to a more rigid sanding block and the thicker areas very quickly clogged the sand paper (a worn down piece of 220 grit and a new piece of 330 grit). Anyhow, it appears I sanded too much - I used a 320 grit sanding sponge. I sanded down very thoroughly until the only grain filler that I could see was actually in the grain. It took a very long time to get that last micron-thick layer off of the wood. In retrospect, perhaps I should have left that little bit where it was. Anyhow, after spraying it with some ultra-classic toner (dark walnut/oak is a great match to the Radiola original color, by the way) I can still see the pores through the finish when the light reflects.
How do I go about filling in the not-completely filled in pores now? I suppose it needed a second coat of grain filler... My guess is that if I spread more grain filler and sand it again, I'll remove the toner and have trouble getting the color even again. Can I build up layers of clear and sand this smooth? Or is there an easier approach?
Thanks for the insights!
(This post was last modified: 10-01-2013, 08:22 PM by EricS.)
Posts: 761
Threads: 56
Joined: Jul 2013
City: Kentucky
Ok, it sounds like you've messed up a little bit here... Wood filler and grain filler are two totally different things, and they are used in two different procedures. Not used together. They are as different as night and day..
Wood filler (Timbermate) - only use this to fill in cracks, small holes, or edge cracks around veneer repairs. Do not spread it over the entire piece.
Grain filler - do not use this to repair wood. It is only used to fill in the grain. The object is to get a smooth, piano like surface. It is spread over the entire surface you want to grain fill.
First, use the wood filler on repairs, allow it to dry completely, then sand it smooth with fine sandpaper. Sand with the grain. You want it to be exactly level with the surrounding wood.
After you finish that, spread your grain filler across the entire surface, about 1/8 inch thick. Try to work it into the grain as you spread it. Allow it to set up a little bit (maybe 10 minutes), then very lightly, very very lightly, use a scaper to remove the excess. You want to leave an extremely thin film of wet grain filler on the surface. In some places there won't even be a film. It doesn't matter - the idea is to not scrape any of it out of the grain. Just get the excess grain filler off and put it back in the can. Now, allow it to dry until it starts to look a little chalky (maybe 20 minutes) (Do not allow it to completely dry!) , then take a rough cloth (burlap works best) and rub the rest of the excess off. Rub against the grain or in a circular motion. When the burlap gets clogged up, fold it over and continue. Pretty soon, you'll have a smooth piece of wood with the only grain filler remaining in the grain. Your wood will look clean. Do not sand. At no point do you use sandpaper on grain filler. Allow it to dry overnight and you are ready to start finishing.
Sometimes if wood has very open pores of grain, it will take two or even three coats of grain filler to get it completely smooth. Some radios need a little grain showing to "look right". Cheaper sets did not have a piano finish when new and they look kind of fake if too much grain filler is used. They end up looking like plastic wood instead of wood.. does that make sense? You just have to use your own judgement on when to stop grain filling.
On the radio featured in this thread, I did not desire a piano finish. That GE was a cheap set when new. However, over the years, the grain had opened up too much, leaving a very rough wood surface. Even with three coats of filler, it wasn't piano smooth.... and I didn't want it to be... I wanted some grain to show. Now, on my Philco Bullet radio, I wanted a piano finish. It's a personal choice you will learn to make once you get the hang of this.
The artist formerly known as Puhpow! 8)
(This post was last modified: 10-01-2013, 08:36 PM by Jamie.)
Users browsing this thread: 1 Guest(s)
|
|
Recent Posts
|
|
Rogers Majestic R-646
|
| Today I finished inspecting all the parts. The result is not very pleasing.
The first positive news:
1) The power tr...Vlad95 — 11:40 PM |
|
HiFi (Chifi) tube amp build - but my own design.
|
| Well, found muh culprit. After using socket test adapters and finding voltages all ok, swapping 6V6s, no avail, swapped ...TV MAN — 11:18 PM |
|
HiFi (Chifi) tube amp build - but my own design.
|
| Well, maybe - maybe not :lol: It's been an interesting project so far! Something so simple, yet so cranky. The 1st one ...TV MAN — 05:12 PM |
|
1949 Motorola 5A9M
|
| Haven't thought of Burgess batteres in a while
https://www.radionostalgia.ca/lib/Images/battery/us/burgess1D.jpgi
...Vlad95 — 03:50 PM |
|
Philco Model 16 wiring question
|
| Measure the voltages first, just in case.morzh — 02:19 PM |
|
1949 Motorola 5A9M
|
| Haven't thought of Burgess batteries in a while Mr. Fixer. Boston Edison always used Burgess in their Bright Star yellow...Paul Philco322 — 02:17 PM |
|
1949 Motorola 5A9M
|
| Thanks Sam. I'll let you know. I can probably scare some up from the local radio club.klondike98 — 02:07 PM |
|
Philco 89 Code 123 Osc Coil
|
| Hello,
I thought I would post my findings on my bad oscillator tickler coil. There were 27 turns on the outer coil b...dconant — 12:38 PM |
|
Philco Model 16 wiring question
|
| Thanks Morzh. So it appears I did wire it incorrectly and I have to switch the wires between pins 2 and 4.bobclausen — 09:24 AM |
|
Philco 46-1209 strange behavior
|
| No, it's not a problem, just during certain condition it could show up.
Yes, an internal tube short could do that too.
...morzh — 09:13 AM |
|
Who's Online
|
| There are currently no members online. |

|
 
|


![[-] [-]](https://philcoradio.com/phorum/images/bootbb/collapse.png)


