Posts: 16,579
Threads: 574
Joined: Oct 2011
City: Jackson
State, Province, Country: NJ
This is the cabinet from the 70 I have finished the chassis of.
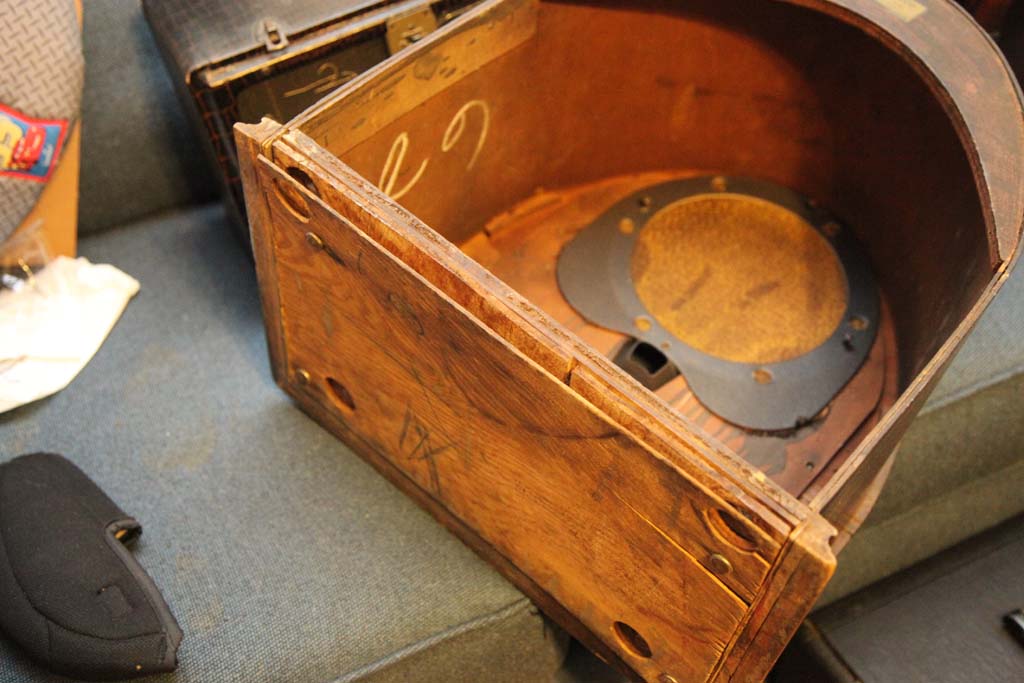
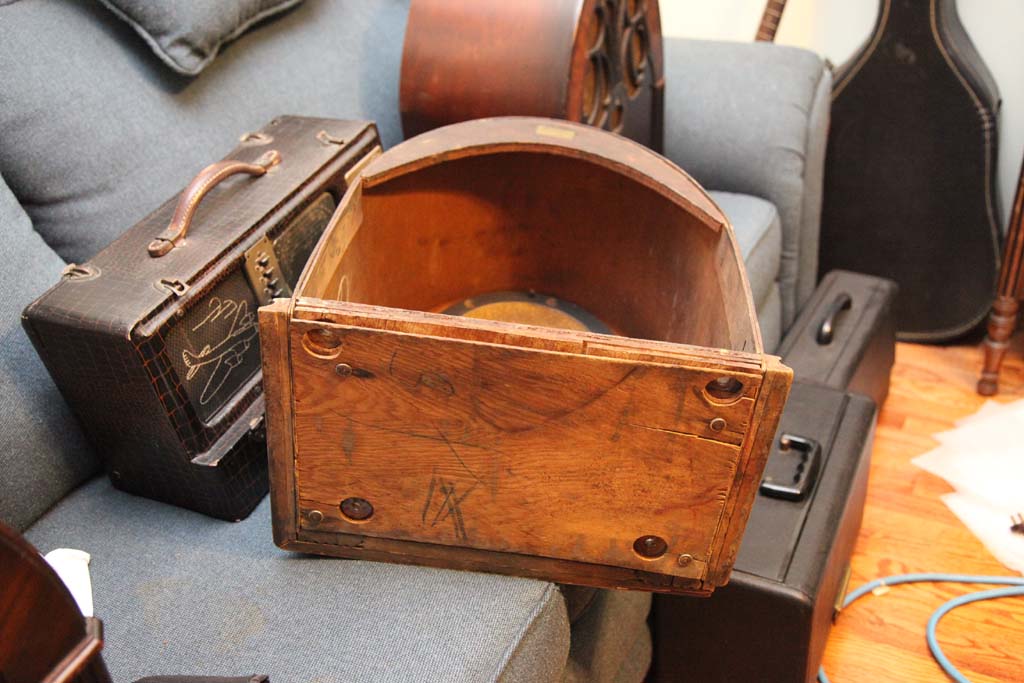
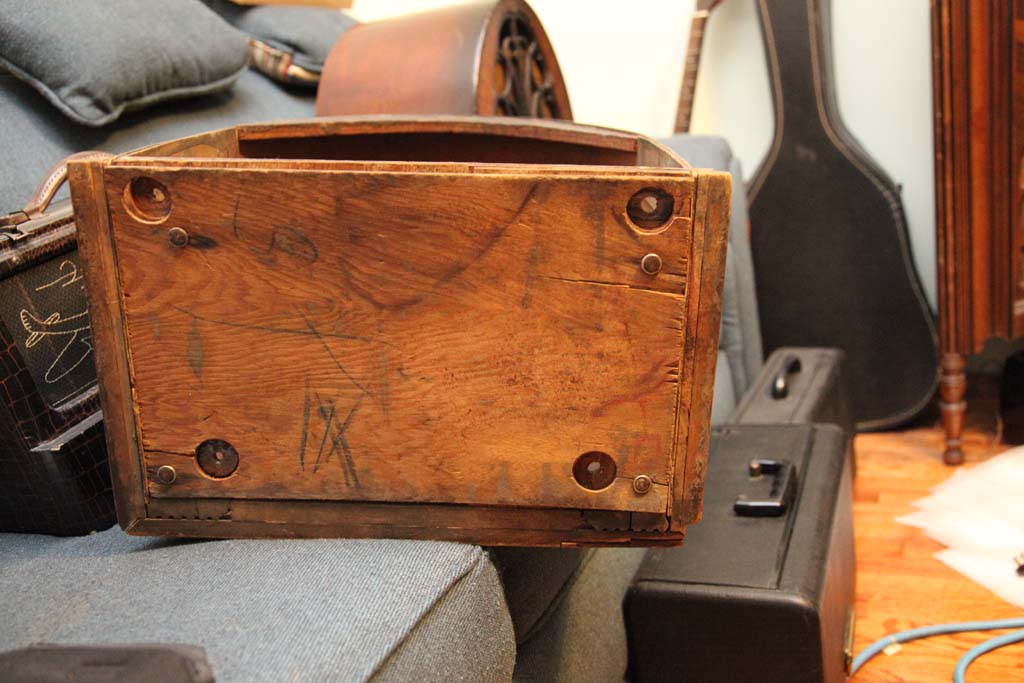
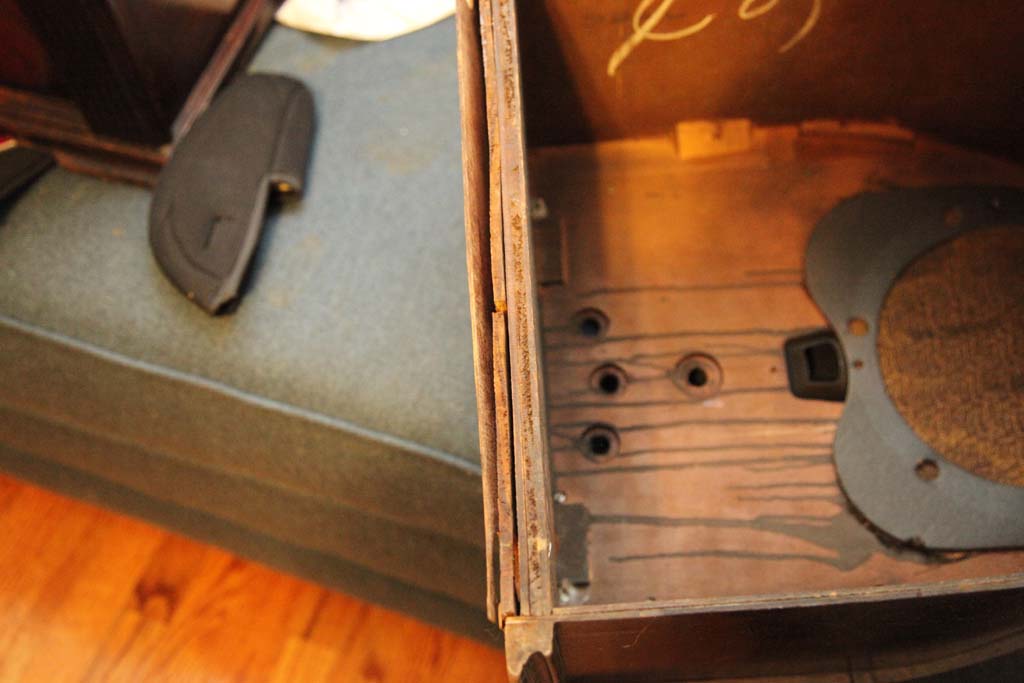
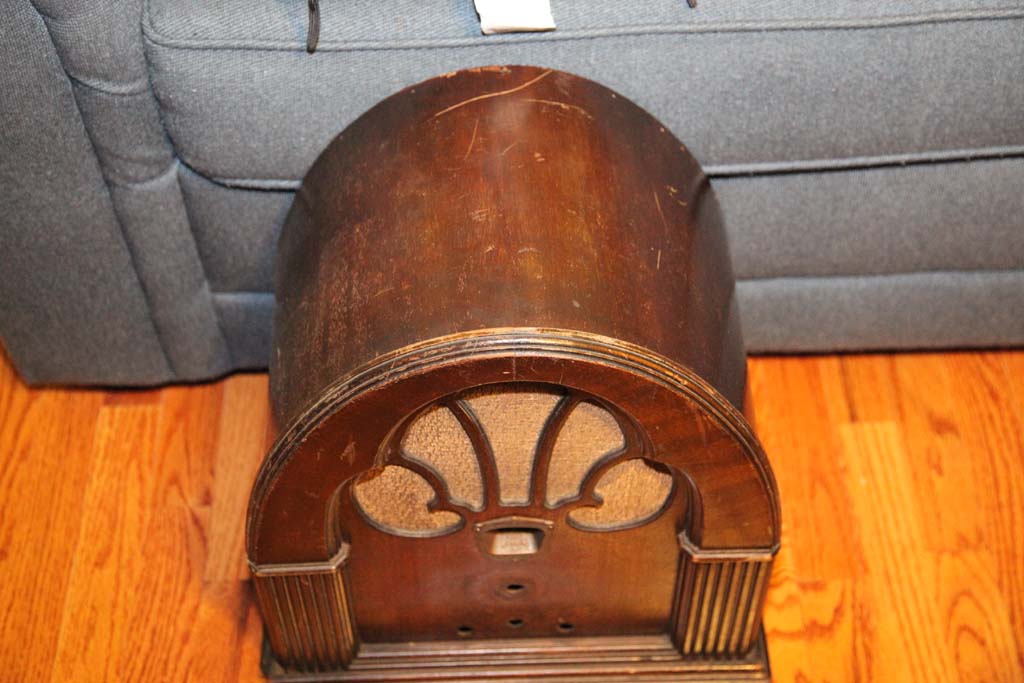
As you can see the bottom is in not so good shape.
Also scuffs, scratches.
Where do I start and what do I do especially with the bottom which is, well, lacking integrity, should I say.
Posts: 736
Threads: 26
Joined: Jun 2013
City: Hayward, California
You could make a new bottom, or can you get some glue in the cracks and clamp it together until it drys? Probably take the bottom off and glue it together with clamps should work. Unless it is worse than the pictures look, If the wood is still in good condition but just coming apart I would think glueing it together should work.
Posts: 5,216
Threads: 275
Joined: Nov 2012
City: Wilsonville
State, Province, Country: OR
I agree with Warren that you can probably re-glue the layers of bottom that have come apart. That keeps the original bottom and should restore it to be able to hold the chassis without falling apart. I also take off those little tack on feet that Philco used. They scratch the heck out of anything you put the radio on so I add some large felt pads at the end of the restoration.
Posts: 761
Threads: 56
Joined: Jul 2013
City: Kentucky
I agree with what has been said. Wood glue. I use a needle and syringe to get the glue down in the cracks. Don't be afraid of overloading it. The excess will squeeze out and can be wiped off with a damp paper towel.
I would not remove the bottom from the cabinet. First, clean any loose wood chips out of the cracks. Then I would add wood glue, then put some parchment paper against the bottom, then something hard and flat (I use a piece of 15"x15"x2" marble tile that I got from Lowes for $9), then use two or three clamps and make it very tight. Let it dry overnight. The parchment paper will keep the excess glue from adhering to your hard surface.
Are you planning on refinishing the cabinet, or are you more interested in saving the original finish?
The artist formerly known as Puhpow! 8)
(This post was last modified: 02-22-2014, 10:20 AM by Jamie.)
Posts: 16,579
Threads: 574
Joined: Oct 2011
City: Jackson
State, Province, Country: NJ
I am explring options. All things being equal I prefer saving original finish.
Posts: 761
Threads: 56
Joined: Jul 2013
City: Kentucky
Ok, you can try saving it. Sometimes it works, sometimes not.
If it were mine, I'd use Howards Restore-a-Finish on it. You can get it at most antique shops. Get some #0000 steel wool and work the Howards in as best as you can. If it is going to work, you will see it sort of dissolve the top layer of lacquer and your scratches will disappear. If it works, you can leave it as it is, or you have the option of adding some clear lacquer over the original finish. If you decide to do this, after the Howards dries, clean the cabinet with mineral spirits, let it dry, then go over it with a tack cloth (very important step!). Spray a light coat of clear lacquer over it and let it dry. I've saved a lot of old cabinets this way. They look very good.
If Howards doesn't work, there is still hope. Clean the cabinet very well with mineral spirits. Go over it well with a tack cloth (to remove any little hairs or lint), then give it a light coating of Mohawk Toner (I would use dark walnut, but ask Ron which color). The color is very important. You need to match the old finish. This is to cover up the scratches. You then follow up with some clear. This is a last resort before stripping. I have a very nice Philco 38-9 that I used this technique on. I also have a couple that it did not work... they were stripped and refinished.
Now, a disclaimer - spraying toner over a scratched finish doesn't always come out well. It is a last resort kind of thing. Sometimes it looks and feels acceptable and you do, mostly, save the original finish. Sometimes it looks bad and the final result is ugly with rough areas. If it doesn't come out well, then you have to strip the cabinet and start over. At this point, as a last resort, you've got nothing to lose. You would have to strip it anyway.
The artist formerly known as Puhpow! 8)
(This post was last modified: 02-22-2014, 02:44 PM by Jamie.)
Posts: 16,579
Threads: 574
Joined: Oct 2011
City: Jackson
State, Province, Country: NJ
Thanks.
These things...starting with Howard, do they stink a lot? Do I need to do it outside?
My garage is not really well equipped and my electrical workshop is in one of the bedrooms.
Which means that if something stinks, others will smell it.
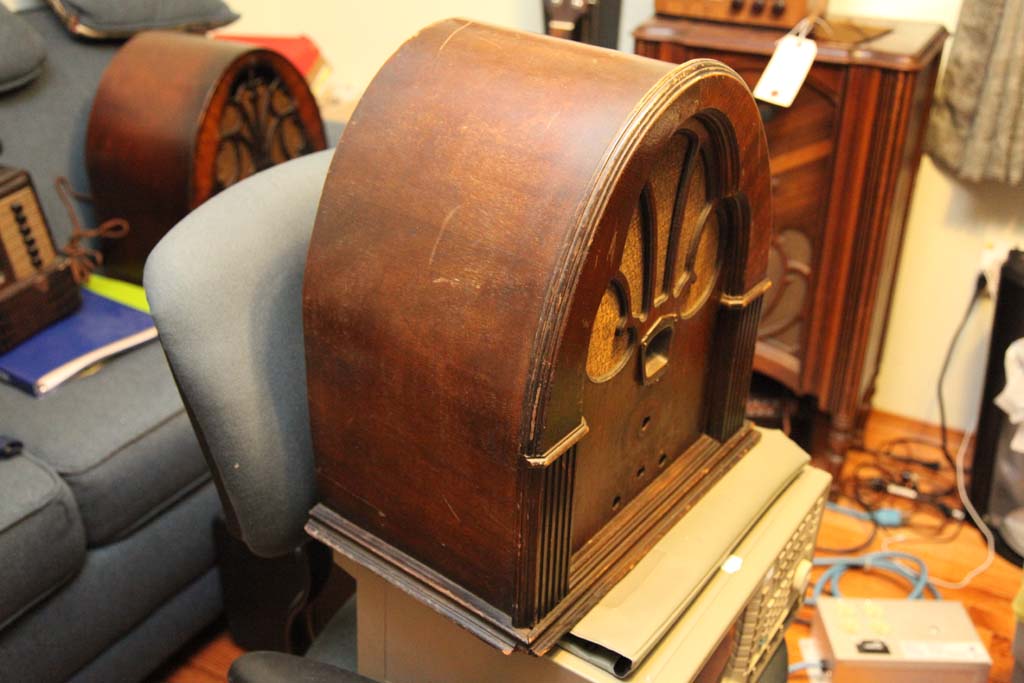
And the last thing - you see there is a missing corner.
Anything I can do about it?
Posts: 736
Threads: 26
Joined: Jun 2013
City: Hayward, California
It would be possible to make a new corner piece. You would either have to try and duplicate the moulding by hand ( or a dremel tool ) or if you have a router with the right bit. If you have a dremel , they have a router base attachment you might be able to use to make a small piece of moulding.
(This post was last modified: 02-22-2014, 04:31 PM by Warren.)
Posts: 761
Threads: 56
Joined: Jul 2013
City: Kentucky
Howards doesn't seem to have much of an odor. It will stain clothing or carpet though. I think you will be safe on the smell factor. If you spray any lacquer, now some of it really stinks. Especially Mohawk.
I agree with Warren. I think you could make a new corner. I've had luck recreating small wooden parts by using balsa wood. It's cheap and very easy to carve and shape. Now, it also dents easy too, so using it on a corner is probably not a great idea. No matter what kind of wood you use, it will need to be sealed before you add any color to it. Matching the color will be the tough part. Shops that sell remote control airplanes always have a nice selection of wood for sale - small pieces, cheap prices, varying hardness too. They should have spruce, pine and balsa for sale. Pine would probably be the best choice - hardness for a corner, yet soft enough to work into shape.
The artist formerly known as Puhpow! 8)
(This post was last modified: 02-22-2014, 05:14 PM by Jamie.)
Posts: 16,579
Threads: 574
Joined: Oct 2011
City: Jackson
State, Province, Country: NJ
I have a reasonably good chunk of wood left of the crown trimming of my kitchen cabinets (it is actual hardwood of some sort.....), and it is pretty thick so I think it would cover the necessary thickness requirements.
My single problem is, I a not that great with wood.
I do have a full Dremel kit, though I have no routing base.
Posts: 16,579
Threads: 574
Joined: Oct 2011
City: Jackson
State, Province, Country: NJ
does Howard come in different colors or is it only medium walnut and this is what I need?
Posts: 736
Threads: 26
Joined: Jun 2013
City: Hayward, California
To use the routing base with your dremel you would also need to see if they have a bit that is close to the same shape as your trim on the radio. You could get a base at the hardware/hobby store and a bit or try to shape it by hand either with the dremel or a file. Then cut 2 pieces to size with a 45 degree angle for the corner.
Posts: 761
Threads: 56
Joined: Jul 2013
City: Kentucky
Howards comes in different colors. You'll have to look at them and decide which one matches the best. It isn't critical though... close will work.
The artist formerly known as Puhpow! 8)
Posts: 5,216
Threads: 275
Joined: Nov 2012
City: Wilsonville
State, Province, Country: OR
You can also buy repro trim from Steve Davis. See http://www.philcoradio.com/davis.htm
Posts: 16,579
Threads: 574
Joined: Oct 2011
City: Jackson
State, Province, Country: NJ
Yes I know their trim, not expensive at all, about 20 bucks. I thought of it.
Gosh....I need "woodowrk 101 course".
Anyone? Will trade for Electronics 101. 
Users browsing this thread: 1 Guest(s)
|
|
Recent Posts
|
|
Philco 42-345 Restoration/Repair
|
| Please tell me this was it, I replaced resistor 27 and it's playing on the broadcast band. I am afraid to change the ban...osanders0311 — 06:12 PM |
|
Philco 42-345 Restoration/Repair
|
| So far still no broadcast, I am posting pictures of #14 Oscillator and also a resistor #27 which connects to an XXL tube...osanders0311 — 04:02 PM |
|
Part numbers to model cross
|
| I believe there is that document, and I think we might have it in the Library.morzh — 03:29 PM |
|
Philco 42-345 Restoration/Repair
|
| Ok MrFixr55,
I have tried the DeoxIT D5 on the band switch and even though it has relieved the tension I felt when turn...osanders0311 — 11:11 AM |
|
Part numbers to model cross
|
| Is there a reference somewhere where you can punch in Philco part numbers and see what models those parts were used in?Jim Dutridge — 10:17 AM |
|
Philco 42-345 Restoration/Repair
|
| Hi OSanders,
Look carefully at the band switch. Turn it slowly and "wiggle" it around the desired band. ...MrFixr55 — 12:33 AM |
|
5U4 vs 5Z4 tubes
|
| I think that RCA and GE introduced metal tubes in the USA in 1936. I don't know if they were being made by RCA, GE or b...MrFixr55 — 11:20 PM |
|
Philco 42-345 Restoration/Repair
|
| Vlad95,
Thank you for the stringing guides and wow there are so manyosanders0311 — 06:01 PM |
|
5U4 vs 5Z4 tubes
|
| A pre war Hallicrafters, and an early one too, very nice! 1936 is pretty early for metal tubes too, which would explain ...Arran — 05:58 PM |
|
Philco 42-345 Restoration/Repair
|
| Thanks Rod,
"When you hear the background hiss and no station it usually indicates that the oscillator quit" ...osanders0311 — 05:52 PM |
|
Who's Online
|
There are currently 978 online users. [Complete List]
» 1 Member(s) | 977 Guest(s)
|
|
|

|
 
|


![[-] [-]](https://philcoradio.com/phorum/images/bootbb/collapse.png)


