Questions about Restoring a Grebe Synchrophase MU-1
Posts: 139
Threads: 8
Joined: Aug 2013
City: Central PA
Hi Everyone,
Some time ago, I picked up a rather worn Grebe Synchrophase MU-1. I just love the look of these radios! I'm not sure where it was kept, but the inside absolutely STINKS, so I've started disassembling the breadboard with the intent of cleaning everything to get rid of the smell. After getting most of it apart, I have a few questions.
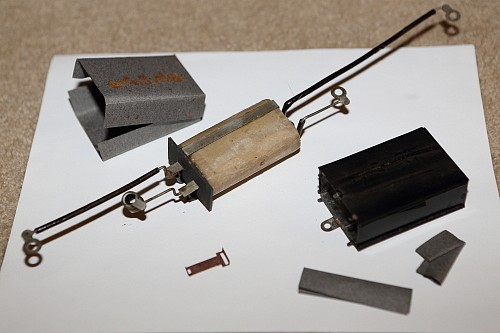
I opened up one of the original paper-rolled caps. It seems this one is supposed to measure 1.0uF and mine measures 1.2uF. Should I close it back up or replace it with one that is not 90 years old?
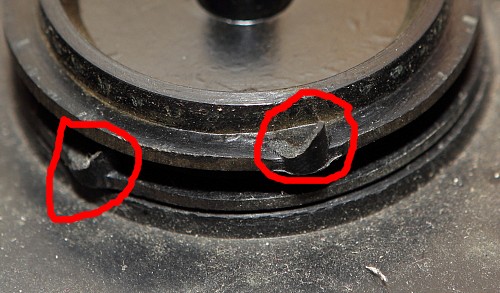
Next up is the plastic ring that sits on top of the tuning dials. These rings have a small "cup" on the bottom side where the beaded chain snaps in to tie the three tuning wheels together (I presume this is the source of the "synchrophase" name). The problem is that for two of my rings, the little cup that hangs down is broken, so it won't hold the chain. Thus, the three dials will no longer move in unison. Any ideas on how to solve this problem without replacing the part?
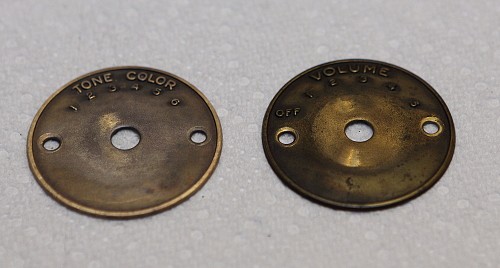
And finally - at least for now - what is the best way to clean the brass escutcheons on the front? The RadioBoulevard article on these recommends Easy-Off Oven Cleaner, but after 2 hours of soaking, it didn't accomplish much. Any recommendations? The left one was sprayed with Easy-Off and the right one is untouched. I am thinking they are not supposed to look like new and shiny brass... but this isn't to my liking.
Thanks for the help!
Eric
Posts: 16,481
Threads: 573
Joined: Oct 2011
City: Jackson
State, Province, Country: NJ
Not bad after 90 years, 20%.
But...most folks will tell you not to take a risk and replace the caps.
Stuff them inside the original boxes.
Any film cap will do.
Posts: 411
Threads: 42
Joined: Sep 2008
City: Ironton Ohio
To clean the brass without stripping all the tarnish and making it gleam like brasso would, I make a paste from cigarette ash and water and brush it as if I were cleaning it with a toothbrush. It will take the black away without cleaning all the age/tarnish off, just lightly brush it or the high spots will be to shiny. Works really well on brass, copper and bronze.
(This post was last modified: 09-18-2014, 01:14 PM by tab10672.)
Posts: 139
Threads: 8
Joined: Aug 2013
City: Central PA
Thanks, Morzh - I was thinking the same thing. It works now, but no telling how long before something goes wrong. I'll pick up some film caps as replacements.
Tab- interesting "solution" (sorry...) - but I don't smoke. What is the role of the ash here, does it prevent the brush from being too harsh and scratching the brass? Wonder if a torn up paper towel might serve the same purpose...
Posts: 16,481
Threads: 573
Joined: Oct 2011
City: Jackson
State, Province, Country: NJ
ash is a fine mild abrasive.
Any ash when finely powdered will do.
Burned paper, charcoal ash (feel it first for possible lumps).
Posts: 2,118
Threads: 112
Joined: Jun 2010
City: Medford OR (OR what?)
I think that those parts were gold plated.
"I just might turn into smoke, but I feel fine"
http://www.russoldradios.com/
Posts: 139
Threads: 8
Joined: Aug 2013
City: Central PA
OK, now I get the point of the ash - thanks!
Russ, I've heard about these being gold plated as well. Some claim they are gold plated, other claim they are brass. What I have been able (I think) to discern here is that very early version of this radio (1924-25) are more likely to be gold plated while the later versions (1925-1927) are more likely to be brass. Beyond this, I don't really have any clear direction.
I've made the bakelite panel gleam like new again and applied a coat of wax, but these parts are proving to be a bit more difficult to clean without "going nuclear" with something like Brasso. I'm OK with a matte finish, but I want the dirt to be gone. I'm trying to work gently on the smaller pieces first to see how well something works or doesn't work.
Eric
Posts: 181
Threads: 0
Joined: Mar 2008
City: Pocasset, MA
I would stick to chemical methods rather than abrasives. "Oven cleaner" is a bit of a puzzle, as brass tarnish is normally removed with acids such as sodium bisulfate (was and I presume still is sold as "Sparex" for jewelry work; also was in toilet-bowl cleaners but I always used Sparex).
These plates seem to vary, but if the background is supposed to be darker, it may not be after cleaning. They don't look that bad to me. How are the tuning-dial escutcheons? Those are more visible. If they look good, and the panel shines, nobody is going to notice the small plates.
(This post was last modified: 09-19-2014, 07:19 PM by Alan Douglas.)
Posts: 139
Threads: 8
Joined: Aug 2013
City: Central PA
The more I dig into this radio, the more I learn. Interesting discoveries...
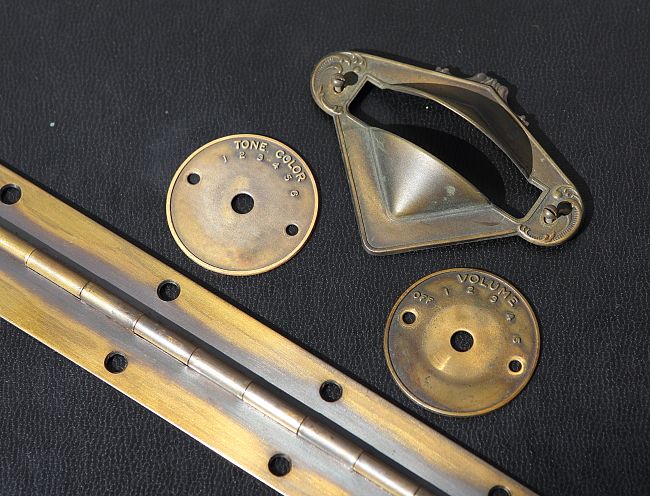
I removed the hinge from the lid and cabinet and gave it a good cleaning with some GoJo. After cleaning and inspecting it, it is clear that this is a brass hinge that was colored with some substance to provide the "antique color" and then it was coated with a clear lacquer to protect the colored finish. The plates around the Volume and Color Tone knobs have had the clear coat worn through so the elements were able to attack the added color and the metal itself. Below is an image I made of the plates sitting on top of my black ipad cover outside in the sun.
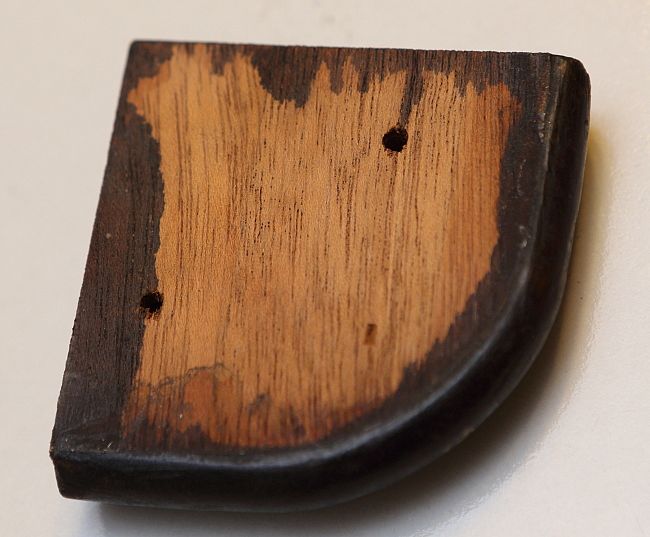
I also removed the wooden feet from the cabinet. The color pattern here seems to indicate that this cabinet was colored with stain and then coated with a similarly clear layer of lacquer. I am not sure that applying lacquer would result in a color pattern like this.
So, anyone have any experience or know of color products that can be applied to re-create an "antique" finish on brass? Time for some more research. I really want this radio to appear "original" when I am finished with it.
Posts: 181
Threads: 0
Joined: Mar 2008
City: Pocasset, MA
All those parts look much better than most. The volume is a little dark, but so what?
Posts: 139
Threads: 8
Joined: Aug 2013
City: Central PA
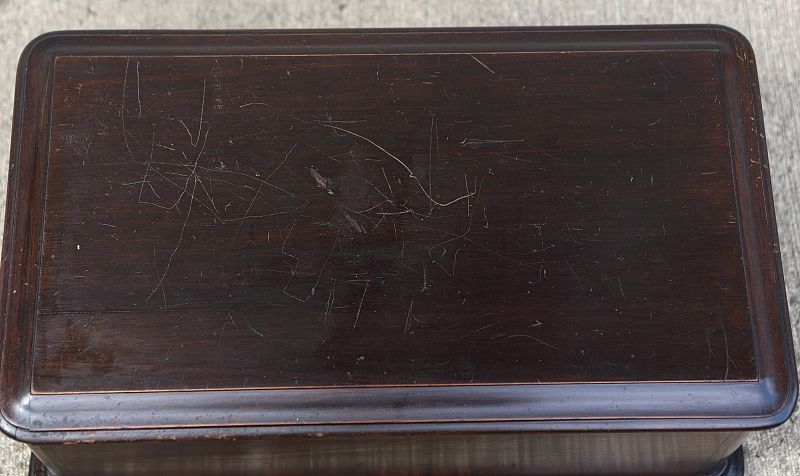
Yeah, I was really impressed how nice the hinge looked once I cleaned it up. This is what led me to the conclusion that the brass plates aren't really that dirty after all. I might try to re-apply some antique finish to the color tone plate to darken it again to match the rest of the plates. At this point, the worst part of the radio is the lid: it has lots of little scratches on it (most of them make it into the wood) and it has split open a bit at one end.
Posts: 181
Threads: 0
Joined: Mar 2008
City: Pocasset, MA
A tapestry runner long enough to drape over the sides of the lid will fix that.
Posts: 139
Threads: 8
Joined: Aug 2013
City: Central PA
Alan, I get the distinct impression that you don't want me to refinish the lid... To be honest, I'm really torn between leaving it as original as possible (and grumbling about the scratches each time I look at it) and repairing the damage that has resulted from careless abuse.
(This post was last modified: 09-24-2014, 08:55 AM by EricS.)
Posts: 181
Threads: 0
Joined: Mar 2008
City: Pocasset, MA
Refinishing is a lot of work, and often doesn't look any better than it did at first, though of course nobody wants to admit that, after investing all the time and effort.
It's actually less work to repair the damage. It seems very tedious while you're doing it, but overall it doesn't take any more time. I remember a 201X that a friend loaned me so I could do an on-the-air comparison with a Stromberg-Carlson from a few years later with the Acoustic Labyrinth speaker (the Philco won hands-down by the way). This thing was a disaster, with deep gouges in the finish. But, with the use of a touch-up marker to color the light wood, the rest of the surface was so smooth and shiny (you could shave in front of it) that from a few feet away you hardly noticed the damage.
(This post was last modified: 09-24-2014, 09:48 AM by Alan Douglas.)
Posts: 139
Threads: 8
Joined: Aug 2013
City: Central PA
Alan,
I agree, refinishing is a ton of work. This is an image of the top of the lid. The contrast is a bit more striking in person... I suppose "easy" solutions are a small "runner" for the top, or to prop the lid open and show off the insides.
I recently refinished a Radiola and a nice table that I found at the local flea market ( before and after images here ) with good results, but each project did take a while and involved some interesting "lessons learned" along the way.
Eric
Users browsing this thread: 1 Guest(s)
|
|
Recent Posts
|
|
Philco 610B oscillator wiring
|
| Do you know what run # your chassis is?
It took me a while to find what you were basing updates/modification on as I did...Radioroslyn — 07:34 AM |
|
Need to purchase some accessories for restoration of my Old Philco Radio
|
| COLLEAGUES,
Thank you all for such good and important suggestions as how to find good replacement parts. I will go fo...palonso — 07:05 AM |
|
Zenith H725
|
| Here's what the inside of AM IFT2 looked like, and the other pic shows the discs I made to take place of the mica and ke...EdHolland — 07:40 PM |
|
Zenith H725
|
| IF2 will need replacement caps. The arcing was severe enough that the mica is pitted and holed where the HT flashed over...EdHolland — 04:04 PM |
|
My Philco 37-116 Restore
|
| Measuring from center tap like the tube voltages show. Cap 127 is isolated from ground. Cap 127 shown in upper left of p...dconant — 08:05 AM |
|
My Philco 37-116 Restore
|
| Are you measuring relative to the centertap or the GND?morzh — 11:57 PM |
|
Philco 610B oscillator wiring
|
| Still not clear on the wiring interface between the 6A7 and oscillator. After refering to the available schematics and s...Tubester — 07:18 PM |
|
Refinishing Ideas
|
| My 37-116 code 121 is the best sounding radio i have...a daily driver. Since we are talking about "changes". ...poulsbobill — 07:18 PM |
|
My Philco 37-116 Restore
|
| Hello, I finally got brave enough to take the cans off the Expander Unit. Got the grid cap wires replaced and back toget...dconant — 06:50 PM |
|
Zenith H725
|
| I got into the first AM IF can today, and found its mica was cracked. Amazing that it was still working. This one makes ...EdHolland — 06:10 PM |
|
Who's Online
|
There are currently 887 online users. [Complete List]
» 4 Member(s) | 883 Guest(s)
|
|
|

|
 
|


![[-] [-]](https://philcoradio.com/phorum/images/bootbb/collapse.png)


