


Welcome Guest! Be sure you know and follow the Phorum Rules before posting. Thank you and Enjoy! (January 12, 2025) x

Thread Closed

Philco 41-280 cabinet veneer
#1

I wasn't going to have a cabinet thread, but I had ordered some walnut veneer on EBay at a great price that came in today and looks like a perfect match to me. Also, I had started striping the ratty cabinet veneer to see the grain and base color a bit better. After I got some of the old finish off, I discovered that Philco had applied the veneer on the front and sides in 4-5 inch strips that run from the Photofinish to the back of the cabinet. It looks to me like I could remove the entire strip on the parts with major damage and simply lay down a new strip with my new walnut. My task is studying how to wrap the new veneer around a 90 degree curve without breaking or cracking the new veneer. I would think going that way is a much better solution than trying to patch those large areas. What do you folks think?
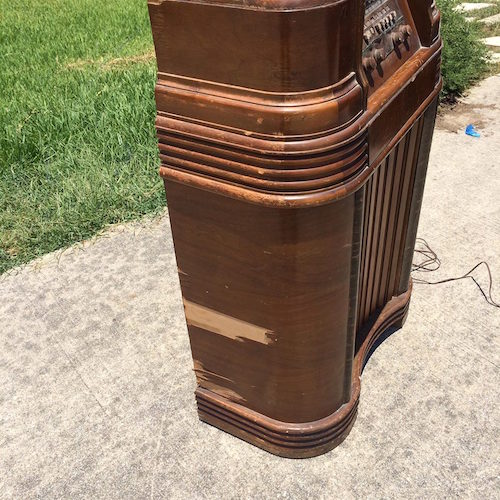
   

The largest repair to be done.
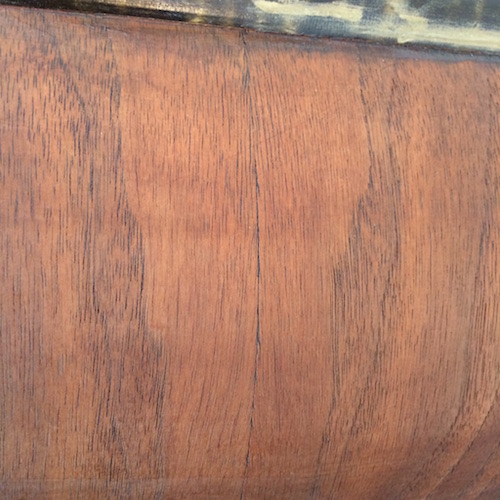
   

A close up of the stripped veneer showing the seams of the veneer strips Philco put in.

Charlie in San Antonio

#2

You have to soak the veneer in water at the area where you want it to bend to make it pliable then wrap it around something with the same dimensions until it dries.
At least that's how I do it.
#3

Has anyone ever tried this technique on a cabinet curve before? The veneer looks quite flexible after he shoots steam into it.


https://www.youtube.com/watch?v=awIBy11kMA8

Charlie in San Antonio


Users browsing this thread: 1 Guest(s)
[-]
Recent Posts
54C Complete Teardown/Rebuild
Richard, Had grabbed it already but thank you just the same.  I find myself wanting to find some way to block out the...glyphmon — 12:03 AM
54C Complete Teardown/Rebuild
Hello roy, here is a link to the schematic . Sincerely Richardradiorich — 11:54 PM
54C Complete Teardown/Rebuild
Richard, The Silvertone 2014 also is a transformerless set, so I am incorporating a 1:1 600 ohm audio isolation transfo...glyphmon — 11:37 PM
Preliminary work on wife's Silvertone 2014
Did an alignment today which was interesting.  IF alignment went great, almost all was already spot-on.  Adjusting on th...glyphmon — 11:35 PM
54C Complete Teardown/Rebuild
The main problem with adding a Bluetooth input is that this set lacks a traditional power transformer to isolate it from...radiorich — 11:19 PM
54C Cabinet Refinish
I started stripping this cabinet before it got super chilly out because I knew I wasn't going to be able to work on ...glyphmon — 11:18 PM
54C Complete Teardown/Rebuild
While I'm waiting to wrap up the final steps on my wife's Silvertone 2014, I started disassembly on the next project.  O...glyphmon — 11:07 PM
Preliminary work on wife's Silvertone 2014
Hello roy, that great news glad it worked out for you !! Sincerely Richardradiorich — 10:50 PM
Preliminary work on wife's Silvertone 2014
Safety caps arrived today.  Soldered one in and had a successful first power-up.  No magic smoke escaped and it tunes in...glyphmon — 09:53 PM
HiFi (Chifi) tube amp build - but my own design.
Tim, you refer to “AK”. Is that Alaska or Atwater-Kent, or… JoeJoe Rossi — 11:49 AM

[-]
Who's Online
There are currently no members online.

>