05-05-2013, 10:50 PM
I wanted to thank everyone on this site for sharing their extensive knowlege and making this hobby such an enjoyable one. My mother was (and still is) addicted to garage sales; so from the time I was big enough to hold a sanding block I have been restoring, repairing and building a wide variety of 'stuff'; as well as being a professional carpenter for more than two decades now.
So, to thank you all for your time and repay your kindness I thought I would share a few things I have painfully learned.
This is my 41-296X
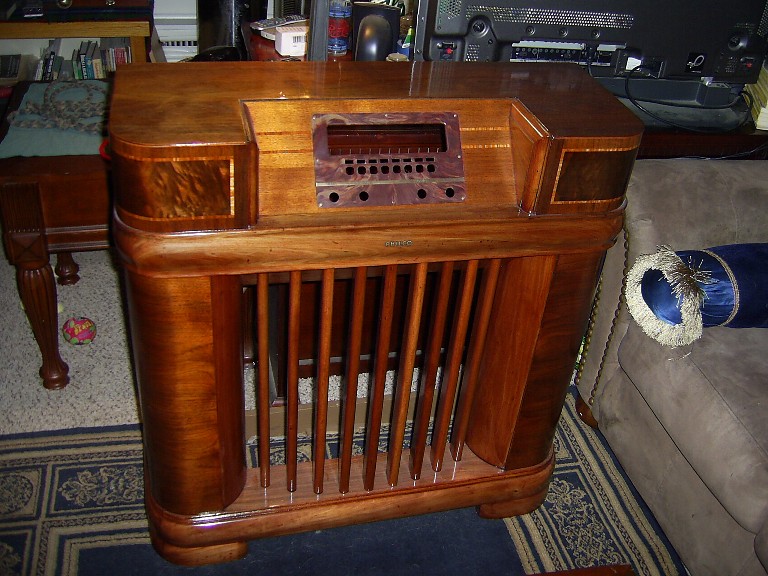
Please pardon the layer of dust on it.
Unfortunately, I did not take any 'before' pictures; and also unfortunately, I did not discover this site until I began to work on the electronic components in the chassis. So Ron, please forgive me the sin of using a water based stain instead of toner. The finish is lacquer; with the base and everything from the chair rail (with the PHILCO label) up hand brushed with 3 heavy coats of satin lacquer lightly steel wool-ed between coats. Then the entire thing received an additional 9 coats of spray gloss lacquer with 0000 steel wool between coats.
I did it this way to ensure that high wear areas had a nice thick layer of lacquer (although DO NOT HANDBRUSH OVER WATERSLIDE PHILCO LABELS)
This is a 1928 Victor Victrola.
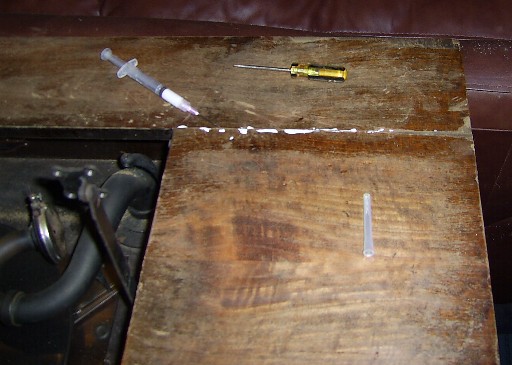
With Ron's permission, I would like to use it to demonstrate some common issues you may run across on any vintage cabinetry. If you can believe it, my Philco was in much, much worse condidion when I bought it from the same guy who sold me the Victor. (The Philco was barely able to stand upright and the veneer was peeling and bubbling off like badly hung wallpaper.)
Anyway, the first thing is to get the loose, lifted veneer glued back down; especially in places where I will be replacing the missing pieces of veneer. Just tap the surface with your fingernail and listen; solidly glued veneer will *tap* and loose veneer will *pop* -you will hear the difference easily. Now glue and clamp down the loose veneers. I like to use a syringe with an 18 guage, screw on needle to get deep under the veneer without causing further damage. It is also useful when the veneer is 'bubbled' up in the middle of a piece, where there is no edge to glue from.
Now, clamping.
Many, many pieces of furniture are awkward if not impossible to traditionally clamp, with round edges, or delicate moulding that would be damaged in tightening a clamp, or you may simply not have access to a wide variety of long pipe clamps, corner clamps etc.
I cut this from a piece of 3/4" MDF (medium density fiber board) Make sure to either cut with a table saw, or use the 'Factory Edge' as the bottom edge, so you have a nice flat surface applying even pressure to the veneer. Also make sure to cut it at least 3" thick, so it will not flex or bow under strain. For smaller models, table tops, cathedrals etc, obviously you will need to make a smaller version, or use another method.
Notice that the rope is about 10' long and has a small loop tied in one end.
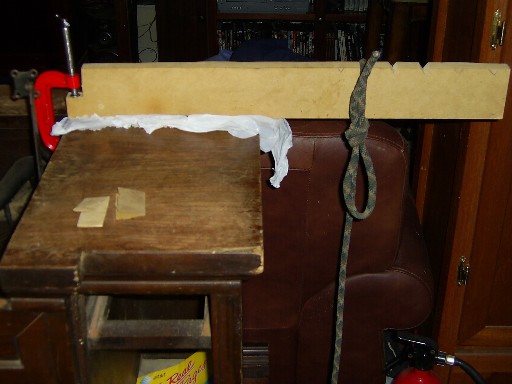
Set your clamp roughly where you will want it, with a small piece of Saran Wrap, or grocery store plastic bag between your clamp and the veneer you are gluing -voice of experience here, especially if you are using Gorilla Glue. Clamp the end you can -if you can. If you can't clamp either end somehow, just add a v notch near the corner I cut so the small red clamp would fit and tie it with two ropes.
Now take the looped end of the rope and hook it through a v notch close to the edge or your cabinet.
Take the other end, and loop it around something solid. For the Philco sides, I turned the console on its side and looped the rope around the far end.
For the Victor demonstration, I am looping it down and around the feet at the base. If you go around a sharp corner or edge that the rope may dig into and damage, put a block of scrap wood between the rope and your project to spread the pressure across a bigger area.
Bring the rope back up and through the loop; now you can add tremendous pressure by pulling down on the end you put through the loop, like a pulley.
Tie the rope off for a moment.
Now; if you clamped one end, go ahead and relax the clamp a quarter inch or so; if you couldn't clamp one end you will just have to go back and forth a bit, adding even tension to the two sets of rope.
Okay; you relaxed the clamp a little, so go and tighten the rope at the other end a little more, or as far as you safely can.
Now, when you clamp the first end back down, the board will press your veneer very firmly and evenly down.
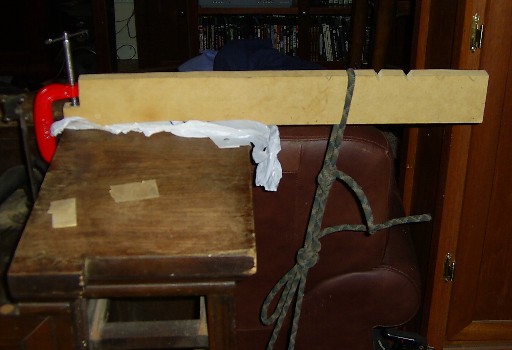
It is not as comlpex as it sounds, and I'm no Boy Scout when it comes to rope.
The same technique can be used on curved surfaces, using only the rope and a few wood blocks.
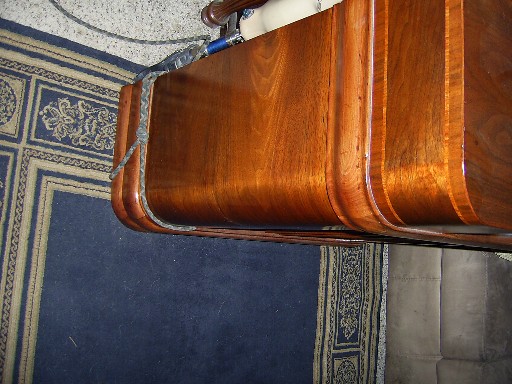
See the curved corners? The left hand side one had a terrible bubble in the veneer, about three inches wide and 3/4 to 1" up, right through the corner.
After injecting glue into the bubble, I put the rope clamp around it as you see it in the picture, pulling it as tight as I could. Then, after tying it off I forced wood blocks under it all around the corner, ironing the veneer back down, then I drove a wedge between the rope and the inside of the console to add a little more pressure. 12 hours later it was solid again.
Well, I feel a little guilty about the length of this post, but if you guys are interested I will continue when my glue dries tomorrow with a post on replacing all of those missing patches in the veneer (and since I am happier with the results I get, I will be using 1/4" solid walnut instead of veneer to do the job. There are five pieces in the side shown in picture above where I replaced veneer that way.)
So, to thank you all for your time and repay your kindness I thought I would share a few things I have painfully learned.
This is my 41-296X
Please pardon the layer of dust on it.
Unfortunately, I did not take any 'before' pictures; and also unfortunately, I did not discover this site until I began to work on the electronic components in the chassis. So Ron, please forgive me the sin of using a water based stain instead of toner. The finish is lacquer; with the base and everything from the chair rail (with the PHILCO label) up hand brushed with 3 heavy coats of satin lacquer lightly steel wool-ed between coats. Then the entire thing received an additional 9 coats of spray gloss lacquer with 0000 steel wool between coats.
I did it this way to ensure that high wear areas had a nice thick layer of lacquer (although DO NOT HANDBRUSH OVER WATERSLIDE PHILCO LABELS)
This is a 1928 Victor Victrola.
With Ron's permission, I would like to use it to demonstrate some common issues you may run across on any vintage cabinetry. If you can believe it, my Philco was in much, much worse condidion when I bought it from the same guy who sold me the Victor. (The Philco was barely able to stand upright and the veneer was peeling and bubbling off like badly hung wallpaper.)
Anyway, the first thing is to get the loose, lifted veneer glued back down; especially in places where I will be replacing the missing pieces of veneer. Just tap the surface with your fingernail and listen; solidly glued veneer will *tap* and loose veneer will *pop* -you will hear the difference easily. Now glue and clamp down the loose veneers. I like to use a syringe with an 18 guage, screw on needle to get deep under the veneer without causing further damage. It is also useful when the veneer is 'bubbled' up in the middle of a piece, where there is no edge to glue from.
Now, clamping.
Many, many pieces of furniture are awkward if not impossible to traditionally clamp, with round edges, or delicate moulding that would be damaged in tightening a clamp, or you may simply not have access to a wide variety of long pipe clamps, corner clamps etc.
I cut this from a piece of 3/4" MDF (medium density fiber board) Make sure to either cut with a table saw, or use the 'Factory Edge' as the bottom edge, so you have a nice flat surface applying even pressure to the veneer. Also make sure to cut it at least 3" thick, so it will not flex or bow under strain. For smaller models, table tops, cathedrals etc, obviously you will need to make a smaller version, or use another method.
Notice that the rope is about 10' long and has a small loop tied in one end.
Set your clamp roughly where you will want it, with a small piece of Saran Wrap, or grocery store plastic bag between your clamp and the veneer you are gluing -voice of experience here, especially if you are using Gorilla Glue. Clamp the end you can -if you can. If you can't clamp either end somehow, just add a v notch near the corner I cut so the small red clamp would fit and tie it with two ropes.
Now take the looped end of the rope and hook it through a v notch close to the edge or your cabinet.
Take the other end, and loop it around something solid. For the Philco sides, I turned the console on its side and looped the rope around the far end.
For the Victor demonstration, I am looping it down and around the feet at the base. If you go around a sharp corner or edge that the rope may dig into and damage, put a block of scrap wood between the rope and your project to spread the pressure across a bigger area.
Bring the rope back up and through the loop; now you can add tremendous pressure by pulling down on the end you put through the loop, like a pulley.
Tie the rope off for a moment.
Now; if you clamped one end, go ahead and relax the clamp a quarter inch or so; if you couldn't clamp one end you will just have to go back and forth a bit, adding even tension to the two sets of rope.
Okay; you relaxed the clamp a little, so go and tighten the rope at the other end a little more, or as far as you safely can.
Now, when you clamp the first end back down, the board will press your veneer very firmly and evenly down.
It is not as comlpex as it sounds, and I'm no Boy Scout when it comes to rope.
The same technique can be used on curved surfaces, using only the rope and a few wood blocks.
See the curved corners? The left hand side one had a terrible bubble in the veneer, about three inches wide and 3/4 to 1" up, right through the corner.
After injecting glue into the bubble, I put the rope clamp around it as you see it in the picture, pulling it as tight as I could. Then, after tying it off I forced wood blocks under it all around the corner, ironing the veneer back down, then I drove a wedge between the rope and the inside of the console to add a little more pressure. 12 hours later it was solid again.
Well, I feel a little guilty about the length of this post, but if you guys are interested I will continue when my glue dries tomorrow with a post on replacing all of those missing patches in the veneer (and since I am happier with the results I get, I will be using 1/4" solid walnut instead of veneer to do the job. There are five pieces in the side shown in picture above where I replaced veneer that way.)


![[-] [-]](https://philcoradio.com/phorum/images/bootbb/collapse.png)


