Help needed with broken trimmer - RCA Q10
Posts: 13,776
Threads: 580
Joined: Sep 2005
City: Ferdinand
State, Province, Country: Indiana
I have refrained from picking up any radios for quite a while now, but a month or so back I splurged and picked up a little export AC/DC RCA Q10. (It was cheap. Keep that word in mind... cheap...as you read on.)
It had its issues (don't they all). This one was missing its safety interlock and has no back. I resolved the interlock issue by cutting a piece of plastic and creating my own entrance point for the AC cord. I drilled two holes in the plastic and ran the separated zip cord through the holes, tying the wires in an Underwriters' knot inside the chassis.
It's an unbelievably cheap radio. And it is a hot chassis set!  Yes, one side of the AC line connects directly to the chassis. It does play quite well after a recap, though.
But I digress.
I started aligning the set this evening. All went well until I got to the first SW alignment step - the 18 mc oscillator adjustment. As I turned the trimmer screw, I suddenly realized that there was no resistance. The screw was stripped! More accurately, the screw itself was fine, but the Bakelite panel into which the screw had been threaded was stripped.
Talk about a cheap way to build a variable capacitor...I find it hard to believe that RCA, which built quality stuff before WWII, became so cheap immediately postwar.
So I am in a dilemma.
The only option I can think of is to do away with the movable plate of the original trimmer and install a separate trimmer capacitor to replace it.
But I thought I would ask the opinions of my esteemed colleagues here first before proceeding. (Actually, I won't be doing anything more to it for a few to several weeks.)
What say you?
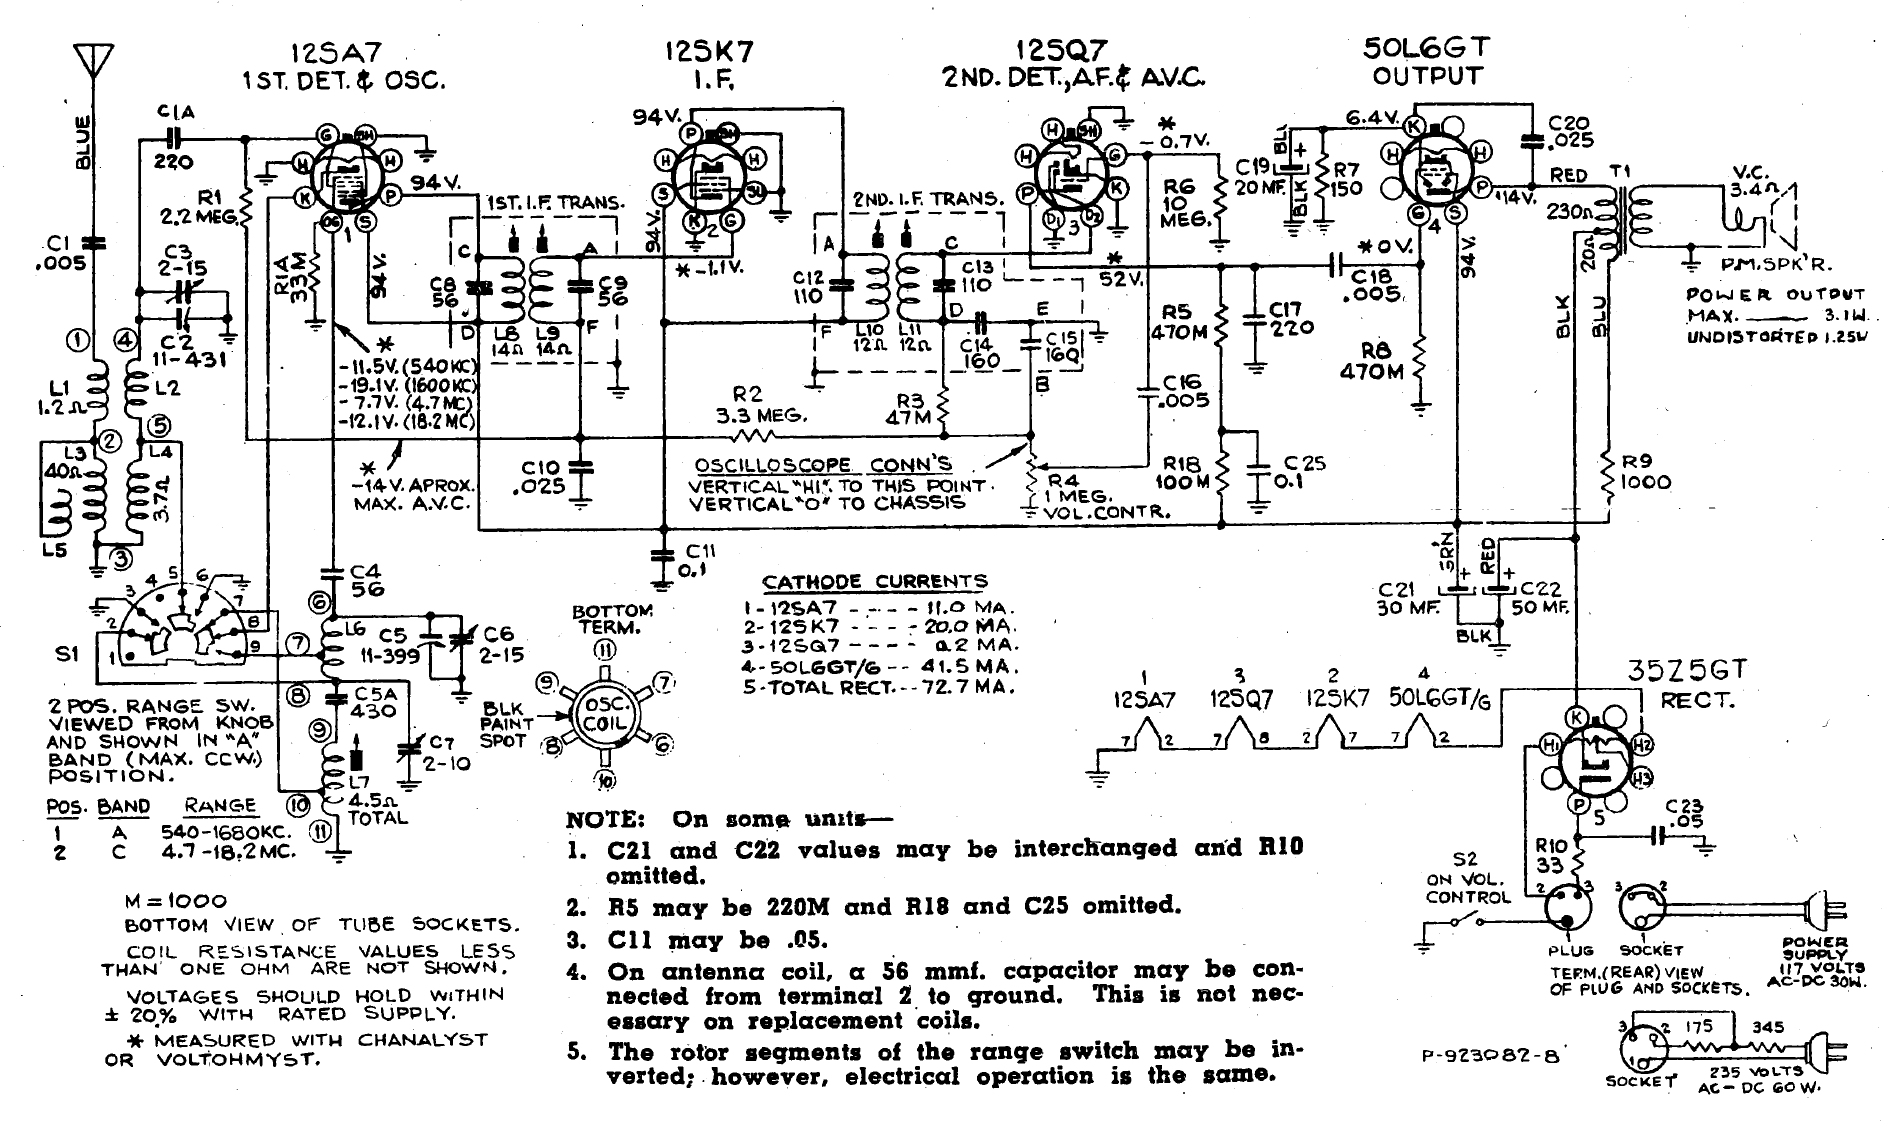
See the schematic below. Fortunately, RCA did see fit to include the value of the trimmer in question, which is C6 in the schematic below (2 to 15 pF).

--
Ron Ramirez
Ferdinand IN
Posts: 1,848
Threads: 141
Joined: Jan 2013
City: Westland, MI
Hello Ron. Would it be possible to re-tap the bakelite to the next larger thread size and use the appropriate larger screw? If not, and the room exists, replace with a new trimmer. Take care and BE HEALTHY. Gary
"Don't pity the dead, pity the living, above all, those living without love."
Professor Albus Dumbledore
Gary - Westland Michigan
Posts: 13,776
Threads: 580
Joined: Sep 2005
City: Ferdinand
State, Province, Country: Indiana
Gary - thanks. I have considered trying that, but I wonder if the old Bakelite can handle a rethreading?
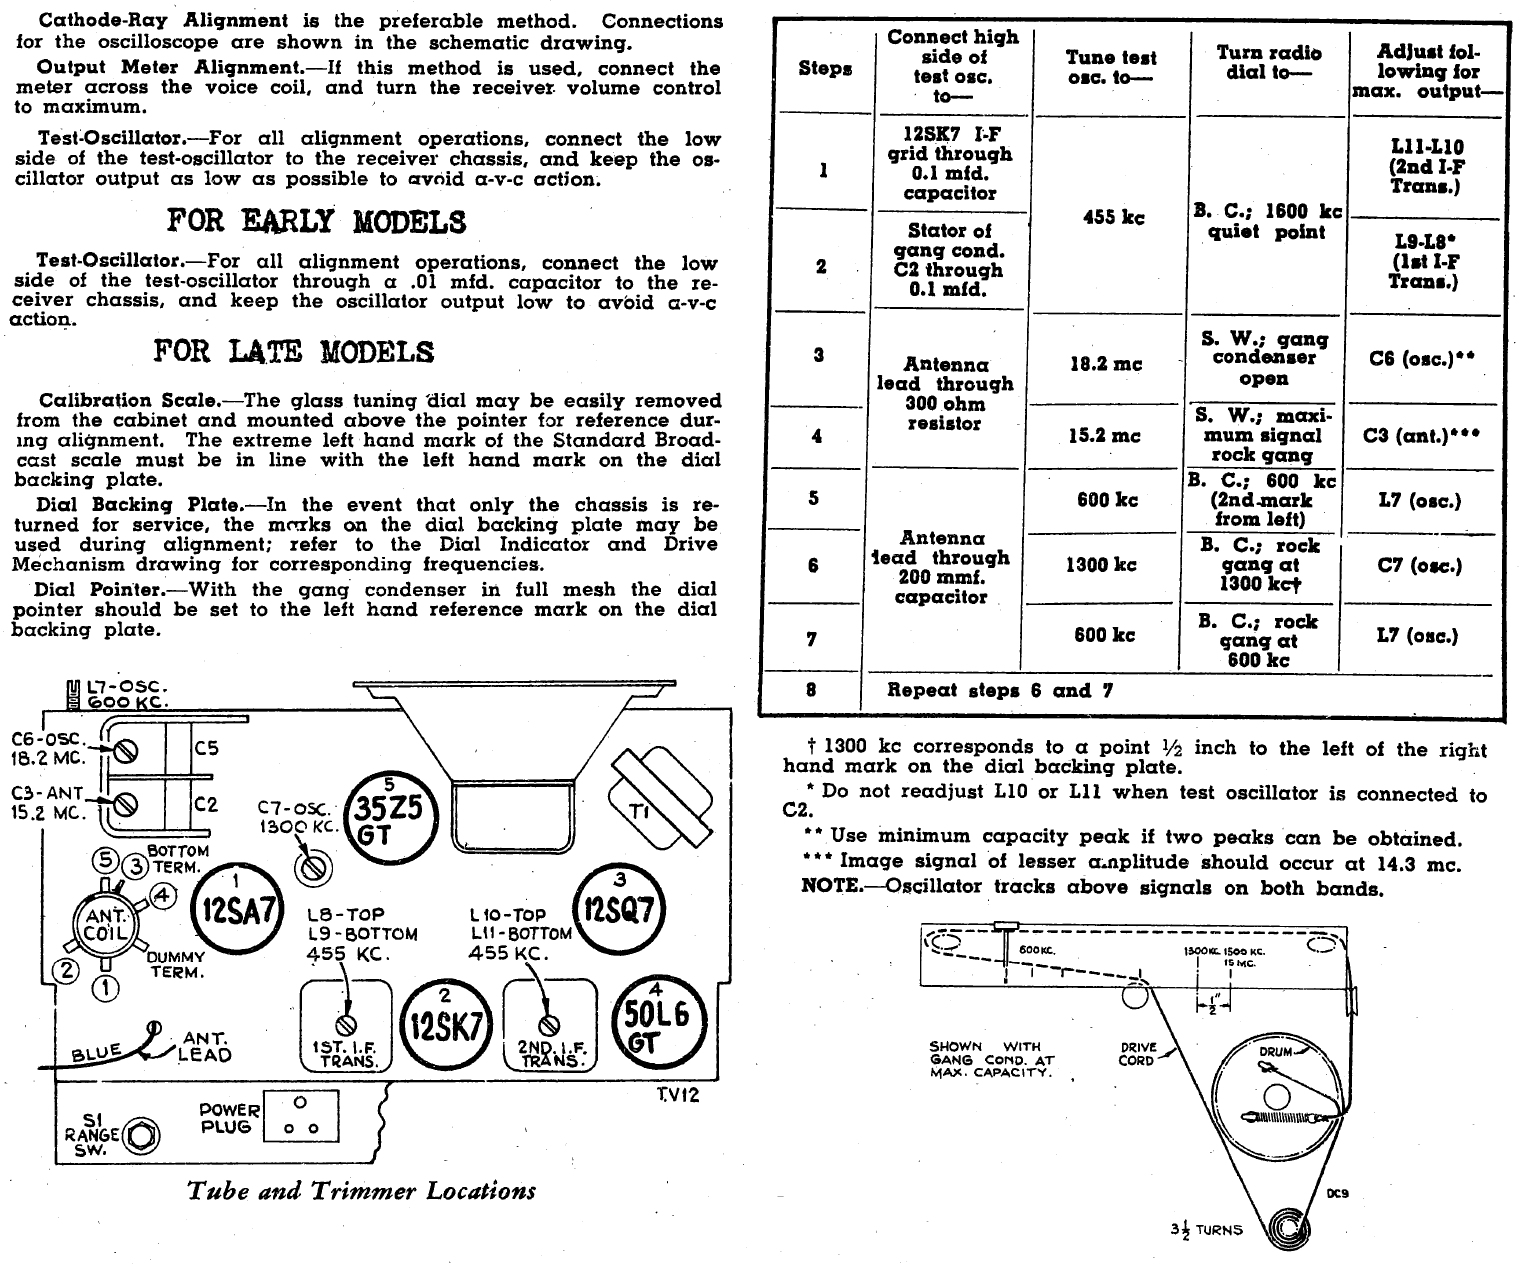
For anyone interested - here is the alignment procedure for this set.

--
Ron Ramirez
Ferdinand IN
Posts: 3,105
Threads: 54
Joined: Apr 2011
City: Lexington, KY
Quote:I have considered trying that, but I wonder if the old Bakelite can handle a rethreading?
Well Ron, you don't have too much to loose by trying since you're contemplating replacing it entirely. You could also fill the hole with J.B. Weld, let cure and then drill and tap.
John KK4ZLF
Lexington, KY
"illegitimis non carborundum"
Posts: 15,305
Threads: 530
Joined: Oct 2011
City: Jackson, NJ
Ron
Without the pucture I am not sure what it looks line, but: if you clean the thread with solvent (degrease) , put some epoxy in, grease the screw and thread it in, so it comes out when you unscrew it...might do the trick.
Or put theflon tape inside and try to see if that works.
Pretty close to what John said with JB Weld.
Yes you got something to lose: the original cap. Backelite CANNOT be rethreaded.
People who do not drink, do not smoke, do not eat red meat will one day feel really stupid lying there and dying from nothing.
(This post was last modified: 08-05-2020, 07:40 AM by morzh.)
Posts: 13,776
Threads: 580
Joined: Sep 2005
City: Ferdinand
State, Province, Country: Indiana
Thanks Mike. (And John, and Gary.) That's what I was afraid of regarding the Bakelite.
I'll likely try the J-B Weld as I don't think I have any Teflon tape. Hmmm...I'll have to check and see. If it doesn't work, I'll add the external trimmer capacitor later.
This is a cheap radio, but it does have separate adjustments for low and high AM, which is unusual - most cheap radios eliminated the low end AM adjustment to save $$$$.
--
Ron Ramirez
Ferdinand IN
Posts: 15,305
Threads: 530
Joined: Oct 2011
City: Jackson, NJ
Theflon tape is the one used in plumbing.
JB is more reliable. Just a bit trickier.
I would not tap. Tap will exert pressure and if it is small old backelite puece, it might crack, even if you are retapping epoxy inside.
I would try fill it with putting a screw inside while it is still soft.
People who do not drink, do not smoke, do not eat red meat will one day feel really stupid lying there and dying from nothing.
(This post was last modified: 08-05-2020, 08:46 AM by morzh.)
Posts: 13,776
Threads: 580
Joined: Sep 2005
City: Ferdinand
State, Province, Country: Indiana
I know what Teflon tape is, I just don't know if I have any of it lying around. I will have to check and see.
Makes good sense re: adding screw to J-B Weld before it sets. I think I'll try the Teflon tape first (if I still have some around here, that is) - less messy than mixing and applying J-B Weld.
--
Ron Ramirez
Ferdinand IN
Posts: 15,305
Threads: 530
Joined: Oct 2011
City: Jackson, NJ
Don't forget to grease the screw. And when torquing it out, be gentle and hold that backelite piece so the torque doesnt apply to it.
People who do not drink, do not smoke, do not eat red meat will one day feel really stupid lying there and dying from nothing.
Posts: 13,776
Threads: 580
Joined: Sep 2005
City: Ferdinand
State, Province, Country: Indiana
I tried the Teflon tape. It holds the screw in place but it still won't adjust like it should.
I *might* try the JB Weld and grease when I am able to get back to the bench. In the meantime, two 1.5-15 pF trimmers are on their way to my place.
--
Ron Ramirez
Ferdinand IN
Posts: 15,305
Threads: 530
Joined: Oct 2011
City: Jackson, NJ
Good to see ya talking trimmers.
Maybe the tape protruded and didn't let the flexible part go all the way? Meaning: a bit too much of it was stuffed in?
People who do not drink, do not smoke, do not eat red meat will one day feel really stupid lying there and dying from nothing.
(This post was last modified: 08-08-2020, 06:14 PM by morzh.)
Posts: 13,776
Threads: 580
Joined: Sep 2005
City: Ferdinand
State, Province, Country: Indiana
Thanks Mike.
I first tried a little Teflon tape, and the screw would not stay in. So I added more. Then it stayed. But as you said, it might be too much. I don't know. I think the original screw is a 4-40 thread and the damaged hole is now big enough for a 6-32 thread.
When I'm home and feeling like going to the bench, I'll post a picture or two.
--
Ron Ramirez
Ferdinand IN
Posts: 358
Threads: 4
Joined: Aug 2015
City: Monteith, Ontario CA
Ron,
If you can tap it out cleanly to 6-32 or even 8-32 without creating any new capacitance between the screw and the housing, go ahead and do it. The cap doesn't care about screw size, only about proximity to the electrical components.
Users browsing this thread: 1 Guest(s)
|
 Yes, one side of the AC line connects directly to the chassis. It does play quite well after a recap, though.


