Big HEAVY lots of tubes - for 1931
Posts: 2,118
Threads: 112
Joined: Jun 2010
City: Medford OR (OR what?)
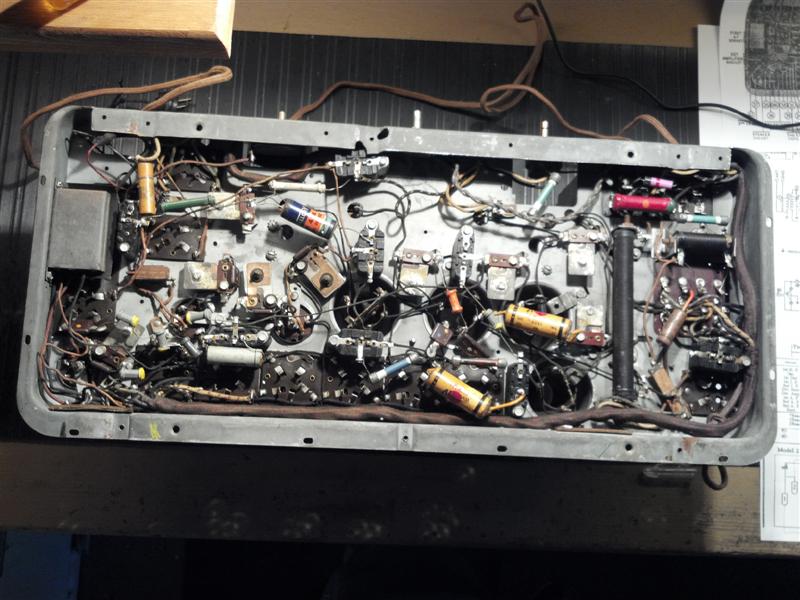
Just got a 1931, lowboy 111. Wow this is a big radio, 11 tubes. I'm going to be stuffing caps for a while. Someone has worked on it (of course). Not too bad, they took out 1 cap block, which I should have, but they also changed out the last stage (45s) input trans. I'd like to find a replacement for that since the new one is much smaller, soldered to the chassis - sideways - you get the picture.
The cabinet has a decal added from the seller, a Thearly(?) Music Co. I'm going to try to preserve that in the refinish.
Just thought i'd post. Haven't been into a philco for a while. If anybody wants to see pictures -----
This is the cabinet. Borrowed picture:
http://www.radioatticarchives.com/radio.htm?radio=2221
OH. and here too. Sorry Ron:
http://www.philcoradio.com/gallery/1931a.htm
I didn’t like that choice of grill cloth though. I have what is left of the leaves pattern - ripped. It is cool enough that I might try some kind of repair job. Otherwise the (Z word deleted) leaf pattern would seem to be a good option - if I can find a piece.
(This post was last modified: 07-31-2012, 07:30 PM by Phlogiston.)
Posts: 13,776
Threads: 580
Joined: Sep 2005
City: Ferdinand
State, Province, Country: Indiana
No apologies needed! 
Congratulations on your acquisition of a 111 lowboy. It's a shame that "falling leaves" pattern was never reproduced, it's really cool, I think. Of course it's a moot subject since reproduction grille cloth is no longer available for the most part.
Did you know the Philco 111 was Philco's first superheterodyne radio?
--
Ron Ramirez
Ferdinand IN
Posts: 2,353
Threads: 92
Joined: May 2010
City: Clayton, NC
Nice find!! I have a 111H, and for an early superhet it is a super radio, especially with the local/distance switch set on "distance."
Please post some pics when you have a chance.
Posts: 2,118
Threads: 112
Joined: Jun 2010
City: Medford OR (OR what?)
So that is the switch that is on the top side of the chassis. I had not gotten that far yet.
Posts: 2,353
Threads: 92
Joined: May 2010
City: Clayton, NC
If you get the radio playing right it will peel the paint on your walls when you have the switch set to "distance."
Posts: 1,562
Threads: 56
Joined: Nov 2008
City: Sedona, AZ/Placentia/CA
Looks like we will be working on the same chassis. Have not started on mine yet, but here is a link to the introduction. Another couple weeks and off I go on it. One other project to finish that I started 30 years ago.
Jerry
http://philcoradio.com/phorum/showthread.php?tid=4953
A friend in need is a pest! Bill Slee ca 1970.
Posts: 2,118
Threads: 112
Joined: Jun 2010
City: Medford OR (OR what?)
30 years - wow.
Well I have started on mine. I see that another metal boxed cap has been removed, .25mf in the center.
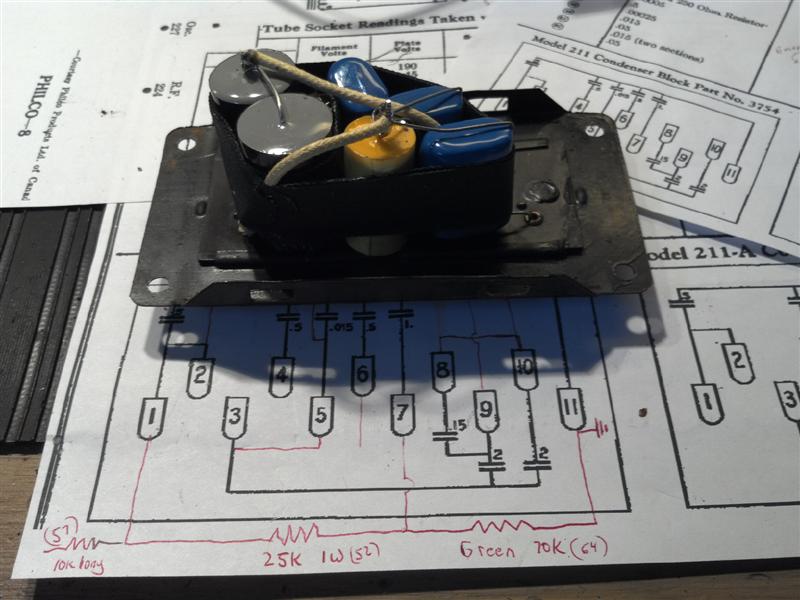
Rebuilt the big cap can using only film 630 volt caps. It costs more but should withstand surges, unplugging the FC speaker, reversed polarity (none) and the test of time. I do not want to do it again. Upped the filter values from 2mf to 3mf as well.


Posts: 7,212
Threads: 266
Joined: Dec 2009
City: Roslyn Pa
Nice set!!! Like the cabinet!! Wouldn't mind finding one too but I'm getting a bit heavy in the console department.
GL
Terry
Posts: 2,118
Threads: 112
Joined: Jun 2010
City: Medford OR (OR what?)
How high can you stack them, anyway?
Posts: 1,562
Threads: 56
Joined: Nov 2008
City: Sedona, AZ/Placentia/CA
Phlogiston, am I safe to assume that removal of the cover on the "big can" was by just squeezing in the sides to release the small tits and then lift the can off? Any problems with tar or such holding the top cover on? Thanks, can't wait to get on mine.
Jerry
A friend in need is a pest! Bill Slee ca 1970.
Posts: 2,118
Threads: 112
Joined: Jun 2010
City: Medford OR (OR what?)
(Chuckling a bit) no, the first part is correct. Pop the bottom loose, reach under and cut the wires and the base will be free. Now if you are lucky, a few of the spot welds on the side of the can will have failed or will with a little push. OTHERWISE, it is not as easy, but not as bad as an AK power can.
Turn the can on its back, tar side up. Drill a ~3/8 hole deep into the tar & foil & other goo. Drive a lag screw into the goo at least 2 - 3 inches. Now at this point you have the opportunity to make yourself less popular with your neighbors or your wife/kids by heating the unit with:
1. A torch
2. The BBQ grill
3. The oven/ toaster oven/ hot plate
However, if you want to avoid such notoriety, it is best to WARM the unit with a heat gun, top and sides, not the exposed tar side, for about 2 minutes with the gun on high. It is not necessary to heat it so much that the paint bubbles off. It will be too warm to hold with your hands but not so with a towel. Then ,pull the nasty out with a set of pliers, pulling on the lag screw and holding the unit with the rag or setting it so that the flanges are supported and the entire tar filled area is exposed - and pull. It is surrounded by paper, pull that out too before it cools.
You may then mount the tar-baby on a plaque as a triumph over technology and display it in a public spot, OR drop it into a paper bag before you get the tar on anything else.
(This post was last modified: 08-02-2012, 09:44 AM by Phlogiston.)
Posts: 2,118
Threads: 112
Joined: Jun 2010
City: Medford OR (OR what?)
P.S. It looks like all of the resistors are all either open or greater than +50% out of spec.
Posts: 2,128
Threads: 18
Joined: Oct 2008
City: Merrick, Long Island, NY
Recap and recarbon is in order. Hey I just added to jargon. Don't tell the newbies.
Posts: 1,562
Threads: 56
Joined: Nov 2008
City: Sedona, AZ/Placentia/CA
Thanks Phlogiston, sorry to hear all gummy with tar. I do believe I will try the method of using a drill from underneath to break the wires from in inside going out to the connection point and leaving the base attached. Then on to the spot welds to see if I can lift the removal top with the base attached to the chassis. Worked great on 112 can.
Jerry
A friend in need is a pest! Bill Slee ca 1970.
(This post was last modified: 08-02-2012, 01:47 PM by jerryhawthorne.)
Posts: 2,118
Threads: 112
Joined: Jun 2010
City: Medford OR (OR what?)
I would rather use wire than carbon, but, yes.
Digging out tar now.
TIP:
Be careful not to cut yourself while extracting old caps. I keep a tube of superglue handy for this instance, seems to work better than black tape as a bandaid.
NOTE:
While I am a professional technician I may not be qualified to dispense medical advice. Please refer to a doctor (that considers himself qualified)
before using any bonding agent to re-attach severed or partially severed body parts.
(This post was last modified: 08-02-2012, 01:49 PM by Phlogiston.)
Users browsing this thread: 1 Guest(s)
|


