Welcome Guest! Be sure you know and follow the Phorum Rules before posting. Thank you and Enjoy! (January 12) x

Thread Closed
Thread Rating:
  • 0 Vote(s) - 0 Average
  • 1
  • 2
  • 3
  • 4
  • 5

What do I do?
#16

Sometimes you can get away with sanding the cracks and they will disappear, or at least, become much less noticeable. It depends on how thick the veneer is, and how deep the cracks go. Of course, if the cracks go completely through the veneer, it doesn't work. The other problem is, even if the cracks vanish, the remaining veneer can re-crack over time.

Even so, I always try to sand the cracks out before doing anything else. Sometimes it works. Just sand lightly with very fine paper. If you manage to sand all the way through the veneer, it's game over.

I used this technique on a 37-650 that was badly cracked all the way down both front sides. The cracks looked horrible, but when I examined them closely, they were superficial. Just the very, very top layer of veneer had cracked. I sanded the cracks away and proceeded to refinish. It came out great. That was six months ago, and no sign of any new cracks. Time will tell.
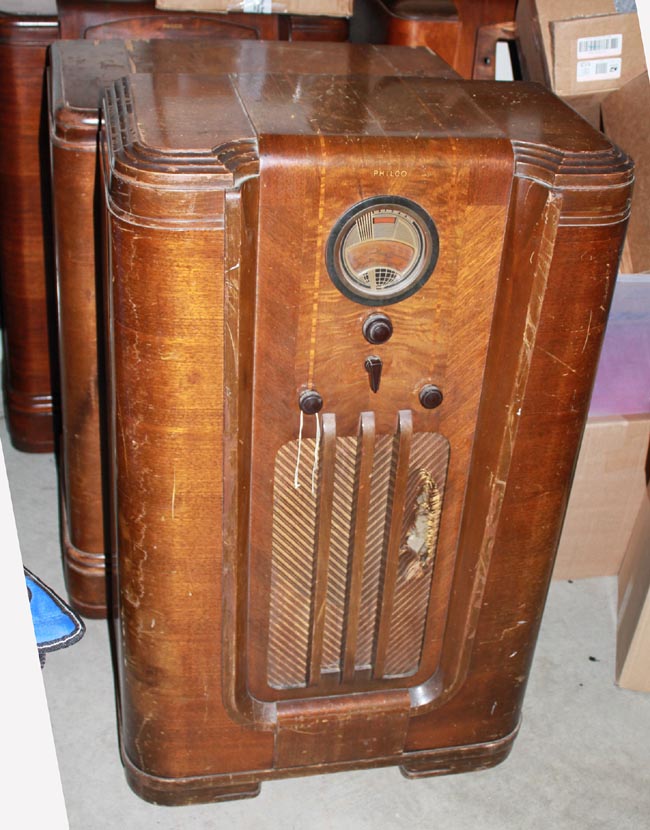
   

This is before....
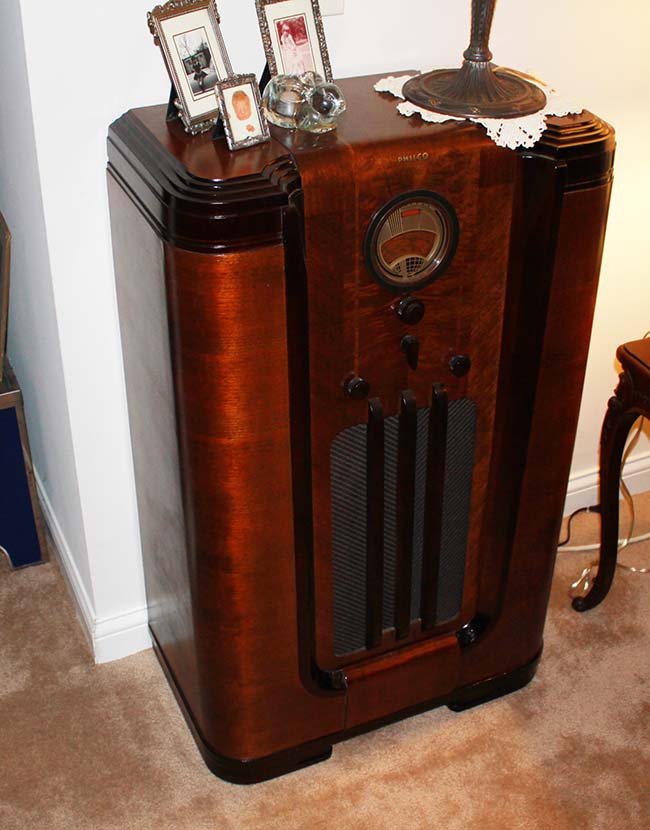
   

..This is after

The artist formerly known as Puhpow! 8)
#17

Thats great!
I was thinking of going a tinge darker on the finish since the light color is definitely making them show up more. I have completely smoothed them out and am hoping with the color change just to the curves it will make it beauteous again

Kirk

Times I have been electrocuted in 2021
As of 1/01/2021
AC: 4 DC: 1
Last year: 6
#18

You can try that, but in my experience, you can't bury the cracks with dark toner. If you try, the set will just be too dark and possibly muddy looking on the area you try to hide. If you've sanded as much as you feel safe doing, and the cracks are still visible.. either get new veneer, or just refinish as if they did not exist. You'll still be able to see them, but it looks better than a very dark area.

Get some timber mate wood filler and work it over the cracks. Then smooth it with fine sandpaper. It accepts toner quite well and you'll hide the much of the cracks.

The artist formerly known as Puhpow! 8)


Users browsing this thread:
[-]
Recent Posts
Need to purchase some accessories for restoration of my Old Philco Radio
Here is a list of resources found in our online library that you might find useful. Mike's Gobs of Knobs email addres...klondike98 — 01:46 PM
First Radio restoration
Hi Tubeman, Welcome to the Philco Phorum.  Phamily Phriendly Pfun with Phine Pholks Phull of Philco Phacts. (See a p...MrFixr55 — 12:33 PM
First Radio restoration
You could post in the WANTED ADs section here on the Phorum and see if anyone has an RF generator that they want to sell...klondike98 — 11:55 AM
Zenith H725
Good ideas, thank you Arrange and Rich. I have the adhesive aluminum foil already and can try that immediately. More ...EdHolland — 10:18 AM
Graphics for majestic 1050 dial glass.
Murf; I found this thread on the ARF, the first photo has a pretty good view of the dial glass. Regards ArranArran — 01:12 AM
Zenith H725
hello Ed, how about that speacial tape used for ducting it's like foil or how about thin piece of aluminum roof flash...radiorich — 12:19 AM
Zenith H725
Ed; One material that I have seen, but never tried for this was material for making exhaust gaskets, it's similar to ...Arran — 11:42 PM
Zenith H725
I just remembered, I have some hi temp silicone rubber material which could do the trick. Or a piece of FR4 laminate. Th...EdHolland — 08:39 PM
Zenith H725
The PSU filter cap arrived today (thank you USPS!) so I will work on that later. Meanwhile, I have the dial, speaker...EdHolland — 06:42 PM
Philco 610B oscillator wiring
Thanks Terry. After checking my notes I think I recorded about -10v at the 6A7 G4/control grid. The screen grid (G3 &...Tubester — 05:59 PM

[-]
Who's Online
There are currently 2326 online users. [Complete List]
» 1 Member(s) | 2325 Guest(s)
Avatar

>