Welcome Guest! Be sure you know and follow the Phorum Rules before posting. Thank you and Enjoy! (January 12, 2025) x

Thread Closed

What do I do?
#16

Sometimes you can get away with sanding the cracks and they will disappear, or at least, become much less noticeable. It depends on how thick the veneer is, and how deep the cracks go. Of course, if the cracks go completely through the veneer, it doesn't work. The other problem is, even if the cracks vanish, the remaining veneer can re-crack over time.

Even so, I always try to sand the cracks out before doing anything else. Sometimes it works. Just sand lightly with very fine paper. If you manage to sand all the way through the veneer, it's game over.

I used this technique on a 37-650 that was badly cracked all the way down both front sides. The cracks looked horrible, but when I examined them closely, they were superficial. Just the very, very top layer of veneer had cracked. I sanded the cracks away and proceeded to refinish. It came out great. That was six months ago, and no sign of any new cracks. Time will tell.
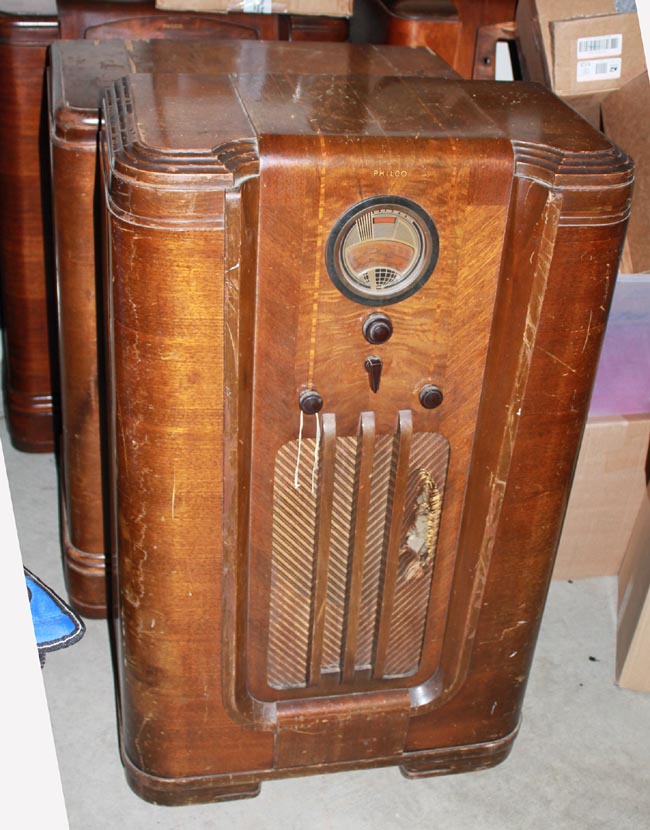
   

This is before....
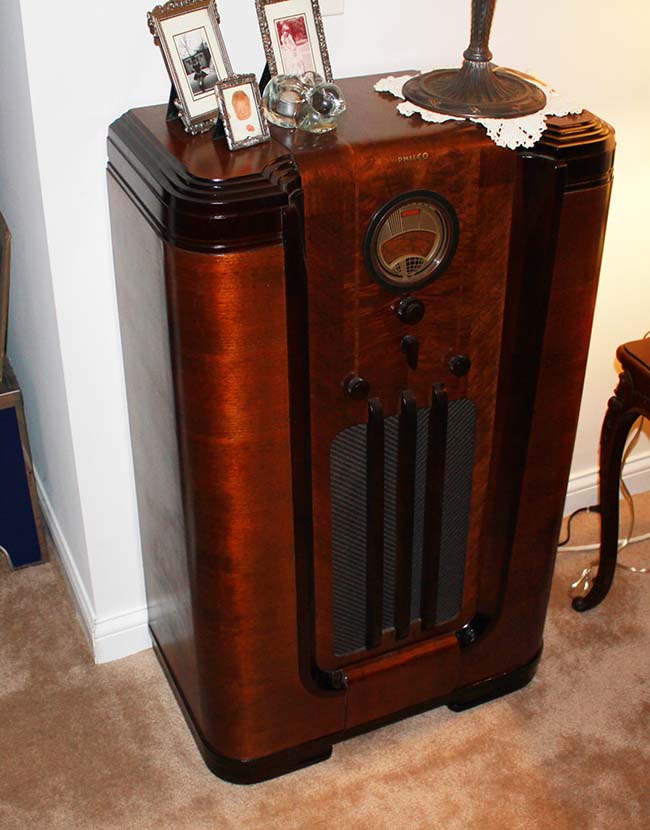
   

..This is after

The artist formerly known as Puhpow! 8)
#17

Thats great!
I was thinking of going a tinge darker on the finish since the light color is definitely making them show up more. I have completely smoothed them out and am hoping with the color change just to the curves it will make it beauteous again

Kirk

Times I have been electrocuted in 2021
As of 1/01/2021
AC: 4 DC: 1
Last year: 6
#18

You can try that, but in my experience, you can't bury the cracks with dark toner. If you try, the set will just be too dark and possibly muddy looking on the area you try to hide. If you've sanded as much as you feel safe doing, and the cracks are still visible.. either get new veneer, or just refinish as if they did not exist. You'll still be able to see them, but it looks better than a very dark area.

Get some timber mate wood filler and work it over the cracks. Then smooth it with fine sandpaper. It accepts toner quite well and you'll hide the much of the cracks.

The artist formerly known as Puhpow! 8)


Users browsing this thread:
[-]
Recent Posts
54C Complete Teardown/Rebuild
Richard, The Silvertone 2014 also is a transformerless set, so I am incorporating a 1:1 600 ohm audio isolation transfo...glyphmon — 11:37 PM
Preliminary work on wife's Silvertone 2014
Did an alignment today which was interesting.  IF alignment went great, almost all was already spot-on.  Adjusting on th...glyphmon — 11:35 PM
54C Complete Teardown/Rebuild
The main problem with adding a Bluetooth input is that this set lacks a traditional power transformer to isolate it from...radiorich — 11:19 PM
54C Cabinet Refinish
I started stripping this cabinet before it got super chilly out because I knew I wasn't going to be able to work on ...glyphmon — 11:18 PM
54C Complete Teardown/Rebuild
While I'm waiting to wrap up the final steps on my wife's Silvertone 2014, I started disassembly on the next project.  O...glyphmon — 11:07 PM
Preliminary work on wife's Silvertone 2014
Hello roy, that great news glad it worked out for you !! Sincerely Richardradiorich — 10:50 PM
Preliminary work on wife's Silvertone 2014
Safety caps arrived today.  Soldered one in and had a successful first power-up.  No magic smoke escaped and it tunes in...glyphmon — 09:53 PM
HiFi (Chifi) tube amp build - but my own design.
Tim, you refer to “AK”. Is that Alaska or Atwater-Kent, or… JoeJoe Rossi — 11:49 AM
Grundig 5088
Skip, you are back to this one? As for fixing, Mark Oppat fixes vol. controls. Don't know about Grunding, but woul...morzh — 10:30 AM
Stromberg Carlson 1500 Squeal
I volunteer for a monthly Fixit Clinic in my county. All the fixers tell anyone who brings in a Keurig that it will prob...RodB — 10:24 AM

[-]
Who's Online
There are currently 2918 online users. [Complete List]
» 2 Member(s) | 2916 Guest(s)
AvatarAvatar

>