Thread Rating:
  • 0 Vote(s) - 0 Average
  • 1
  • 2
  • 3
  • 4
  • 5

What do I do?
#16

Sometimes you can get away with sanding the cracks and they will disappear, or at least, become much less noticeable. It depends on how thick the veneer is, and how deep the cracks go. Of course, if the cracks go completely through the veneer, it doesn't work. The other problem is, even if the cracks vanish, the remaining veneer can re-crack over time.

Even so, I always try to sand the cracks out before doing anything else. Sometimes it works. Just sand lightly with very fine paper. If you manage to sand all the way through the veneer, it's game over.

I used this technique on a 37-650 that was badly cracked all the way down both front sides. The cracks looked horrible, but when I examined them closely, they were superficial. Just the very, very top layer of veneer had cracked. I sanded the cracks away and proceeded to refinish. It came out great. That was six months ago, and no sign of any new cracks. Time will tell.
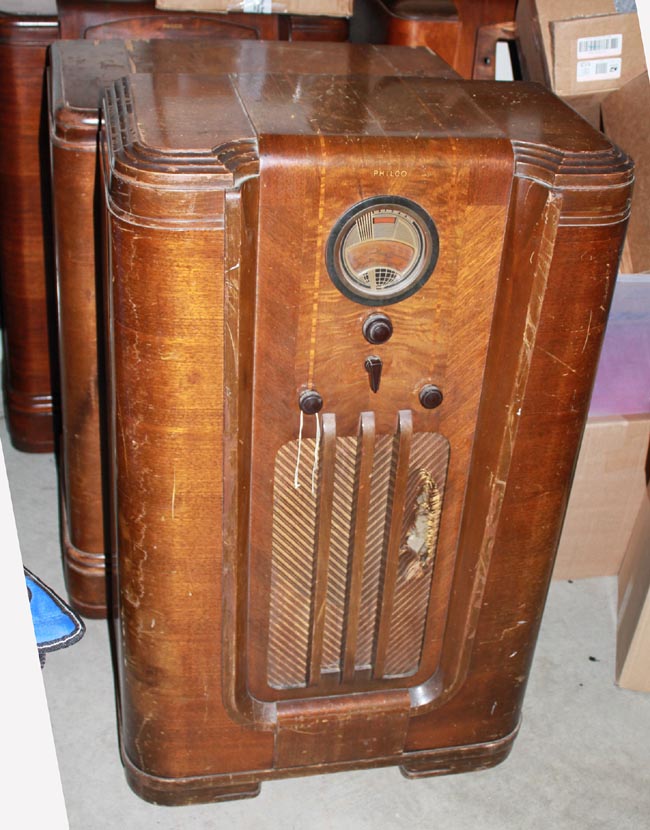
   

This is before....
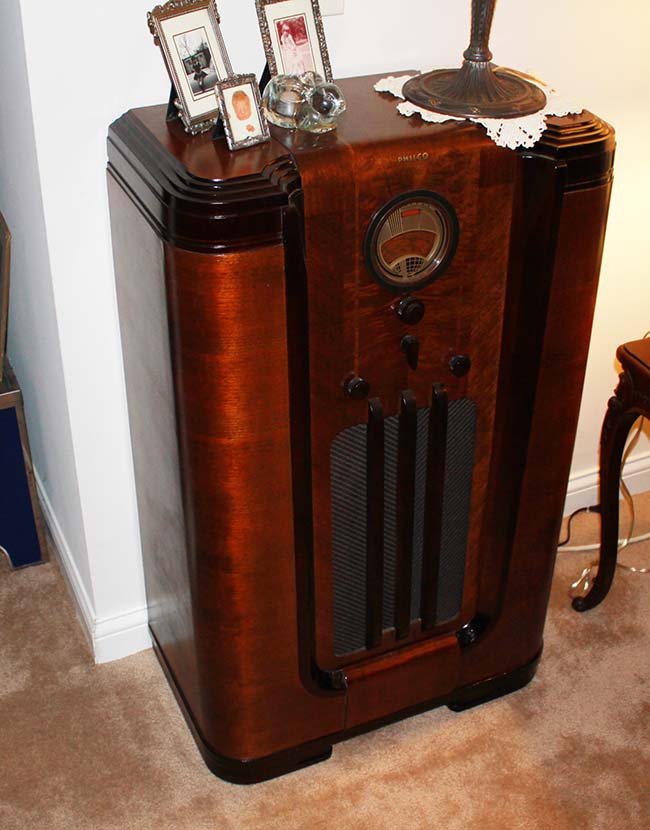
   

..This is after

The artist formerly known as Puhpow! 8)
#17

Thats great!
I was thinking of going a tinge darker on the finish since the light color is definitely making them show up more. I have completely smoothed them out and am hoping with the color change just to the curves it will make it beauteous again

Kirk

Times I have been electrocuted in 2021
As of 1/01/2021
AC: 4 DC: 1
Last year: 6
#18

You can try that, but in my experience, you can't bury the cracks with dark toner. If you try, the set will just be too dark and possibly muddy looking on the area you try to hide. If you've sanded as much as you feel safe doing, and the cracks are still visible.. either get new veneer, or just refinish as if they did not exist. You'll still be able to see them, but it looks better than a very dark area.

Get some timber mate wood filler and work it over the cracks. Then smooth it with fine sandpaper. It accepts toner quite well and you'll hide the much of the cracks.

The artist formerly known as Puhpow! 8)


Users browsing this thread: 8 Guest(s)
[-]
Recent Posts
HiFi (Chifi) tube amp build - but my own design.
Tim, nice write up and thanks for sharing !! Sincerely Richardradiorich — 02:47 AM
HiFi (Chifi) tube amp build - but my own design.
Well, this was a real "Hum-Dinger" :lol: ! This will be kinda long, but hopefully it will help others having t...TV MAN — 01:55 AM
Shadow Meter Bulb
Phorum members, I am trying to find the bulb # for PHILCO Shadow Meter part number 45-2180 that is from a 37-640 chassis...georgetownjohn — 06:53 PM
Philco 41-608 changer coupler
3D-printing...short of machining, of course. Or molding.morzh — 05:20 PM
Philco 41-608 changer coupler
Thanks, Morzh. That solves the issue of the rubber pieces. Now, I need to find a way to replicate the pot metal piec...alangard — 05:07 PM
12' Philco
If it is 12', either Kareem or Andre would have to jump pretty high to look at the front panel. Kareem would have an e...morzh — 01:48 PM
12' Philco
And here's a story about the tires on the truck. Same "no-stoop" guy must have installed these! Take care a...GarySP — 01:17 PM
Hickok AC51 tube tester
I think they have only shown the secondaries of the transformer. Two of them feed the rectifiers' filaments.morzh — 12:58 PM
IF can wire size and Rubber mounts?
Arran If the wire inside cans is the gauges you mentioned, the sole reason for that would be mechanical, to stiffen t...morzh — 12:56 PM
12' Philco
Rod, Yes, I know, but the Giant Philco is not around anymore either, so I go by whoever was alive fairly recently. H...morzh — 12:54 PM

[-]
Who's Online
There are currently no members online.

>