Zenith 12-S-265 (chassis 1204)
Posts: 1,199
Threads: 49
Joined: Oct 2017
City: Allendale, MI
I'm missing the 3 x 10mfd cardboard cap on my 15U270. Gonna have to try and make one. The 4/8 on mine had been worked on previously. The cardboard was missing and new caps silicon-ed in the can. I'm doing similarly only filled in the end with cardboard and poured in some bee's wax to make it look a little better.
(This post was last modified: 05-22-2020, 04:10 PM by rfeenstra.)
Posts: 3,160
Threads: 59
Joined: Apr 2011
City: Lexington, KY
Quote:.....The 4/8 on mine had been worked on previously. The cardboard was missing and new caps silicon-ed in the can. I'm doing similarly only filled in the end with cardboard and poured in some bee's wax to make it look a little better.
In hindsight I should have used beeswax on my 3 x 10 MFD, but on the 4/8 (and also the 12/20) there is a circular cardboard piece that fits on the end of the tube so you don't see what's inside anyway.... at least on an original capacitor. Maybe if I find my beeswax (lost in the move) before I put it back together I'll redo the 3 x 10...

I just checked all of my tubes and they all look good except for a 6A8 that was in place of a 6L7 so I replaced that one. I got brave and also pulled the 6T5 and on the tester it does light, but I'm pretty sure it will be too dim to actually use, but I'll try it just to see how bright it actually is.
John KK4ZLF
Lexington, KY
"illegitimis non carborundum"
(This post was last modified: 05-22-2020, 05:22 PM by Eliot Ness.)
Posts: 3,160
Threads: 59
Joined: Apr 2011
City: Lexington, KY
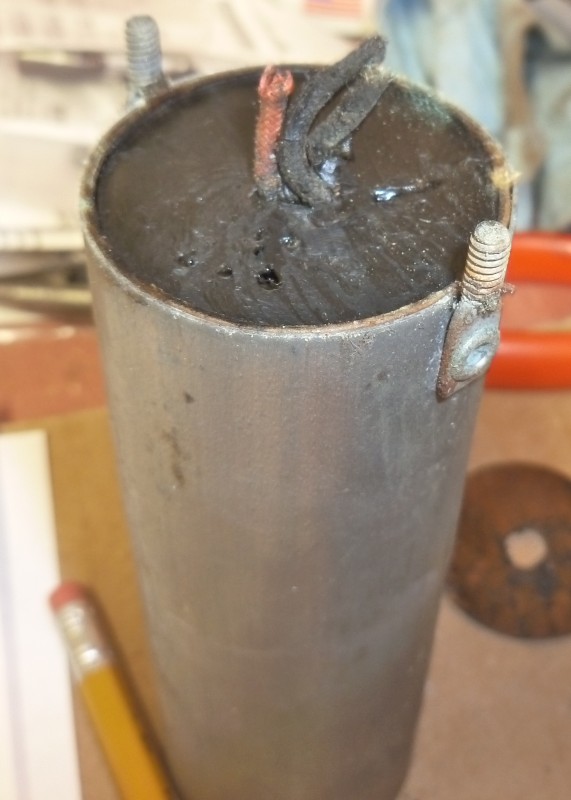
I last left you hanging in suspense as I put the can with C27 & 27 into the freezer. Oddly the can has several wrinkles, sort like it had been heating up and expanding in spots, or maybe just defects from the factory. Fresh from the freezer I was hoping that maybe it would slide out, but no dice, and since it was metal I didn't want to put more dents in it by beating it with a hammer. So I then sank a 3" drywall screw into the tar, set the can in an aluminum foil tray and heated the daylights out of it with my heat gun on high. Eventually the hard black tar started bubbling and gripping the drywall screw the guts just plopped out into my trash can.

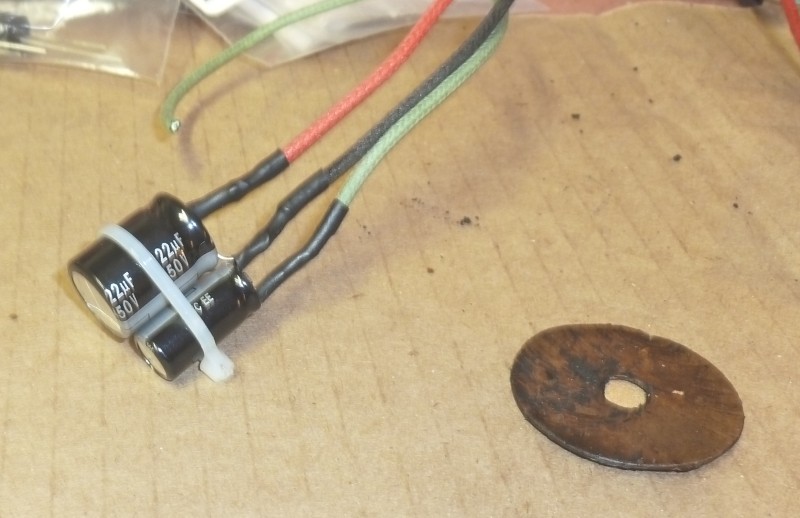
C26 & 27 are 20 and 12 MFD so I used a 10 and a 22 MFD:

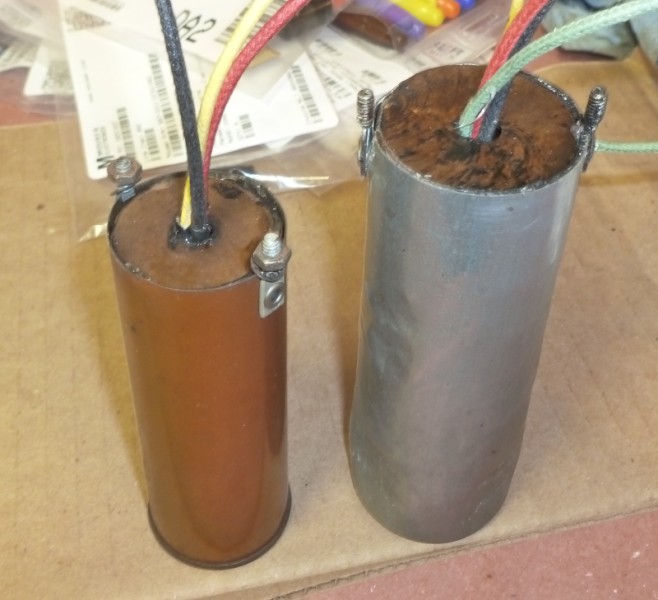
Like the other can I put some filler in the bottom, used some hot glue to anchor everything in place, then (like with the other tube) made a dummy cardboard disc I set in about 1/4" from the top to conserve hot glue. I then filled that space with hot glue and set the original end piece on the can. Now both the electrolytic capacitor cans that mount on top of the chassis are stuffed and ready to go:

I guess my next step will be to tack in the new candohm and the seven electrolytic capacitors. I guess I'll put in a new line cord and bring it up slowly just to see if there are any other problems. Then I'll restuff all the paper caps, check resistors, and then begin the slow process of disassembly to clean everything and clean/service/adjust the robot dial shutter assembly and the tuning capacitor. Stay tuned to this Bat Station 
[Video: https://www.youtube.com/watch?v=alQ0zUjLLmg]
John KK4ZLF
Lexington, KY
"illegitimis non carborundum"
(This post was last modified: 05-23-2020, 10:42 PM by Eliot Ness.
Edit Reason: grammer
)
Posts: 16,533
Threads: 573
Joined: Oct 2011
City: Jackson
State, Province, Country: NJ
John
My memory tells me, the copper colored cans in both my Zeniths (9S262 and the Spinet) took very litle effort. Didn't have aby aluminum cans.
I heated the can on low so I could still hold it in my hand and used a corkscrew, it pulled out just fine.
Unlike some other cans, where I could be heard uttering bad Russian curses aloud, good thing there was no one to hear it.
People who do not drink, do not smoke, do not eat red meat will one day feel really stupid lying there and dying from nothing.
Posts: 3,160
Threads: 59
Joined: Apr 2011
City: Lexington, KY
Mike, yes the capacitor tube in the copper colored can just slid right out but the aluminum can took quite a bit of heat. A cheap corkscrew would probably be easier to finagle than my 3" drywall screws. If I ever finish this chassis I have a 9 tube 5905 1938 chassis I want to redo. All my Zeniths have broken dial belts now so when I heard Adams was going out of business I bought belts for all the radios I have that use them.
John KK4ZLF
Lexington, KY
"illegitimis non carborundum"
Posts: 16,533
Threads: 573
Joined: Oct 2011
City: Jackson
State, Province, Country: NJ
The guy who took over sells those on eBay, I bought one.
People who do not drink, do not smoke, do not eat red meat will one day feel really stupid lying there and dying from nothing.
Posts: 1,199
Threads: 49
Joined: Oct 2017
City: Allendale, MI
I did too, just the other day.
Posts: 3,160
Threads: 59
Joined: Apr 2011
City: Lexington, KY
He also has a website:
https://www.qualityradiobelts.com/index.html
It was nice to see someone continue the business 
John KK4ZLF
Lexington, KY
"illegitimis non carborundum"
Posts: 3,160
Threads: 59
Joined: Apr 2011
City: Lexington, KY
Not much of an update, but I jumpered in my electrolytic capacitors and replacement candohm resistor assembly and brought it up slowly and briefly to 110V but my B+ was lower than I liked so I brought it back down. I then broke out my ohm meter and found a 10 ohm short from B+ to chassis ground. I was just about to unsolder a heavily populated terminal for isolation when I saw a replacement Solar .05 cap buried by the bandswitch and sure enough that guy measured 10 ohms. Replacing it brought my B+ up to almost where I wanted it, but instead of messing with it I decided to just start replacing capacitors and resistors as needed along with servicing/cleaning the chassis and shutter dial assembly.
I decided to try my hand at making dog bone resistors. There are a couple of different approaches, the molding and the tubing method. Below is one example of the molding method:
https://ehscott.ning.com/forum/topics/do...esistors-1
I dismissed this because I felt the learning curve was a bit too high for this process.
That left the tubing method as shown in the following two videos:
https://www.youtube.com/watch?v=0ddMuSt_aR4
https://philcoradio.com/library/index.ph...resistors/
The first video mentioned TAP Plastics as a source for tubing but their shipping was insanely high. Steve Davis mentioned using Paper Mate pens so I ordered a box of 60 for just over $5 on Amazon, but the ones I received were slightly tapered so I went to a hobby shop looking for small tubing. I wanted 4 different sizes but they only had 1/4 and 5/16 in stock. I found the 3/8 and 7/16 on eBay and the combined shipping for both was only $1.99:
https://www.ebay.com/sch/m.html?_odkw=&_...n&_sacat=0
The seller is omnimodels and the brand of tubing is Evergreen if that link doesn't work.
I decided to use this tubing and instead of J-B KwikWeld I ordered some two part putty (milliput) since that seems less messy and easier to work with, but I have some J-B KwikWeld if needed for some reason.
Tearing the chassis and shutter dial assembly down for cleaning/servicing, re-stuffing the paper caps, and making the dog bones will draw this project out but I'll try to make periodic updates, especially on my dog bone project.
John KK4ZLF
Lexington, KY
"illegitimis non carborundum"
Posts: 2,118
Threads: 112
Joined: Jun 2010
City: Medford OR (OR what?)
when making the resistors it is easy to accommodate a 1W or even larger replacement into the construction of a 1/4W (original). This will help in any heat-dissipation issues (speculation) created by encapsulating the new resistor.
"I just might turn into smoke, but I feel fine"
http://www.russoldradios.com/
Posts: 3,160
Threads: 59
Joined: Apr 2011
City: Lexington, KY
Thanks Russ, due to their smaller size I pretty much use 1 & 2 watt resistors for most applications.
The tuning was very stiff so I needed to access the tuning gears, so I carefully removed the shutter dial assembly. I think the stiffness was a combination of dried out grease and a clock spring that was too tight.
After removing the gears and clock spring I realized I needed to remove the tuning cap. I didn't really want to but it was so filthy there was no way to properly clean it without removing it. After breaking out the Weller soldering gun I finally got it off the chassis and both the tuning cap and the chassis under was indeed filthy. I spent a lot of time spraying the tuning cap with fast drying contact along with an acid brush. I'll let it dry before I take it out to the garage and blow it out with my compressor making sure there are no shorts and lightly lubing it.
With the tuning cap off I spent some more time cleaning the chassis. Cotton balls, Go-Jo, blue paper shop towels and Dollar Store glass cleaner seem to slowly cut through the thick layers of grime.
John KK4ZLF
Lexington, KY
"illegitimis non carborundum"
Posts: 16,533
Threads: 573
Joined: Oct 2011
City: Jackson
State, Province, Country: NJ
Russ
about that help with heat dissipation...larger size will and will not help with the heat dissipation.
Depends what you mean by the help.
If you mean that the new resistor inside the mold itself would handle the heat better....yes, simply because it is designed for it.
But here is some physics for you:
- The resistor is, well, encapsulated. This means the intended heat exchange with the ambient air is greatly impeded now. However if used well under the specifications it is still OK for it as it simply will not produce enough heat to self-destruct, even with no now air cooling.
- If used not well below specs. It will heat up way more than it would otherwise. So de-rate your resistor some 50%.
- Now let's talk the outside overmold. If it is ceramics-based, it will not suffer from the heat. I it is plastic, especially painted, it might, depending on how much heat the internal resistor produces.
The worst part is, this is exactly where your resistor power rating practically does not matter. Why? Because you produce the same amount of heat independently of the wattage rating, and it all is trapped inside that piece of painted plastic. Better yet, whatever resistor you used, you said you are trying to make it the same size to look authentic, so if you dissipate 1/4W, either your 1/2W or 1W resistors will make the same amount of heat over the same time trapped inside the same exact size plastic tube.
This is not to say that this technology is deeply flawed, not necessarily, and Steves or yours eresistors are just fine....as long as we are dealing with low dissipations. Try to make real old 3W dogbone this way and dissipate 1W.....you will feel the smell.
Users browsing this thread: 1 Guest(s)
|
|
Recent Posts
|
|
Philco newbie with P-1891-WA console questions
|
| Hello Jeff ,
Far as the Electrolytic capacitors go here is a list of parts.
that will work . I like using Nichicon and...radiorich — 09:50 PM |
|
Philco newbie with P-1891-WA console questions
|
| Well, I've been stumped at trying to get the first of 11 electrolytic capacitors. I got a schematic and have a list of t...Jeffcon — 07:54 PM |
|
Model 80 Antenna Issue?
|
| Thanks Gary and Rod.
I also found an article in the Philco Repair Bench under Service Hints and Tips, about installi...Hamilton — 12:32 PM |
|
Model 80 Antenna Issue?
|
| Hello Hamilton, here is a little information found in our Philco Radio Library at the bottom of the Home page. Hope it ...GarySP — 11:28 AM |
|
Model 80 Antenna Issue?
|
| I did as you suggested and touching the middle of the volume control did nothing so the coil has to be rewound. Any idea...Hamilton — 10:19 AM |
|
1949 Motorola 5A9M
|
| This would be the second portable in the "other radios" forum where I have a similar one in my collection. I h...Arran — 12:41 AM |
|
Looking for any info: 1977 Ford-Philco Console Hi-Fi Turntable and Radio
|
| Hi PittsburgTost.
The record changer looks like a Garrard or BSR (Likely Garrard). The spindles just pull out and pu...MrFixr55 — 11:57 PM |
|
Looking for any info: 1977 Ford-Philco Console Hi-Fi Turntable and Radio
|
| Hello PittsburghToast ,
Welcome aboard and it looks like gary may have something for you !
now if I dig through my se...radiorich — 11:35 PM |
|
Model 80 Antenna Issue?
|
| You are kind of on the right path. You can touch the grid cap of the Detector/Oscillator 36 tube. I'm expecting a respon...RodB — 08:48 PM |
|
Looking for any info: 1977 Ford-Philco Console Hi-Fi Turntable and Radio
|
| Welcome to the Phorum, PittsburghToast! I found an old thread that my interest you regarding the quality and worth of P...GarySP — 08:48 PM |
|
Who's Online
|
There are currently 1707 online users. [Complete List]
» 1 Member(s) | 1706 Guest(s)
|
|
|

|
 
|


![[-] [-]](https://philcoradio.com/phorum/images/bootbb/collapse.png)


