Growing up quick...with a 38-690xx Pics added.
Posts: 40
Threads: 2
Joined: Jul 2011
I have been a busy bee. Honing my skills and learning as much as I can. My little Model 20 consolette just got a big brother! A 38-690 has found it's way into my very happy hands. I will be taking my time and doing this one right. All caps and lytics will be re-stuffed to preserve the original appearance under the chassis. All tubes that need replacing will be Philco branded. Proper cloth wire where needed etc etc. This set is completely original from what I can tell. Its extremely dirty and the amp chassis has some exterior rust issues but nothing terrible. It is complete and the cabinet is solid although the original finish is unfortunately too far gone to save. I'm gonna need help guy and girls. Any and all tips and tricks or advice is greatly appreciated. I know the importance of this console in Philco history and want to treat it right. Thanks!
(This post was last modified: 05-03-2012, 12:40 AM by badwaxcaps.)
Posts: 2,128
Threads: 18
Joined: Oct 2008
City: Merrick, Long Island, NY
(05-01-2012, 12:52 PM)badwaxcaps Wrote: I have been a busy bee. Honing my skills and learning as much as I can. My little Model 20 consolette just got a big brother! A 38-690 has found it's way into my very happy hands. I will be taking my time and doing this one right. All caps and lytics will be re-stuffed to preserve the original appearance under the chassis. All tubes that need replacing will be Philco branded. Proper cloth wire where needed etc etc. This set is completely original from what I can tell. Its extremely dirty and the amp chassis has some exterior rust issues but nothing terrible. It is complete and the cabinet is solid although the original finish is unfortunately too far gone to save. I'm gonna need help guy and girls. Any and all tips and tricks or advice is greatly appreciated. I know the importance of this console in Philco history and want to treat it right. Thanks!
Wow, this is one complicated set.
You might want to get a decent schematic set from Chuck's website
http://www.philcorepairbench.com/schematics.htm
Because the one on NA is pretty blurry.
http://www.nostalgiaair.org/Resources/255/M0013255.htm
Posts: 40
Threads: 2
Joined: Jul 2011
Pulled all the tubes last night and found some good and some bad. Unfortunately both 6L6G's tested rather weak. I have begun taking high res digital pictures of everything for reference and started a notebook for documenting progress and such. I have seen a couple of articles on re-stuffing paper caps but was wondering if anyone has any advice on what works best.
Posts: 13,776
Threads: 580
Joined: Sep 2005
City: Ferdinand
State, Province, Country: Indiana
Congratulations on your acquisition! 
Just remember, do not disturb the single bakelite block in the upper chassis, part (97). That does not - repeat, does not - contain any capacitors. Instead, it contains the coils for the 10 kc audio filter! Leave it alone.
--
Ron Ramirez
Ferdinand IN
Posts: 40
Threads: 2
Joined: Jul 2011
Thanks for the heads up on that "cap" block Ron. I would have been sorry after chipping its insides out! Another question.. I believe the original woofer cone is in fine shape but it was recommended that I have it reconed anyway to get the best possible sound. Do I really want to do that or retain the original. I want the best possible sound reproduction but not if its going to detract from the value or originality of the set. If the speaker is shot then I can understand a recone job but what if its pristine?
(This post was last modified: 05-02-2012, 05:16 PM by badwaxcaps.)
Posts: 13,776
Threads: 580
Joined: Sep 2005
City: Ferdinand
State, Province, Country: Indiana
No!
Unless there is a problem with the original cone... leave it alone. Believe me, the originals sound just fine, thank you. 
--
Ron Ramirez
Ferdinand IN
Posts: 40
Threads: 2
Joined: Jul 2011
Believe me the last thing I want to do is change anything. I blast people out of the room with my 10S669 Zenith and it has it's original speaker so I will definitely retain the cone on the Philco if its in decent shape. It is composed of two different materials. Whats the significance of that design?
Posts: 40
Threads: 2
Joined: Jul 2011


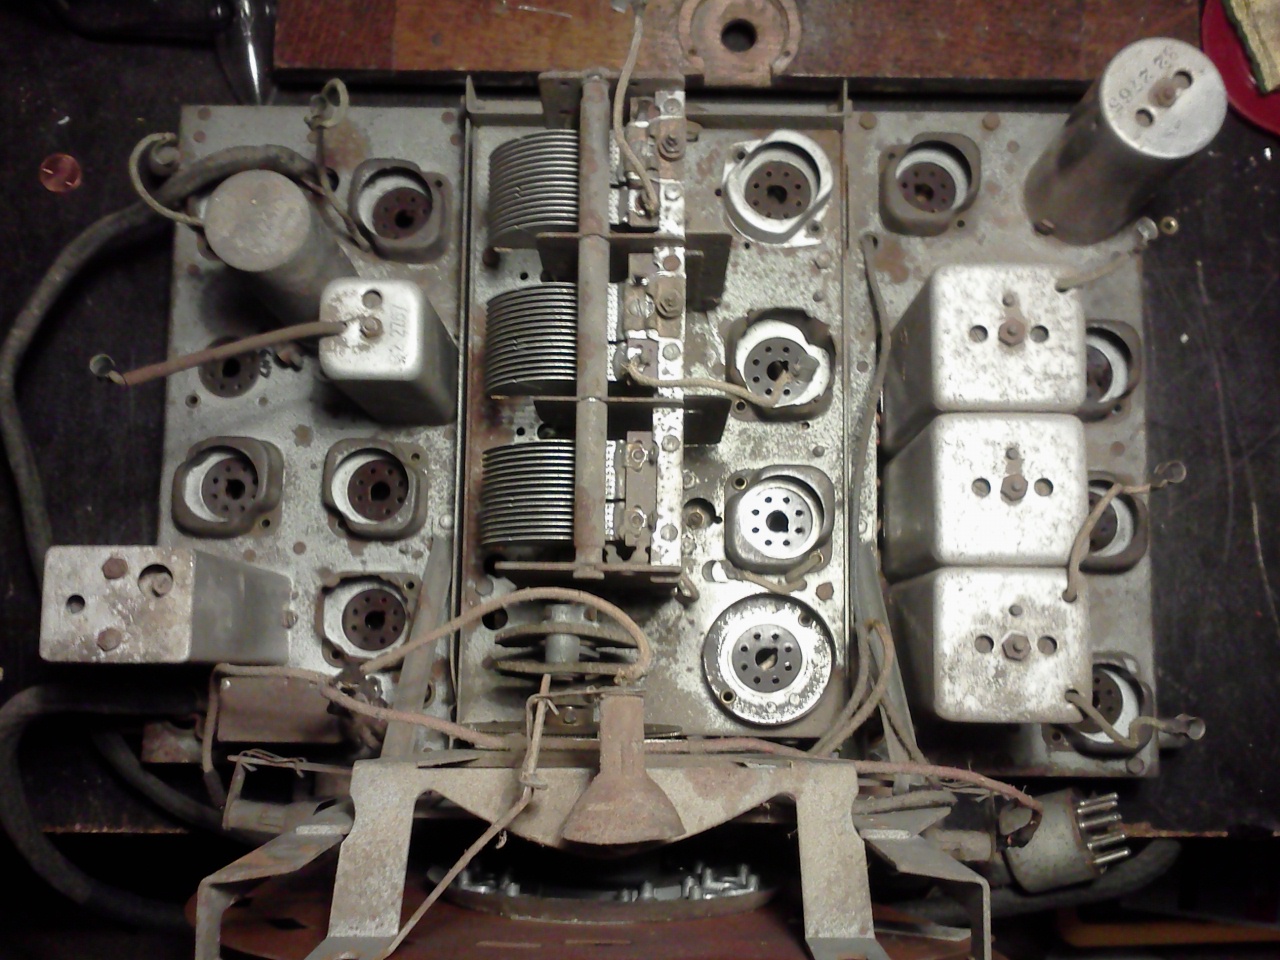
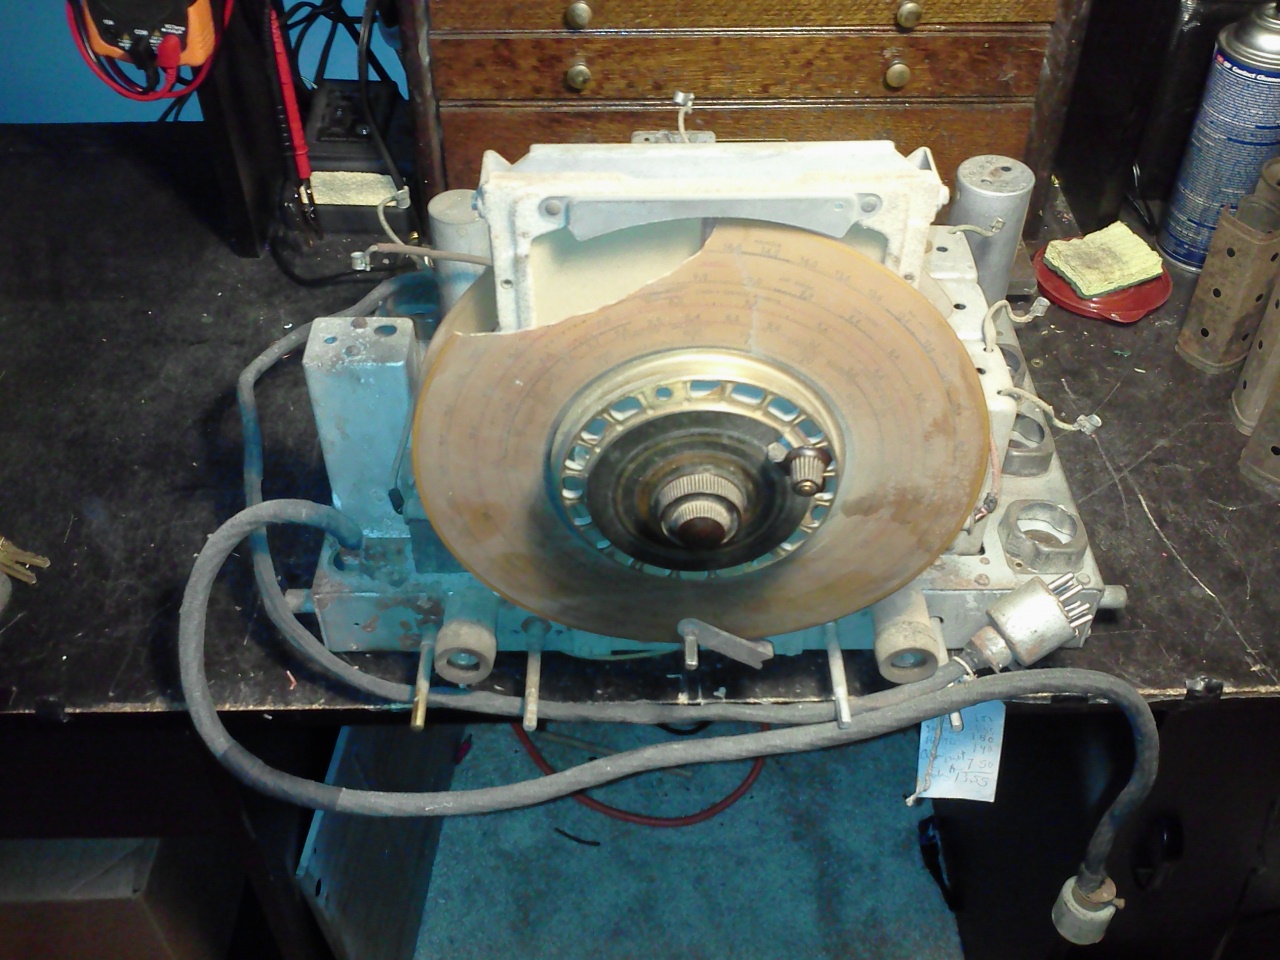
Here are some pics of the tuner chassis. If they come out properly. As you can see I have my work cut out for me.
(This post was last modified: 05-03-2012, 12:39 AM by badwaxcaps.)
Posts: 40
Threads: 2
Joined: Jul 2011
(This post was last modified: 05-03-2012, 12:47 AM by badwaxcaps.)
Posts: 40
Threads: 2
Joined: Jul 2011
Posts: 1,562
Threads: 56
Joined: Nov 2008
City: Sedona, AZ/Placentia/CA
BWC, looks like someone tried to "reform" one of those electrolytics.  Due to holiday, your caps will mail out today. Those sockets don't look too bad. I would carefully realign the bent pins and hit the fiber board with crazy glue. If you want to go nuts, mix up a little epoxy and fill in where part of the board is missing.
Jerry
A friend in need is a pest! Bill Slee ca 1970.
(This post was last modified: 05-29-2012, 01:32 PM by jerryhawthorne.)
Posts: 2,128
Threads: 18
Joined: Oct 2008
City: Merrick, Long Island, NY
Preserve as best your "umbilical" plugs and sockets. Wire can be replaced, but plugs and sockets, that's another story. Agree replace, restuff, whatever all the elecrolytics and paper caps at a bare minimum before even thinking about bringing set up ever so slowly with variac.
Posts: 4,950
Threads: 54
Joined: Sep 2008
City: Sandwick, BC, CA
Quote: Is there any chance of obtaining replacement umbilical plugs? Somebody (not me) broke these. Probably prying them out of their sockets with a screwdriver.
There may be source for similar plugs elsewhere but I wouldn't count on finding them as they were likely proprietory to the Philco 690s and maybe only the 38-690s. Most of the two chassis sets I have seen use a 7 pin plugs and sockets to tie the cable to the chassis. I would take the plug apart and try gluing and filling the wafer back together with two part epoxy, preferably high heat epoxy without metal fill in it (do not use metal filled JB Weld) you may have to clean the phenolic material up good before you do. If it's really bad you may have to make a duplicate of the original wafer and replace it altogether.
Regards
Arran
Posts: 40
Threads: 2
Joined: Jul 2011
I found some suitable material to reinforce the existing wafers. That "reformed" lytic has been straightened and restuffed. I managed to clean up the mangled shield bases and they will now accept shields correctly. Now all I have to do is locate two shields 
Posts: 2,353
Threads: 92
Joined: May 2010
City: Clayton, NC
Keep up the good work! 
Users browsing this thread:
|
|
Recent Posts
|
|
Philco 42-345 Restoration/Repair
|
| So far still no broadcast, I am posting pictures of #14 Oscillator and also a resistor #27 which connects to an XXL tube...osanders0311 — 04:02 PM |
|
Part numbers to model cross
|
| I believe there is that document, and I think we might have it in the Library.morzh — 03:29 PM |
|
Philco 42-345 Restoration/Repair
|
| Ok MrFixr55,
I have tried the DeoxIT D5 on the band switch and even though it has relieved the tension I felt when turn...osanders0311 — 11:11 AM |
|
Part numbers to model cross
|
| Is there a reference somewhere where you can punch in Philco part numbers and see what models those parts were used in?Jim Dutridge — 10:17 AM |
|
Philco 42-345 Restoration/Repair
|
| Hi OSanders,
Look carefully at the band switch. Turn it slowly and "wiggle" it around the desired band. ...MrFixr55 — 12:33 AM |
|
5U4 vs 5Z4 tubes
|
| I think that RCA and GE introduced metal tubes in the USA in 1936. I don't know if they were being made by RCA, GE or b...MrFixr55 — 11:20 PM |
|
Philco 42-345 Restoration/Repair
|
| Vlad95,
Thank you for the stringing guides and wow there are so manyosanders0311 — 06:01 PM |
|
5U4 vs 5Z4 tubes
|
| A pre war Hallicrafters, and an early one too, very nice! 1936 is pretty early for metal tubes too, which would explain ...Arran — 05:58 PM |
|
Philco 42-345 Restoration/Repair
|
| Thanks Rod,
"When you hear the background hiss and no station it usually indicates that the oscillator quit" ...osanders0311 — 05:52 PM |
|
Philco 42-345 Restoration/Repair
|
| RodB
:beerchug:Vlad95 — 10:22 AM |
|
Who's Online
|
There are currently 1026 online users. [Complete List]
» 1 Member(s) | 1025 Guest(s)
|
|
|

|
 
|


![[-] [-]](https://philcoradio.com/phorum/images/bootbb/collapse.png)


