
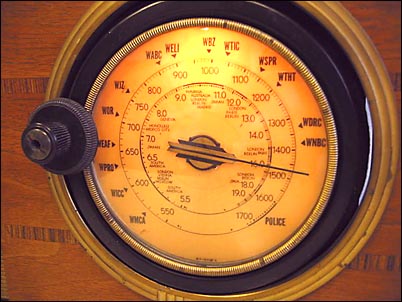
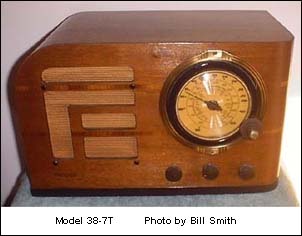
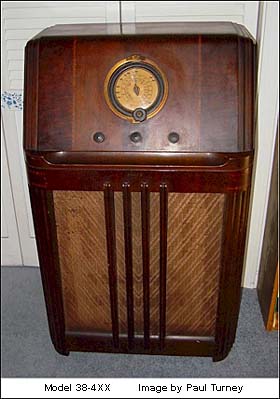
Besides the Philco Automatic Tuning Dial on some 1938 models, an new "conical indexing" type circular dial mechanism was introduced on three 1938 models. Specifically the 38-4, 38-7 and the 38-22 are the only models to use this Cone-Centric type tuning dial.
How It Works
This excerpt taken from the Mallory-Yaxley Radio Service Encyclopedia, 1938, p.225.
The Cone-Centric tuning system employs small metal cones which are locked in place in a circular slot as shown in the line drawing (Figure 12) from the Mallory-Yaxley Radio Service Encyclopedia from 1938. Two small holes near the apex of the cone allow the insertion of a special tool through the hollow center of the tuning knob. This permits the cones to be loosened, moved along the slot and tightened in the desired position in a single operation as the dial is adjusted to tune on a desired station. Subsequent selection of the station is accomplished with accuracy by centering the conical depression of the tuning arm over the desired station preset cone. There is a manual vernier knob as well for minor fine-tuning adjustments once the tuning arm is placed on a cone.
The Cone-Centric tuning system employs small metal cones which are locked in place in a circular slot as shown in the line drawing (Figure 12) from the Mallory-Yaxley Radio Service Encyclopedia from 1938. Two small holes near the apex of the cone allow the insertion of a special tool through the hollow center of the tuning knob. This permits the cones to be loosened, moved along the slot and tightened in the desired position in a single operation as the dial is adjusted to tune on a desired station. Subsequent selection of the station is accomplished with accuracy by centering the conical depression of the tuning arm over the desired station preset cone. There is a manual vernier knob as well for minor fine-tuning adjustments once the tuning arm is placed on a cone.
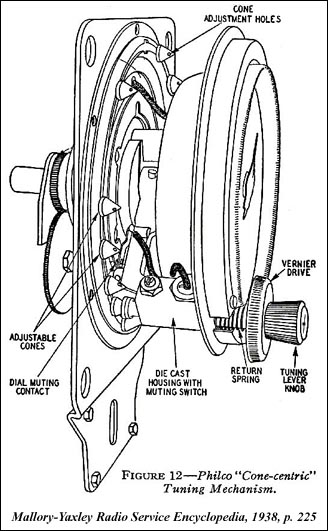
The Philco "Cone-Centric" tuning system employs small metal cones which are locked in place in a circular slot as shown in Figure 12 (right). The two small holes near the apex of the cone allow the insertion of a special tool through the hollow center of the tuning knob. This permits the cones to be loosened, moved along the slot and tightened in the desired position in a single operation as the dial is adjusted to tune on a desired station. Subsequent selection of the station is accomplished with accuracy by centering the conical depression of the tuning arm over the desired station cone.
Tuning Instructions from Owner Instruction pamphlet.
Tuning is accomplished by moving the knurled tuning knob around the outer circumference of the dial, causing the pointer or "station finder" to move over the scales. This new method enables you to locate any desired station with maximum ease and speed.
There are three positions of the tuning knob: "Out," "In," and "Intermediate."
The "Intermediate" position is for ordinary tuning -- standard and short-wave. The other two positions are for use in Automatic Tuning, as explained below.
"Vernier" or fine tuning is accomplished by pressing in and revolving the large flat knob underneath the knurled tuning knob.
Automatic Tuning
A number of stations -- those most popular with listeners in your locality -- are marked on the special local dial, which is available through your local dealer.
To select any of these marked stations, pull the tuning knob to the "Out" position, move it until the pointer points at the desired station, then push the knob "In." It is not necessary that it be pointed exactly at the station. Automatic Tuning assures the correct tuning position being obtained if the operator secures the approximate position. If the pointer is pointed too far off the station, the set will remain silent when the knob is pushed "In."
[This dial mechanism has an audio muting switch activated when tuning to suppress static and booming audio when passing through stations as you sweep the along dial while tuning. C.S.]
 Tuning Other Standard Broadcasts
The tuning knob must always be in the "Intermediate" position for ordinary broadcast tuning. To select a desired station simply move the tuning knob until the hand points at the frequency (kilocycles) number of the station desired.
The frequencies of many American standard broadcast stations are listed on the Station List card furnished with this receiver. For best tone, always tune the station in accurately with the volume low, then increase the volume as desired with the Volume Control Knob.
Silent Tuning
The "Out" position of the knob is for "silent tuning" between stations. In addition to using it as explained previously (when selecting a marked station by Cone-Centric Automatic Tuning), you can change from one station to another "silently" if desired. Simply pull the knob "Out," turn it until the hand points at the frequency of the station wanted, then press the knob in to the "Intermediate" position.
Tuning is accomplished by moving the knurled tuning knob around the outer circumference of the dial, causing the pointer or "station finder" to move over the scales. This new method enables you to locate any desired station with maximum ease and speed.
There are three positions of the tuning knob: "Out," "In," and "Intermediate."
The "Intermediate" position is for ordinary tuning -- standard and short-wave. The other two positions are for use in Automatic Tuning, as explained below.
"Vernier" or fine tuning is accomplished by pressing in and revolving the large flat knob underneath the knurled tuning knob.
Automatic Tuning
A number of stations -- those most popular with listeners in your locality -- are marked on the special local dial, which is available through your local dealer.
To select any of these marked stations, pull the tuning knob to the "Out" position, move it until the pointer points at the desired station, then push the knob "In." It is not necessary that it be pointed exactly at the station. Automatic Tuning assures the correct tuning position being obtained if the operator secures the approximate position. If the pointer is pointed too far off the station, the set will remain silent when the knob is pushed "In."
[This dial mechanism has an audio muting switch activated when tuning to suppress static and booming audio when passing through stations as you sweep the along dial while tuning. C.S.]
 Tuning Other Standard Broadcasts
The tuning knob must always be in the "Intermediate" position for ordinary broadcast tuning. To select a desired station simply move the tuning knob until the hand points at the frequency (kilocycles) number of the station desired.
The frequencies of many American standard broadcast stations are listed on the Station List card furnished with this receiver. For best tone, always tune the station in accurately with the volume low, then increase the volume as desired with the Volume Control Knob.
Silent Tuning
The "Out" position of the knob is for "silent tuning" between stations. In addition to using it as explained previously (when selecting a marked station by Cone-Centric Automatic Tuning), you can change from one station to another "silently" if desired. Simply pull the knob "Out," turn it until the hand points at the frequency of the station wanted, then press the knob in to the "Intermediate" position.
The following information taken from Philco Serviceman, July, 1937.
Installing the Dial Card
Installing the Dial Card
 Special "local" dial cards were furnished with these models which was obtained from the local Philco Dealership when the set was originally purchased. A Dealer technician brought the set to the owner's home and offered the owner a choice of one or more dial cards with station presets printed on them. These were regional dial sets distributed to Philco dealers nationwide. The technician then inserted the dial and removed the factory generic paper dial and set the cones to the pre-printed station preset positions.
Dial card was performed by removing the tuning knobs from the station selector arm. The knobs are held in position by a special brass knob screw which has a large screwdriver slot in the end. To remove the knobs separate then and hold the shaft with a pair of pliers. It is important that the pliers hold the shaft between the knobs to prevent damage to the spring which disengages the slow-speed (vernier) tuning knob. The knob screw can be removed while holding the shaft with the pliers. Remove the small screws on either side of the station selector knobs and take off the station stop cover. Press the knurled bezel, turn counter-clockwise and remove.
Remove the station finder hand (dial pointer) by drawing it straight out and away from the radio chassis. This dial pointer (hand) is keyed in its correct position and is pressed on to the end of the shaft. Be sure to draw it straight away from the set. The hand should not be turned or twisted as it is removed!
Remove the round dial retaining spring. Next, remove the factory paper dial card furnished with the receiver. Replace with the special local card from the Philco Dealer. The proper position is fixed by index cutouts along the dial card edge. Place the round retaining spring over the dial edge. Replace the finder hand (dial pointer) and bezel. Replace knobs, but not the cover plate.
Here is a PDF file of the various dial cards I've compiled from actual sets, swapmeets, eBay listings, etc. I'm sure there are more dials I've not run across as this list is not all-inclusive. If you happen to have a Cone-Centric model with a dial that is not on this list, could you kindly send me an email with the dial part number, the station call letters and frequencies so we can all benefit?
Cone Centric Dial Card Listing (PDF file)
Methods for Presetting the Cones
The receiver as originally shipped has the cones closely spaced together at the right side of the dial. They may be set for the particular stations in any one of several ways depending upon the equipment that the Service Man has available.
The receiver as originally shipped has the cones closely spaced together at the right side of the dial. They may be set for the particular stations in any one of several ways depending upon the equipment that the Service Man has available.
The simplest method of determining the positions at which the cones should be preset is by tuning in the particular stations to resonance, using a tuning eye, shadowgraph, vacuum-tube voltmeter (VTVM) or similar device connected to the AVC returns (AVC line), as a resonance indicator. A more accurate method of indicating resonance, however, is to zero-beat the normal I-F signal resulting, with the un-modulated R-F signal from a typical signal generator (such as the Philco Station Setter) or with any other pure R-F signal which can be tuned in the neighborhood of 470 kc (such as a short-wave beat oscillator).
 Preliminary Procedure
The receiver should be turned on and set for operation on the broadcast band. The receiver is tuned to approximately 540 kc and the volume control set about half way on. The tone control should be in the normal position.
The signal generator is set for operation at approximately 470 kc. The modulation should be removed (OFF) from the generator signal by the means provided. The generator attenuator should be turned on full.
Both receiver and generator should be allowed at least 15 minutes to warm up before adjustments are attempted. [NOTE: This dial setting procedure is performed only after the radio is properly aligned and functioning properly.]
The output lead of the generator is clipped to the insulation on the wire that is soldered to the middle section of the tuning condenser gang on the Model 4. On the Model 7 and Model 22, the generator lead is clipped to the insulation on the wire that is soldered to the rear section (nearest the back of the radio) of the tuning condenser. Connect the generator ground lead to the receiver chassis.
As the tuning indicator of the signal generator is rocked in the vicinity of 470 kc a hiss will be heard in the loudspeaker. As the tuning indicator passes 470 kc there will be two pronounced peaks with a minimum position between. The generator signal should be adjusted to the point of minimum hiss between the two peaks. Connect an aerial to the receiver in the usual manner. [NOTE: The preceding steps set the signal generator frequency to the exact IF frequency of the radio.]
Presetting the Cones
The station nearest 1500 on the dial must be aligned first. The next stop is used for the station next lower in frequency and so on for the rest of the station presets.
The station nearest 1500 on the dial must be aligned first. The next stop is used for the station next lower in frequency and so on for the rest of the station presets.
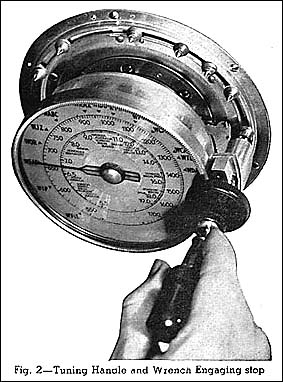
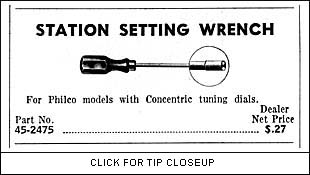 Rotate the dial handle to the right until it is directly over the first stop. Press the knob to engage the stop. Holding the knob in this position, insert the special wrench (mentioned above) in the hole of the tuning knob until it engages the stop screw head (cone). See Fig 2 above. Turn the wrench counter-clockwise to loosen the cone.
When the cone is loose, rotate the handle until the station finder (dial pointer) hand is at the the station desired. Care should be taken to keep the handle and wrench engaged with the station stop (cone) so that the stop is moved along its track to the position it is to occupy for automatically tuning the station.
As the station finder hand approaches the desired station a whistle will be heard - first very shrill and then gradually getting lower in frequency as the station is tuned in. When the whistle is heard the slow speed station selector knob (large flat vernier knob) should be used for further tuning for best accuracy.
At the exact point at which the station is perfectly tuned, this whistle will no longer be heard. This is the point at which the station indexing stop (cone) must be locked.
When this point is reached turn the wrench clockwise and lock the cone is position. Care must be taken in tightening the cone to prevent detuning the station. The whistle should not reappear while the cone is tightened. If the whistle reappears the screw should be loosened again and the cone re-tuned for zero-beat. The remaining stop cones can be set similarly. Now the station stop cover may be replaced.
Reproduction Cone-Centric Tool
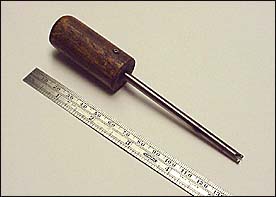
Since the special wrench Part No. 42-2475 is no longer available, a new facsimile of the cone setting tool is available from Ken Wright. Ken can be emailed at wklw@cox.net. The tool is not an exact reproduction of the conical tipped original, but the two tips of Ken's tool do get the job done and engage the two holes in the cones.
Since the special wrench Part No. 42-2475 is no longer available, a new facsimile of the cone setting tool is available from Ken Wright. Ken can be emailed at wklw@cox.net. The tool is not an exact reproduction of the conical tipped original, but the two tips of Ken's tool do get the job done and engage the two holes in the cones.
Cone-Centric Dial Parts and Drawings
The Philco Service Bulletin Number 282 is a parts listing and three drawings for the Cone-Centric mechanism. The four page service bulletin is available below in PDF file format.
Page 1 - 60K Page 2 - 60K
