Background
Open coils are a common fault on some early Philco models. Often it is the primary of an RF or Oscillator coil that goes bad due to deterioration of the cotton insulation that eventually corrodes the wire. Fortunately with a little patience these can be rewound since they consist of a relatively small number of turns on the outside of the coil (secondary is underneath).
Models
Philco 20, 70, 90
The Philco Repair Bench has a detailed article Rewinding Philco RF Coils on techniques for rewinding coils for these models.
Philco 20
| Coil Winding | Number of Turns | Wire Gauge |
| RF (primary) | 55 | 32 |
Source: Philco Repair Bench [link]
Philco 70
| Coil Winding | Number of Turns | Wire Gauge |
| RF (primary) | 69 | 32 |
Source: Philco Repair Bench [link]
Philco 90
| Coil Winding | Number of Turns | Wire Gauge |
| RF (primary) | 100 | 34 |
Source: Philco Repair Bench [link]
Philco 60
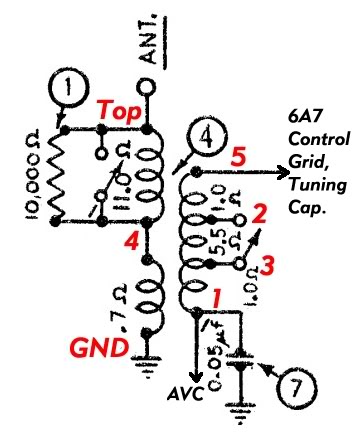
Antenna Coil
“Primary (outer) winding – 4 turns, CW, bottom to top, 38 gauge
Secondary winding (on the coil form) – All CW, bottom to top. 25 turns from beginning (lug 1) to lug 3. 129 turns from lug 3 to lug 2. 20 turns from lug 2 to lug 5. 32 gauge works well for this winding.
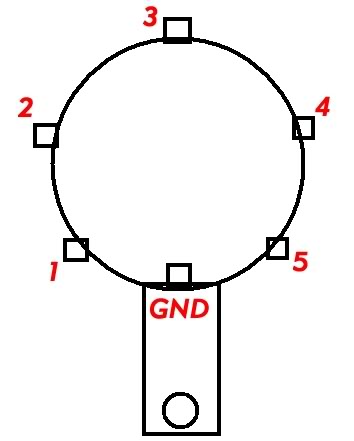
There is also a separate winding inside the coil form, mounted at the top. It is approximately 250 turns, 38 gauge.Looking at the bottom side of the coil, where the lugs and mounting bracket are, you count the lugs clockwise starting at the first lug to the left of the mounting bracket, as shown [below]. “Top” is a terminal on the very top of the antenna coil, not shown in this crude illustration. “GND” is the mounting bracket itself, which also has a lug connected to it. The coil will be grounded by the mounting lug and the bolt which secures it to the chassis (ground).”
Source: Ron Ramirez [link]
Philco 89 and 19
“A properly restored, stock 89 can work just about as well as one does with the “Super 89” mod – IF you take the time to bake the oscillator coil in your oven for about 30 minutes at 200 degrees F, then clean off and rewind the outer (tickler) winding. This is critical. These oscillator coils are very prone to moisture absorption.
Also, be sure you replace the 15K resistor in series with the oscillator coil tickler winding – part (10) in Bulletin 146 – with a 10K or even 8.2K unit; 1/2 watt is fine. In addition, you must replace the capacitor in parallel with this resistor, part (8) in Bulletin 146, with a new 680 pF mica or NP0 ceramic cap. The original was 700 pF and is a paper-wound cap inside a bakelite block shared with a .09 uF cap connected as a B+ bypass. 680 pF works fine as a replacement for the 700 pF cap. This will cure most, if not all, of the ills associated with Model 89.”
Source: Ron Ramirez [link]
| Coil Winding | Number of Turns | Wire Gauge |
| Oscillator (primary) | 25 | 39 |
| RF (primary) | 12 | 39 |
Source: Ferran [link]
| Coil Winding | Number of Turns | Wire Gauge |
| Interstage (primary) | 12 | 32 |
- From the bottom of coil start at pin 3, wind clockwise almost 12 turns (end at pin 5). Pins are numbered as shown in Model 60 diagram.
Source: Nathan Slingerland
Philco 37-84
| Coil Winding | Number of Turns | Wire Gauge |
| Oscillator (primary) | 14 | 39 |
Source: Ferran [link]
Philco 600
| Coil Winding | Number of Turns | Wire Gauge |
| Oscillator (primary) | 125 | 36 |
| Oscillator (secondary) | 25 | 36 |
Source: Radioroslyn [link]
Other Models
If you need to rewind a coil that is not yet in the list above it’s still possible! Just start a thread on the Philco Phorum! Include some photos if possible. An administrator will add what you find to the information above and immortalize your name with the details.
Before attempting to repair the coil take lots of photos with your cell phone or camera. Be sure to capture how the coil connects to the terminals of the coil as well as the body of the coil.
The most critical information is the number of turns and the direction (clockwise or counter-clockwise). To get the number of turns you can take the traditional approach and run a pin or needle over the surface of the coil. Alternatively, open a clear photo of the coil on your computer and zoom in to count!
You can figure out the direction of the wind based on the beginning / ending of the coil.
The wire gauge is often not critical though you should still try to stay close to the original so that the end result will be physically similar to the original.